Building Business Processes with WEBCON BPS – an expert guide: Part 3 - Parent Workflow - Prototype changes and task retrieval
Disclaimer
I hope you read the Disclaimer because this is not a simple tutorial. In addition, the parent workflow, user assignment overview, is special. We need to create this workflow in a way that we fetch all possible user assignments for existing workflows as well as for those which will be created in the future1. So, don’t be scared from a few complex looking SQL statements.
Part introduction
This is part 3 of my “Building Business Processes with WEBCON BPS – an expert guide” in WEBCON BPS. In this part we will take the prototype and and enhance it to get all workflows for which a active tasks exists.
In part 1 we defined the use case and showed in part 2 how the Designer Desk can help us. The Designer Desk can be used by everyone to create a prototype. Turning the prototype into a real application we need a trained WEBCON BPS user with a license for using the Designer Studio.
Tip: If you are a seasoned WEBCON BPS Designer you can scroll through this text and look out for boxes like this one. These contain tips / summaries and the like. You may find some useful information without reading everything.
Changing Instance number
Due to the fact the Designer Desk hides the more complex internal workings we need to change the form type values, especially the Acronym which is used in the instance number. An instance number like DTYPE-1/2021/02/00006/9072 isn’t helpful at all.
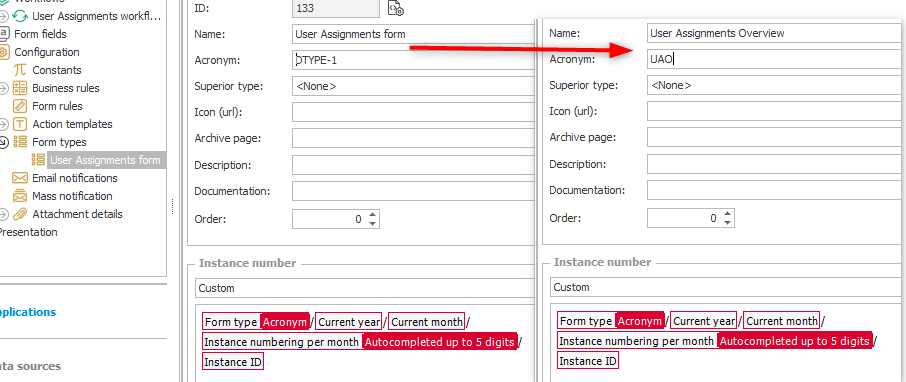
Tip: Don’t be confused when you read about signature or instance number. They are synonyms.
Remark: Deciding for a instance number format is far more difficult than you might expect. You have to verify that it is understandable, that it is not to long and that it won’t be repeated in your database. There can only be one workflow instance with an instance number. The first using this number wins. If you forget this, you won’t be able to create new workflow instance for the other workflow. I will revisit this topic in another post.
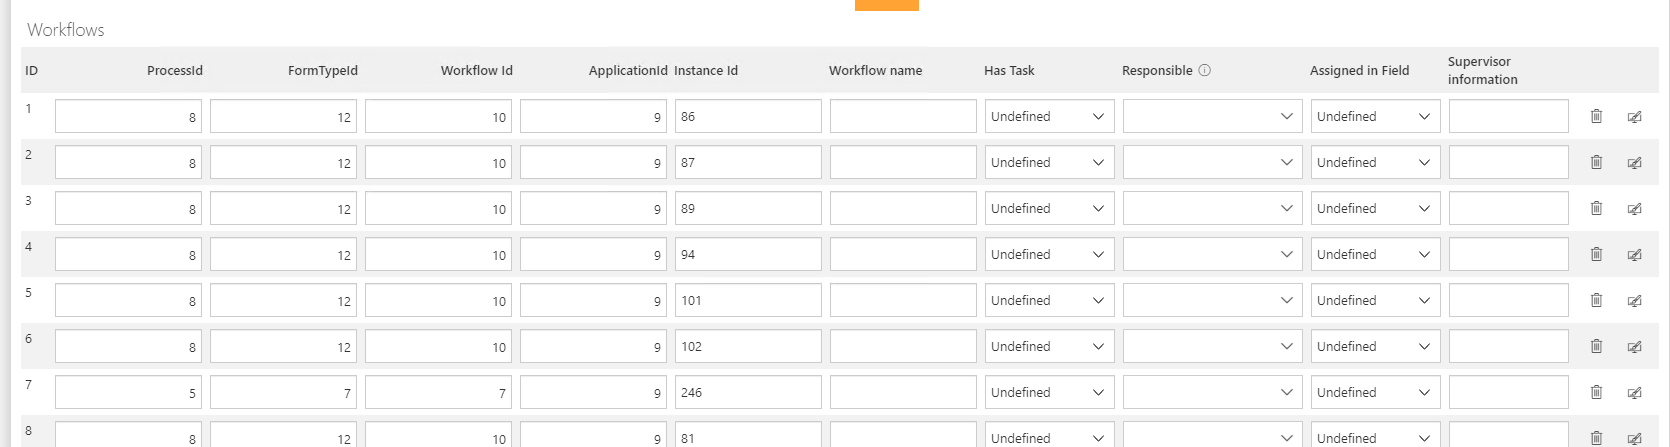
Adding additional fields to the item list
These are the fields of our Workflows Item list which we got via the Designer Desk from our process owner.
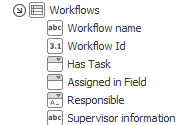
So, we need our supervisor and the name of the workflow, and the Id of the element, which is referred to as Workflow Id in this case. Here are a few problems:
- We have a misleading name; the column Workflow Id should hold the Ids of the workflow instances and not of the absence workflow which has the Id 6.
- Workflow name is a simple text field, but this won’t work in a multilingual environment, so we need to retrieve the workflow name at runtime in the language of the current user.
- For retrieving the supervisor information, we need some more Ids, at least internally.
- In addition, it would be good, that we have more than only the name of the workflow. Th responsible should be able to easily recognize the workflow. Therefore, we need the name of the application, process, workflow and also the form type.
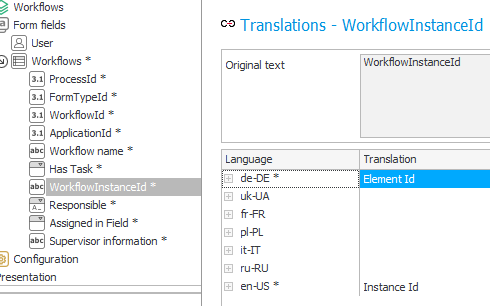
The screenshot below shows the added fields and the translations of the field “WorkflowInstanceId”.
Instead of providing an English translation. I could have simply used the translation value for the field, but there’s a simple reason:
Tip: There will be cases, where you want to use an “internal” name for an object. For this, you can simply provide an additional translation. This will make it more distinguishable, especially across workflows/processes.
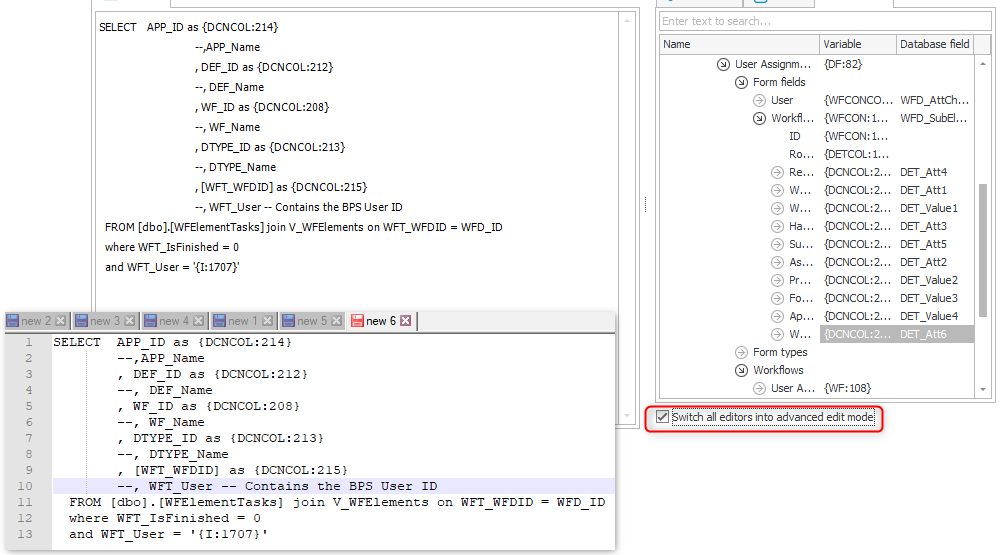
Creating the SQL statement
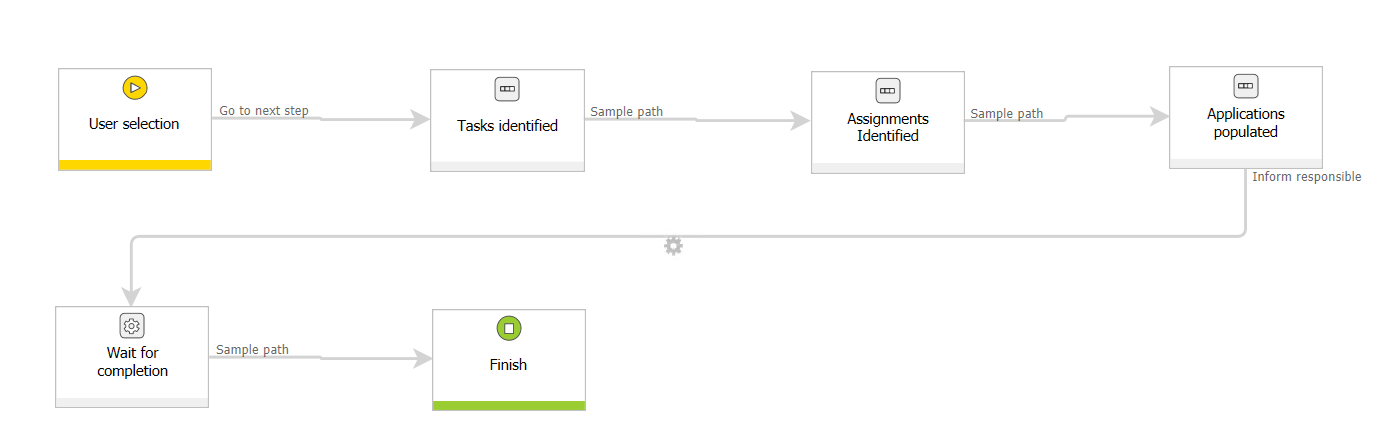
Looking at the workflow diagram we see that we need to retrieve all open tasks for the required user:
First, I will rename the path and add an action to update the item list. If I’m familiar where the requested data is stored and which names the fields have, I would write the SQL statement directly into the expression editor.
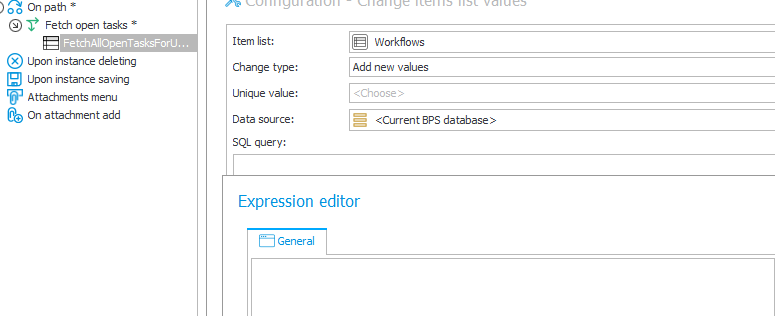
This isn’t the case now. Therefore, I will create this script using the Management Studio. This will help me with identifying the fields, test the data and so on.
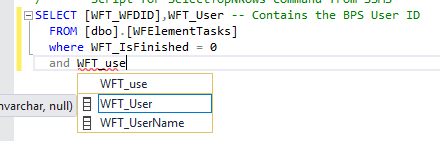
TIP: If you don’t know which objects relate to which tables in the database you can take a look at the post: Configuration tables in WEBCON BPS.
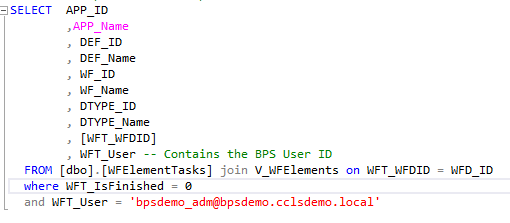
Armed with this knowledge I could join all the necessary tables or rely simply on V_WFElements which already contains all the IDs I need.
Tip: There’s an overview of existing views in the database: Views embedded in the content database
Tip: I prefer to add a leading comma instead of a trailing one. If I have a trailing one, I will often get a “Incorrect syntax near the keyword” when I comment out one line.
Using variables in expressions
Now we have all the information we need. We can remove the hard coded values and map the columns to the appropriate fields of the item list.
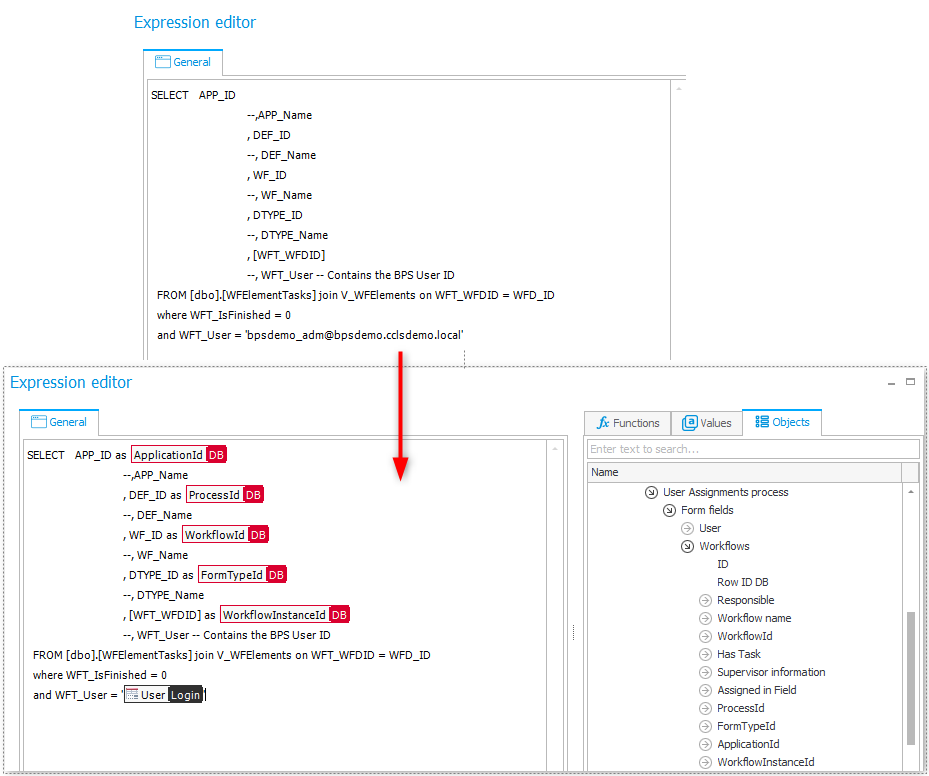
If you activate the advanced mode, you can see the internal representation of the variables (objects).
Tip: You can simply copy an expression inside the Designer Studio and it will work. To be more precise, inside the same database. The integer values refer to the respective rows in the table. If you copy & paste the same script in a Designer Studio connected to a different database, you will run into problems.
During execution, the internal expressions of the variable will be replaced by the appropriate database field. You probably noticed the curly brackets around the names. The curly expression is referred to as moustache expression or variables and are “magic” expressions. These will be replaced with a real value during execution.
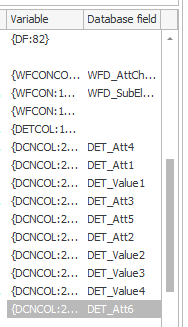
Tip: If you want to know more about them start the help from the designer and search for help site called ‘Variables’
Tip: Whenever possible, use the Objects tab to get the wanted information instead of writing the name manually. This will save you a lot of headaches if you change the type of a field later on2. In addition, the usages tab will show you where it is used.
Testing retrieval of all open tasks
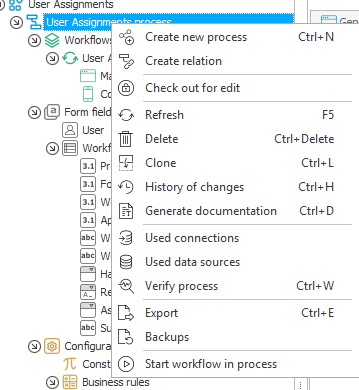
We can start a new instance either from the BPS Portal or simply use the context menu:
After moving the workflow to step two, we see the result which look Ok. Except:
- Some fields are not required yet like responsible.
- “Has Task” has not been set.
- The entries aren’t sorted
Worst of all, can I really be sure that I retrieved only that the variables in our SQL statement have been replaced correctly? How can I make sure of this? For this we have two options.
Prior WEBCON BPS 2021
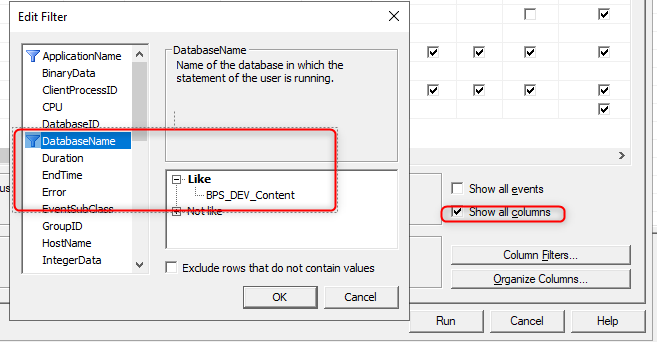
Prior the new WEBCON BPS 2021 version I would have used SQL Server Profiler, which requires a few prerequisites:
- A development environment,
- Sufficient SQL Server privileges to execute SQL Server Profiler, - There are no production databases on it.
Warning: This will have an impact on the performance of the server you shouldn’t activate the trace longer than absolutely necessary.
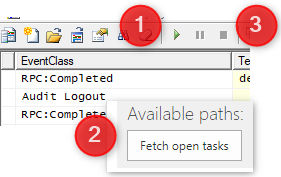
If this is the case, you can can start a new trace and add a filter for the database, by selecting “Show all columns” and set the name of your BPS Content database
Once the filter is set, the trace can be started (1) immediately before you click on the path in the browser (2). Once the execution is complete stop the trace (3).
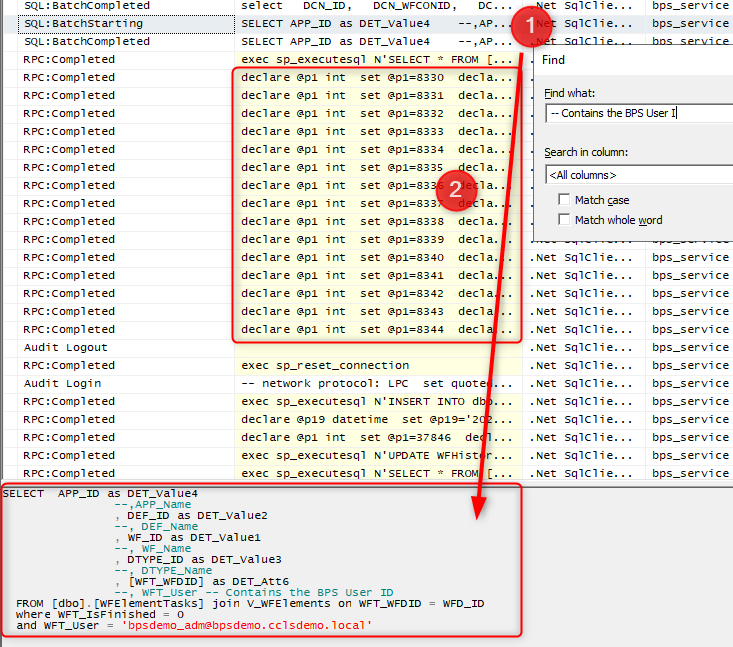
Afterwards scroll to the top and search for something unique in the query (1). You should find your query with the replaced values. If everything looks fine and but you still got the wrong data, you can copy the statement into Management studio and execute again to verify the results.
In this specific case, we have also another benefit. Below the searched SQL statement (2) there are a bunch of insert statements which represents our item list update.
With WEBCON BPS 2021
WEBCON BPS 2021 added a diagnostic mode. This is not only a simple replacement of the debug=1 query parameter setting. It enhances the logging information and brings it to an even friendly more detailed level. There’s an official post about this tool:
https://community.webcon.com/posts/post/diagnostics-and-form-behavior-registration-mechanism/215/3
So, I will just demonstrate how this replaces the SQL Server Profile approach. Just copy the search string into the logger and expand the nodes. That’s all. :) Ok, it’s not formatted, there’s no syntax highlighting but you can still copy & paste it into Management Studio to execute it.
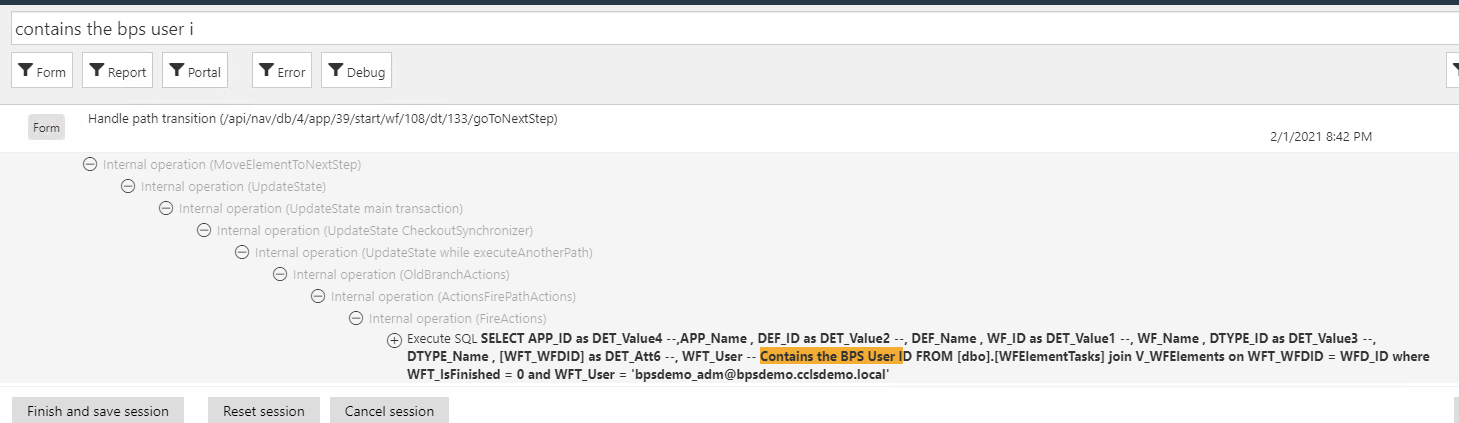
Tip: The best of the new Diagnostic mode is, that any user can do this and even save the log files so that an administrator can look over them at a later time.
Continuation
In the next part we will see what options we have to test our SQL statement during design and execution time.
Part overview
- Introduction and Use Case
- Parent Workflow- Prototype implementation using the Designer Desk
- Parent Workflow - Prototype changes and task retrieval
- Parent Workflow - Identify workflows by selected user
- Parent Workflow - Getting translations & supervisor
- Sub Workflow - User assignment task
- Parent Workflow - Starting sub workflows & monitoring column
Download
You can download the application from here.
Comments