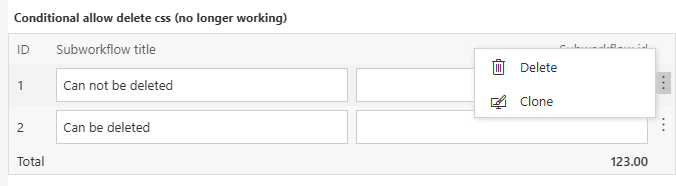
Jekyll2024-07-21T19:27:12+00:00https://daniels-notes.de/feed.xmlDaniel’s notesBlog about WEBCON BPS and GitHub projects.Daniel KrügerConditional editing/deleting of item list rows2024-07-21T00:00:00+00:002024-07-21T00:00:00+00:00https://daniels-notes.de/posts/2024/conditional-allow-deleting-item-list-rowsOverview
I’ve run into a few requirements over the years in which I needed to prevent that some item list rows should be edited, left alone being deleted. If this applies to all rows, this is straight forward, while it gets a bit tricky, if some should be deletable while others may be editable without being deletable. Unfortunately, my old solution doesn’t work for this anymore and I needed to come up with a new one.
In this post I will describe the new solution in a simplified use case where an item list is used for starting sub workflows and the sub workflow id is stored in an item list column. I will also describe the old solution as it may inspire others.
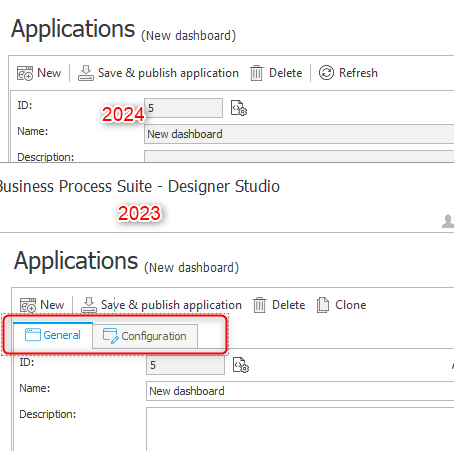
Remark: I have to admit that I don’t like the new solution, simply because I hate configuring forms on step level. That being said, maybe some upvotes could help this user voice: Adding virtual column for clone/delete/edit action.
New solution
Conditional disable item list row editing/deleting
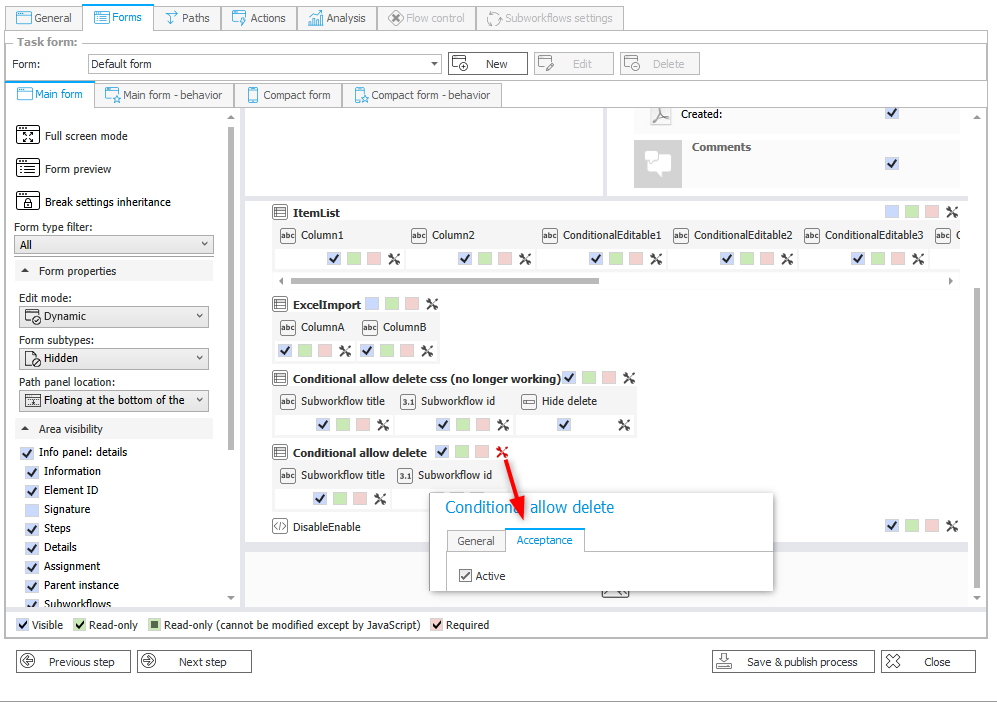
This makes use of the seldomly used Acceptance functionality of an item list. At least I can count the number of times I used it at one hand. It is the second tab of the configuration options only available when the form is configured on step level.
Acceptance is configure per step.
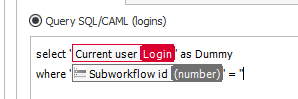
I won’t go into further details about the configuration options, as they are pretty much self-explaining. So, I will just focus on the small part how to determine, whether a row should be editable. Since this configuration allows the current user to edit a row, when the user selected in a column, I’m using the Query SQL/CAML option to return the current user, if the row should be editable. I’m not sure whether it was intended to be used like this, but it is working. :)
Return the current user, if the row should be editable.
select'{I:CURRENTUSER}'asDummywhere'{SFD:137}'=''
Row is not editable and cannot be deleted, if the workflow id column has a value.
Making cells editable
If the Acceptance configuration determines, that a row is not editable, it is not editable. It takes precedence over any field configurations.
If you want to make a cell of a disabled row editable, you can work around this by using form rules in combination with JavaScript.
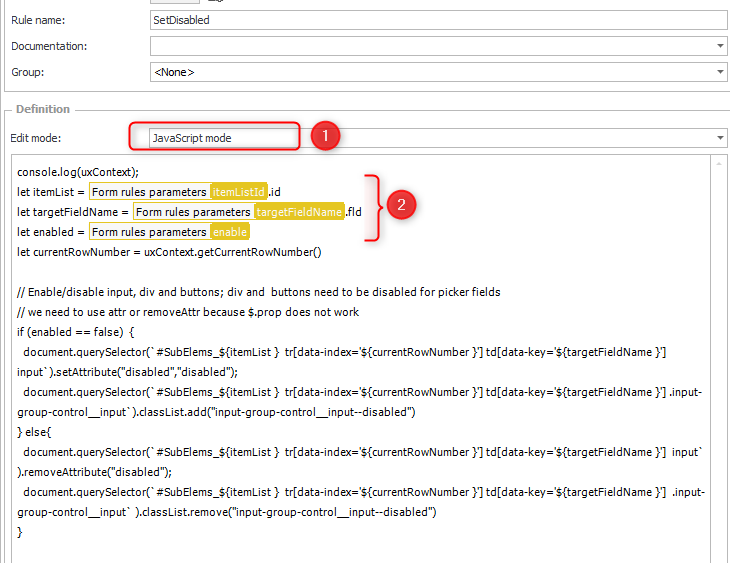
There’s no build in function to mark a cell as editable or not. Here we need a form rule of type JavaScript (1) with three parameters (2):
Item list
Field, which should be enabled/disabled.
Enabled to define, whether the field should be editable or not.
The JavaScript will disable or enable the defined column in the current row of the provided item list.
console.log(uxContext);letitemList=#{BRP:98}#.idlettargetFieldName=#{BRP:99}#.fldletenabled=#{BRP:100}#letcurrentRowNumber=uxContext.getCurrentRowNumber()// Enable/disable input, div and buttons; div and buttons need to be disabled for picker fields// we need to use attr or removeAttr because $.prop does not workif(enabled==false){document.querySelector(`#SubElems_${itemList} tr[data-index='${currentRowNumber}'] td[data-key='${targetFieldName}'] input`).setAttribute("disabled","disabled");document.querySelector(`#SubElems_${itemList} tr[data-index='${currentRowNumber}'] td[data-key='${targetFieldName}'] .input-group-control__input`).classList.add("input-group-control__input--disabled")}else{document.querySelector(`#SubElems_${itemList} tr[data-index='${currentRowNumber}'] td[data-key='${targetFieldName}'] input`).removeAttribute("disabled");document.querySelector(`#SubElems_${itemList} tr[data-index='${currentRowNumber}'] td[data-key='${targetFieldName}'] .input-group-control__input`).classList.remove("input-group-control__input--disabled")}
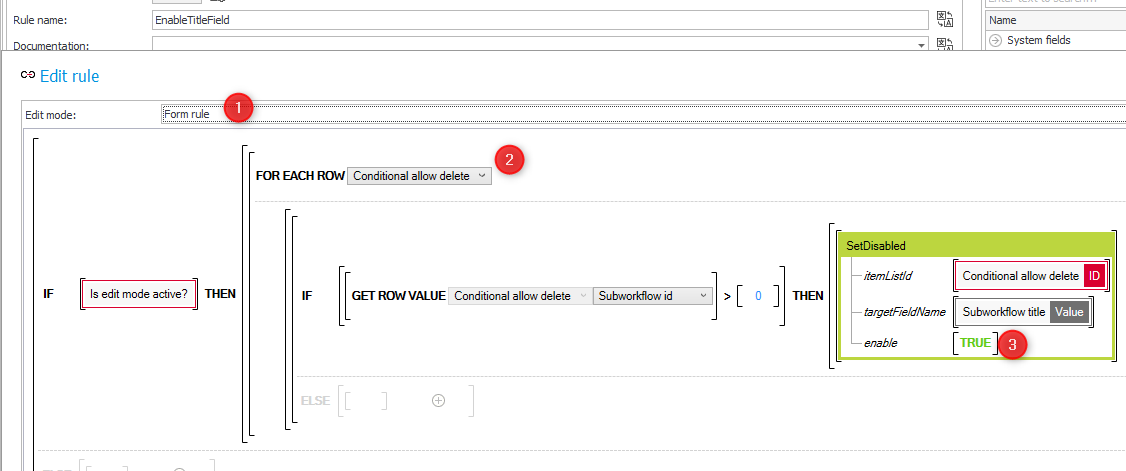
We need another form rule, this time of type Form rule (1). It iterates through all existing rows (2) and calls the previous form rule (3) and passes the item list and column to enable. I’m using an if here, so that the JavaScript form rule is only executed for the disabled rows.
Info: You can make use of this form rule in other cases too. Instead of passing True you could use a function as a parameter which returns true or false.
Remark: As this is a workaround, it may cease to work in other version if the DOM changes, internal JS changes to the parameters or due to other factors. The querySelectors works for the mentioned version, you may need to update these for older / newer versions.
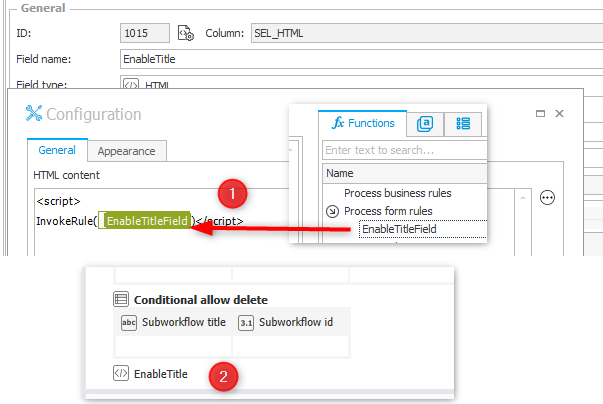
All that is left is to create a HTML field (1) which calls the form rule with the foreach row function and place this after the item list in the form. Of course, it needs to be visible in the field matrix. It’s mandatory, that it’s placed after the item list, otherwise the rows wouldn’t be part of the DOM yet and the JavaScript function couldn’t modi-fy the elements.
The function is executed via an HTML fields which is rendered after the item list.
Remark: I’ve no idea why this works even after the user clicked on a column header to change the sorting, but it does. At least in this version.
Old solution
Implementation
I’m using the same use case for this and the delete action should be hidden, if the column with the sub workflow id has a value.
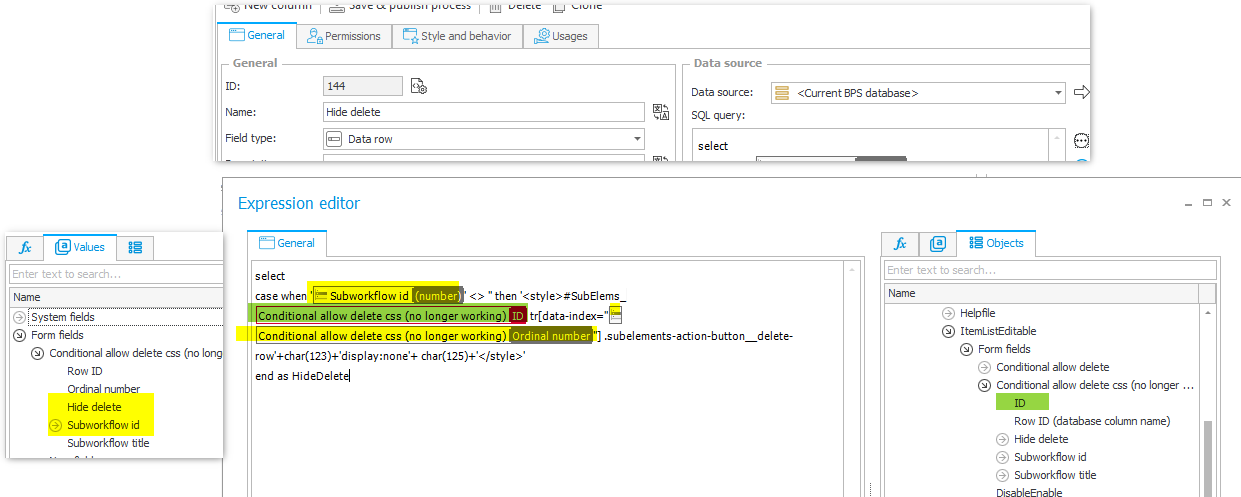
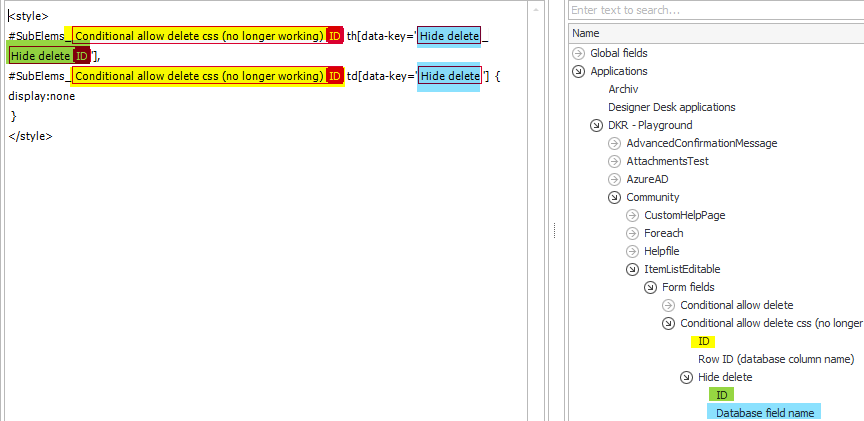
The data row generates a styling targeting the delete action .subelements-action-button__delete-row of the current item list and row. The SQL uses the char function to generate the {} brackets to prevent that the values in between those are interpreted as variables.
The column needs to be rendered, so that the CSS will be part of the page which in turn will hide the action. Therefore, it has to be visible in the field matrix but we can hide with CSS using an HTML field.
Unfortunately, my favorite solution has been broken because of three changes in the later WEBCON BPS versions.
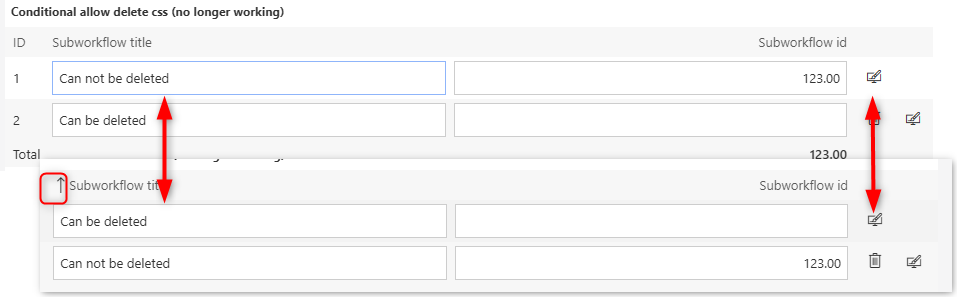
Sorting of item lists
The css will hide the action for the second row, regardless original row is now at a different position because of the user sorting.
Context menu for row actions in a small window.
We cannot target the dialog with the row action, if it’s opened from a context window.
]]>Daniel KrügerImport applications using an application2024-07-20T00:00:00+00:002024-07-20T00:00:00+00:00https://daniels-notes.de/posts/2024/Importing-applications-using-an-applicationOverview
You may wonder why, and you are right to do so. Just because we can doesn’t mean that we should do it. My reasons may be driven from my perspective as a WEBCON partner who’s customers a mainly in the regulated industry. This typically requires documenting ‘everything’ if something is automated, it is less documentation work.
My reasons are:
We have an audit trail /version history for each import.
We have the history of the imports in the system itself and not somewhere else.
It can be executed by anyone without specific knowledge or privileges to do so. Ok, this may cause problems with new processes and missing privileges. But this is another topic.
Best of all, we can create a ‘snapshot’ of specifics elements before the import and compare these after the import. This is especially helpful, because some elements are always overwritten, and you may need to change them back after the import.
If you find yourself in one of these points you should continue to read.
Import application phases
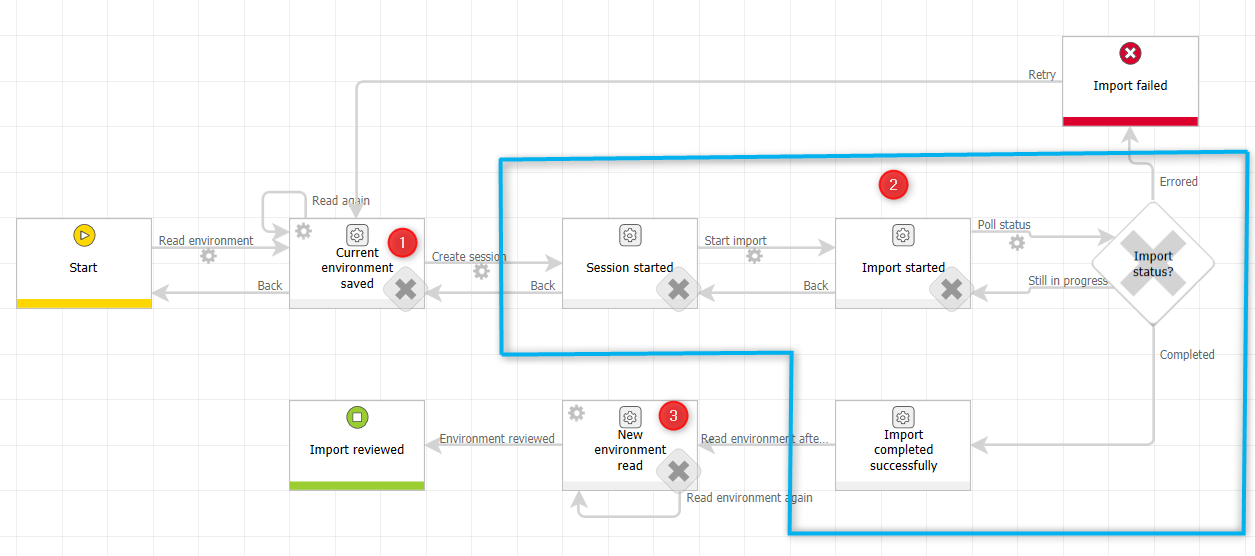
The process consists of three different phases.
Creating a snapshot of the current environment
The import itself
Updating the snapshot information with the current data
Workflow diagram of the import workflow.
While some of these steps could be merged together, I prefer a more detailed approach.
Environment snapshot creation
General explanation
In these steps I capture all relevant information which may get changed. Some of these changes could be prevented with a correct import configuration, but not all. These are for example:
Application group names
Business entities properties
Both elements will always be overwritten. There is neither a configuration option in the import dialog of the Designer Studio nor in the configuration file.
Even if you have a configuration file, it may be outdated. Creating a snapshot before, will help you to identify unexpected changes.
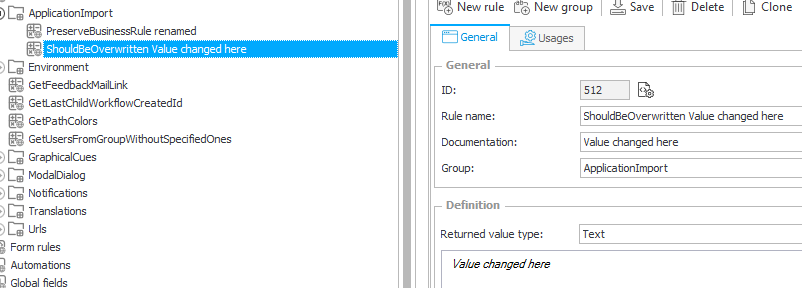
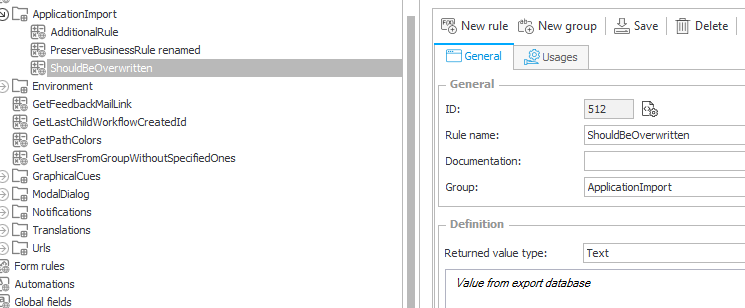
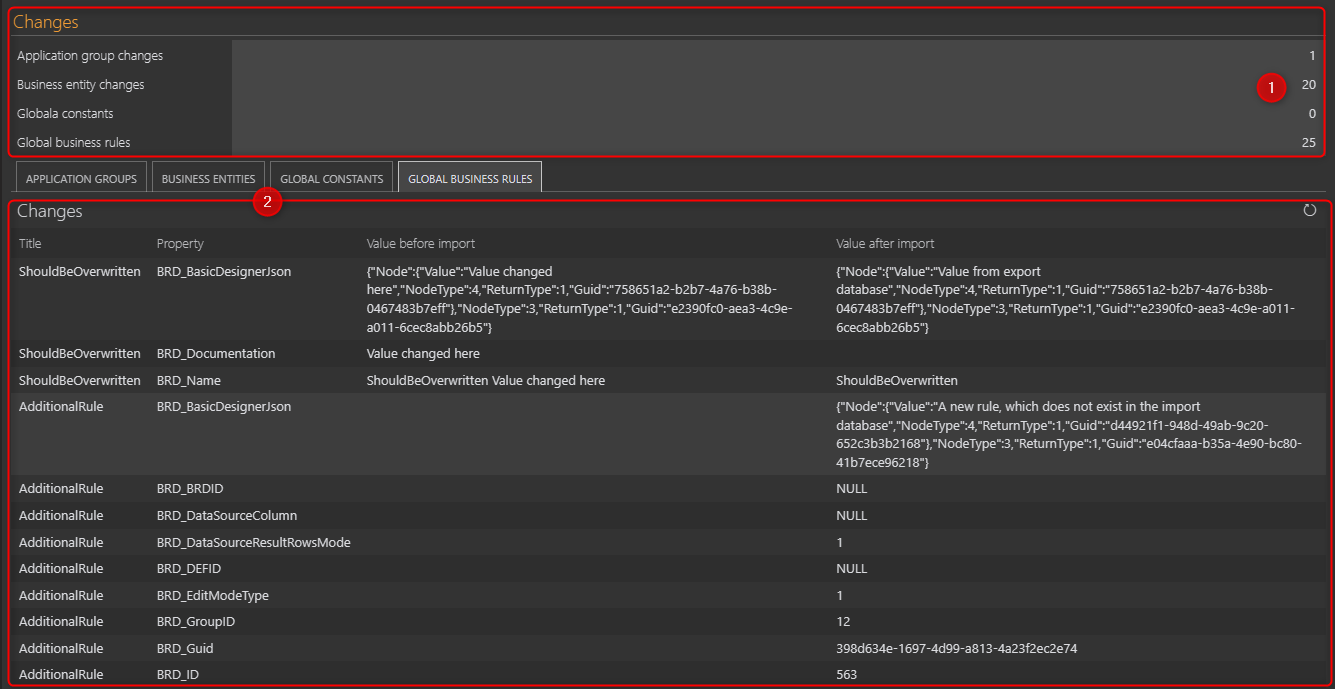
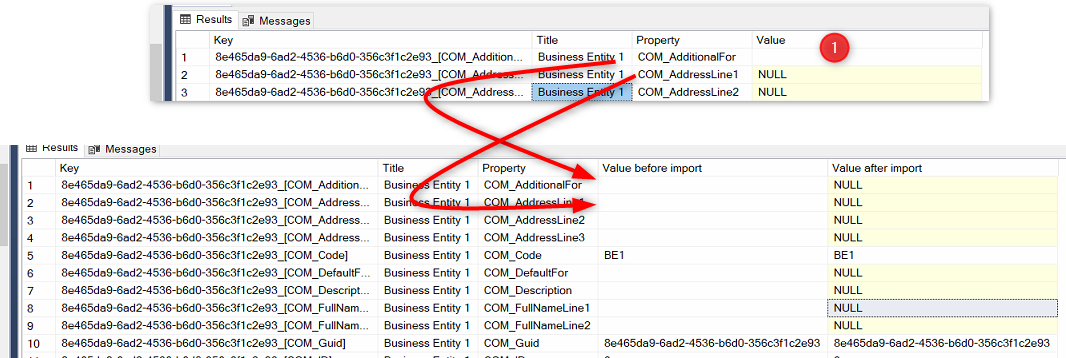
But how does it look like? Let’s use an application which uses global constants rules as an example. If you are transferring an application between different content databases in the same environment or have multiple environments to which an application should be transferred, these values may be different. The below screenshot is an example of changes. Please ignore the fact, that I used business rules here. One business rule (constant) was changed which should be overwritten after the import while the other one should keep its configuration.
Global business rules before the import
This was the result after the import.
Global business rules after the import
Since the values have been stored before the import and are read again after the import we can:
Provide an overview where and how many properties have been changed
What exactly was changed
An overview what was changed after the import
Saving the data
This is basically the same for each element we want to save. We need to
Create an item list to store the information
Populating the item list in the different steps
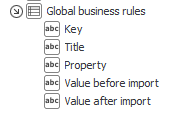
The item list consists of these fields
Key
The key is needed to update the correct row and identify whether a new element has been added by the import. It consists of the GUID of the element and the column name. The integer ID of an element is not an option, as the element may have been deleted and will be added again. While the integer value will change, the GUID will be the same.
Title
The name of the element, so that you know to which element the property belongs. I don’t assume that you would like to use the key. ;)
Property
The column in the table in which the value is stored.
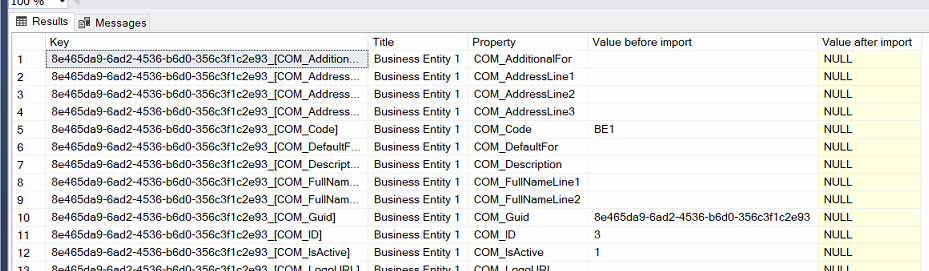
Value before import
Value after import
Item list for storing the information
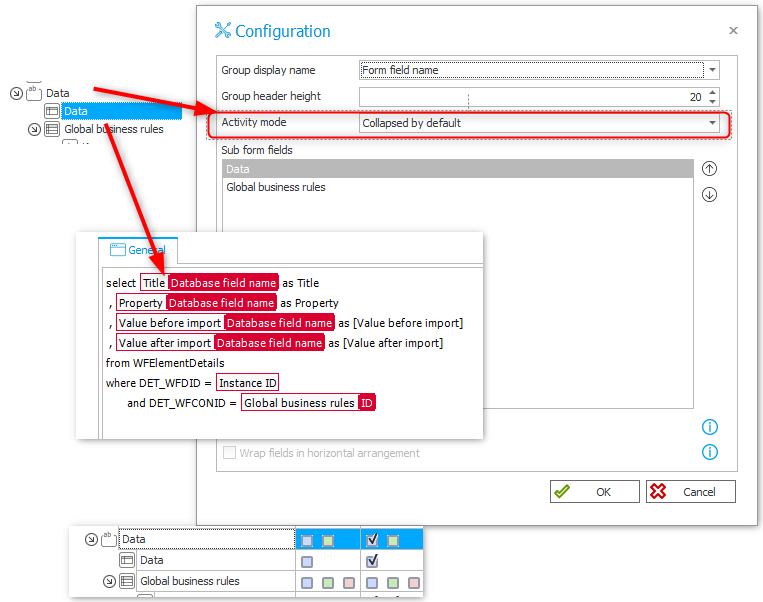
Due to performance reasons, I never display the item list itself, but use a data table to render the information. Both are placed inside a group which is collapsed by default.
Rendering a data table is way faster than rendering an item list, even if it’s readonly.
Info: If you don’t need any special formatting and an item list is read only anyway, then using a data table is a good option for a better user experience. Especially if there are hundreds of rows.
Displaying the changes
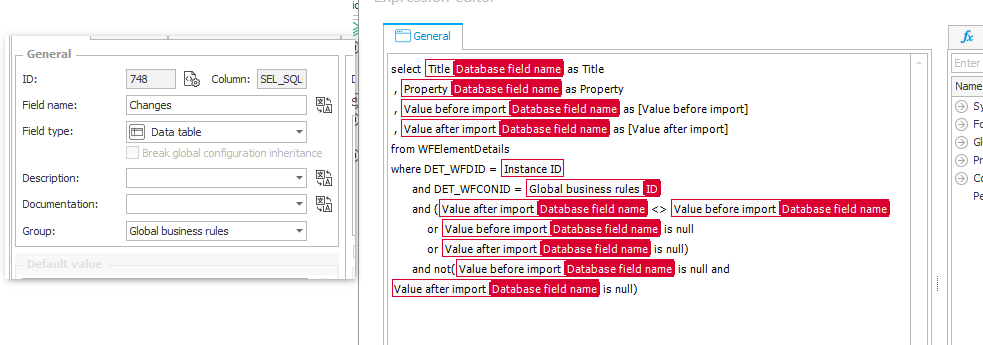
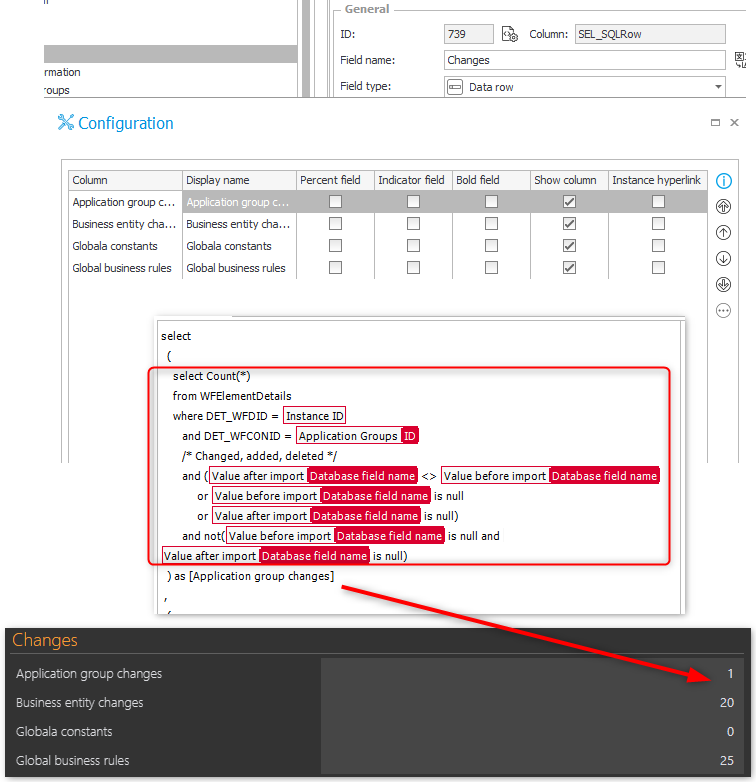
The changes are again displayed in a data table. There’s just an additional where condition to check, whether anything was changed. Since you can’t compare null values I had to make sure, that:
The value is different, which works if neither value is null.
The overview of the changes is simply a combination of these statements displayed as a data row. Instead of selecting the columns we do a count and use the whole statement as a sub select.
The change overview uses a data row to display the number of changes
Actions
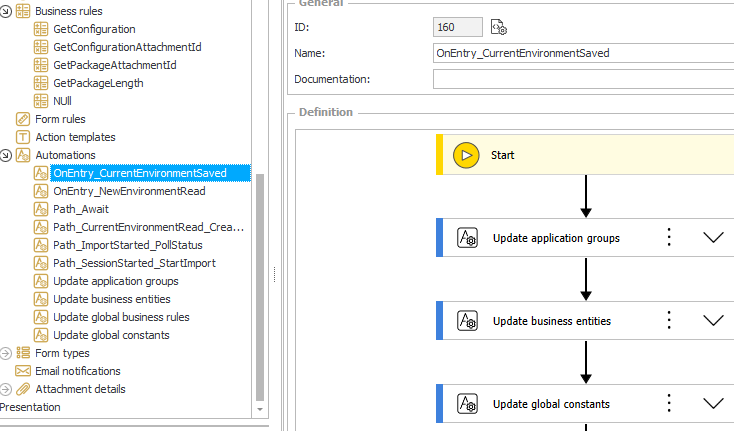
I tend to create process automations for each trigger, so that I don’t need to bring up the step dialog. In this case the OnEntry automations are both the same, at least at this moment.
I create automations for triggers
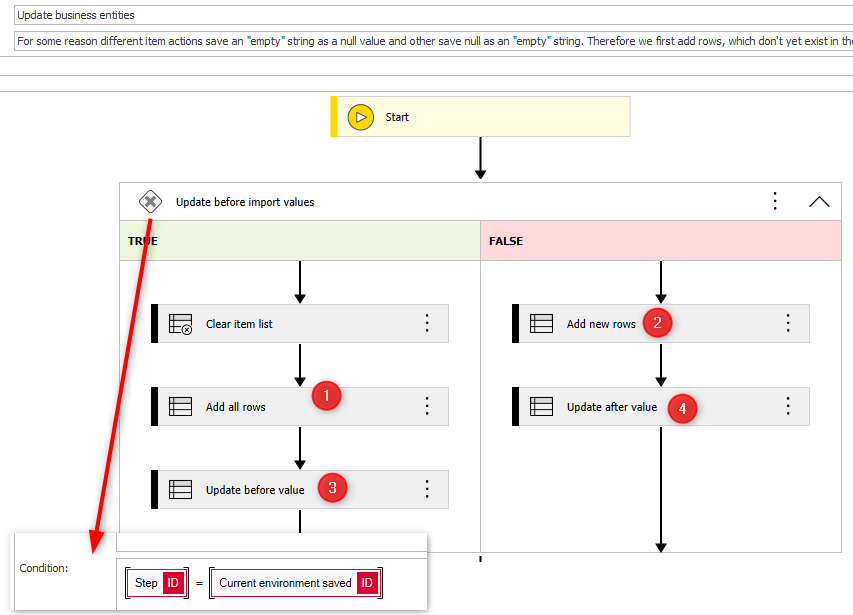
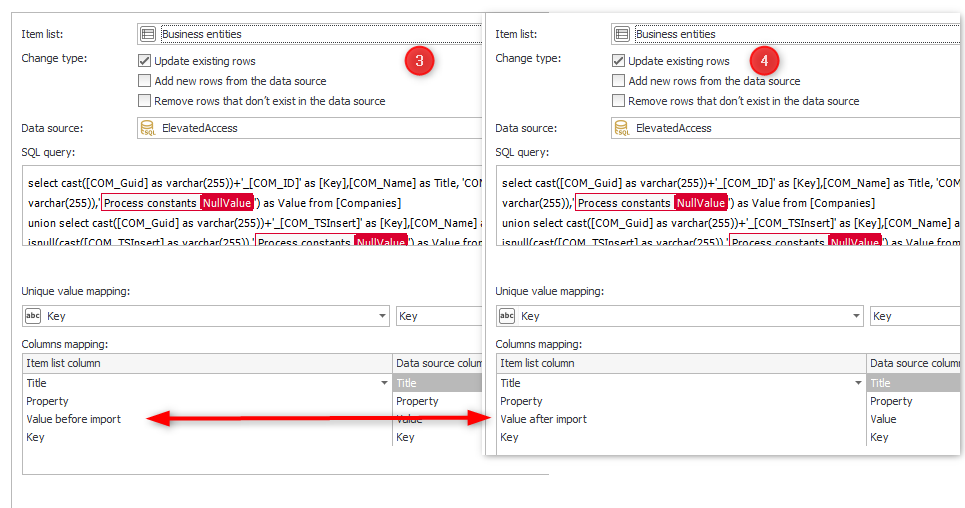
Each OnEntry automation calls all ‘Update xyz’ item list automation. The automations are always build up the same way. There’s a condition to check whether the ‘before import’ or after ‘import value’ should be updated. The numbers in the screenshot will be used later.
All automations are for updating the item list are build the same way
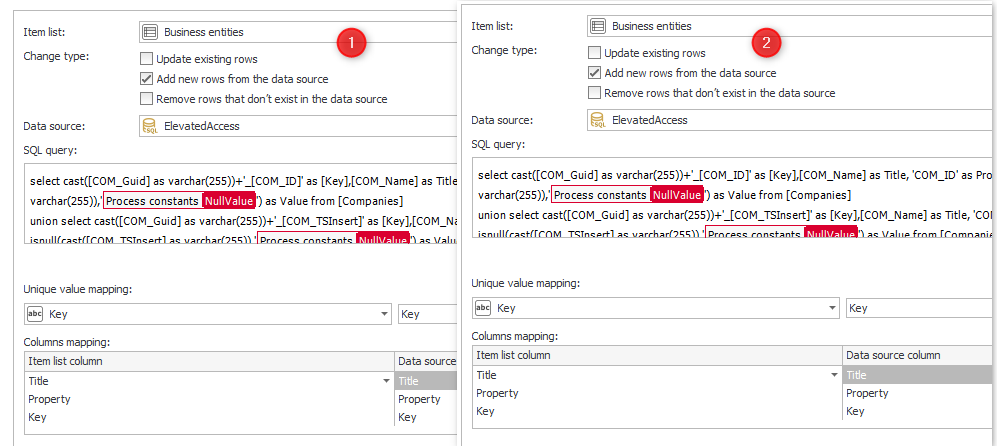
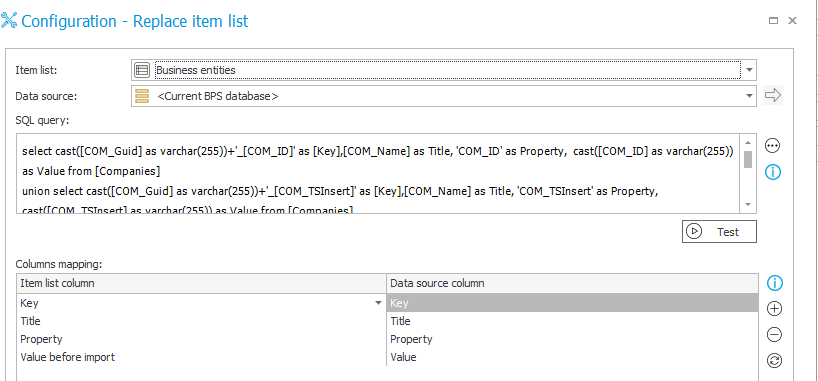
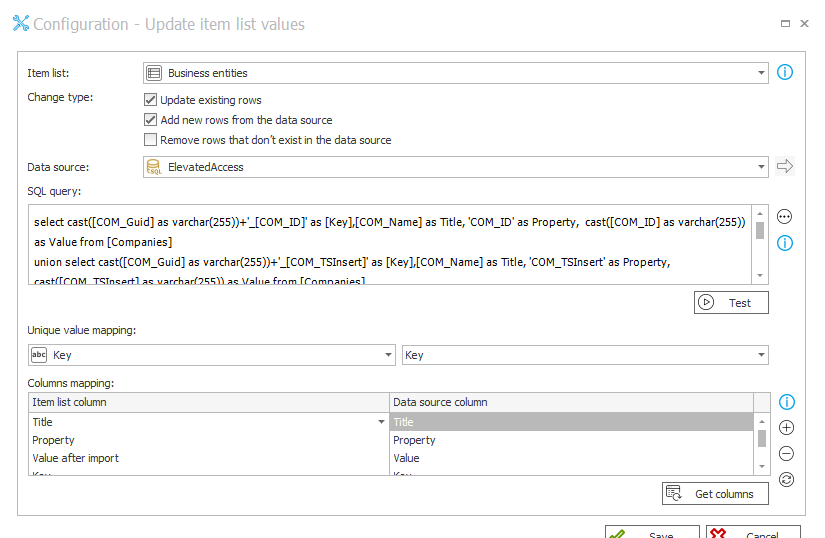
The actions all use the same SQL command and only the settings are different.
The add rows action is in both cases the same.
The update actions map the value to a different column.
Info: You are right, this looks strange. Originally, I used a replace action on the left and an update action with update and add rows option on the right. It turned out I wouldn’t be able to compare the values using this approach. You can read up on the nitty gritty details here.
Creating the SQL statement
I’m way too lazy to create all those SQL commands myself and no I didn’t use ChatGPT or similar. I used my favorite tool for ‘generating’ code: Excel. :)
The file is stored in the GitHub repository, so I will focus on how to use it.
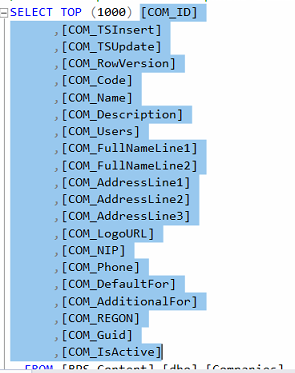
Bring up the SQL Management studio, generate a select statement and copy the columns.
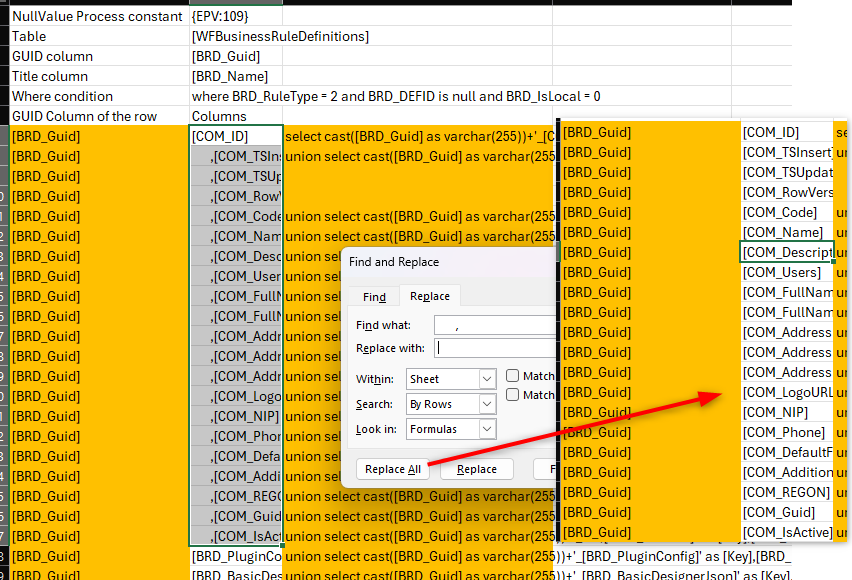
Paste these into the Excel and remove the leading space and comma with Find and replace so that you only have the column names.
Paste the columns to excel and remove the spaces and ,.
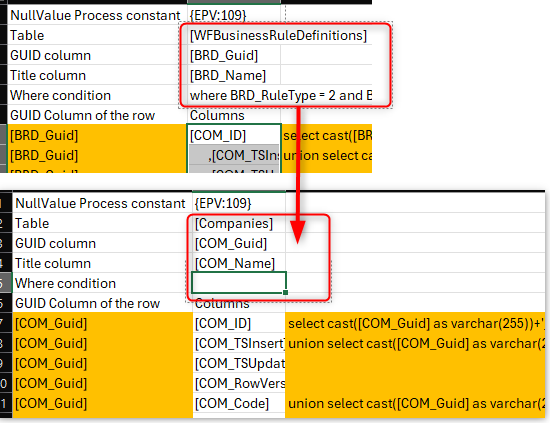
Update the values of:
Table
GUID column
Title
Where condition, which is optional
Updated elements for this table
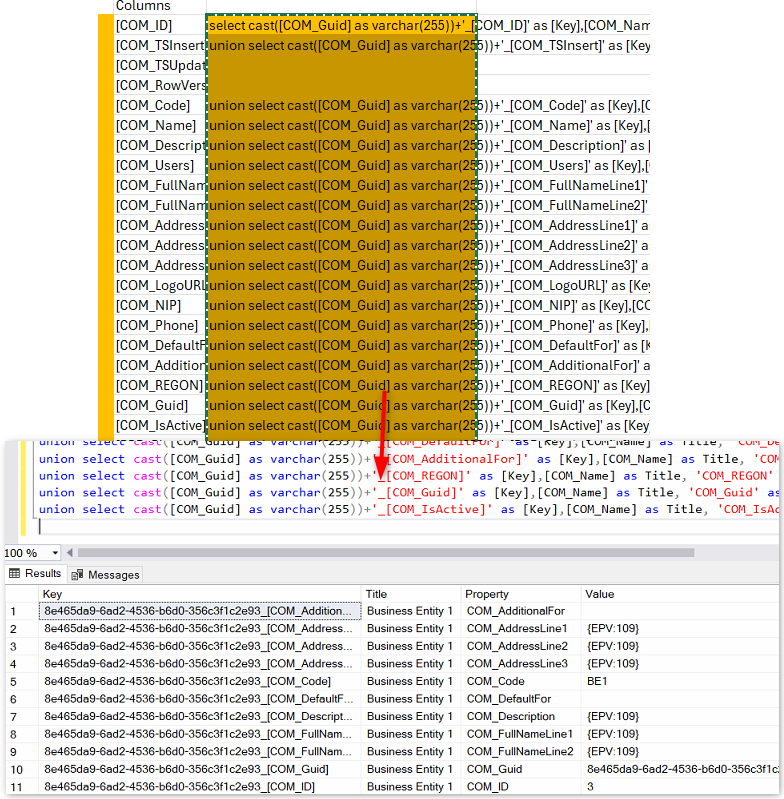
Afterwards you can copy the generated lines back to management studio to test them.
Result of the generated SQL statements
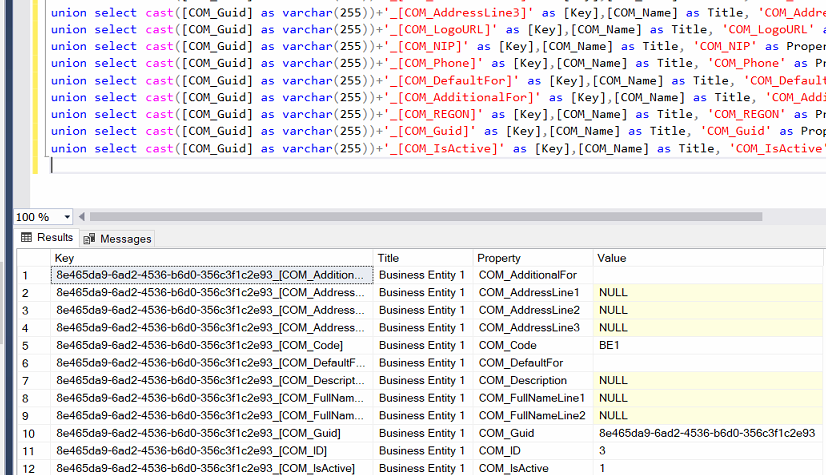
The TSUpdate and RowVersion column is always ignored. Either the values stay the same, if the element wasn’t modified or they will be different, in this case something else was changed. Therefore, these values would only cause unnecessary data.
Importing the import package
Fields
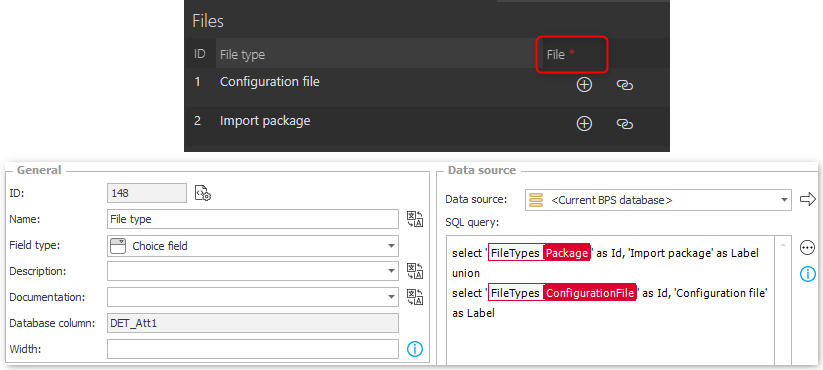
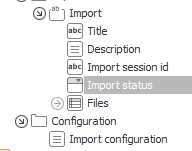
Using the import API requires the import package and a configuration. I’ve opted for uploading those two files. While I also used categories in the attachments I created an item list with local attachments. This allowed me to make these files mandatory. For the File type I used a drop down with a custom SQL query which uses constants as an id.
File type configuration in the files item list
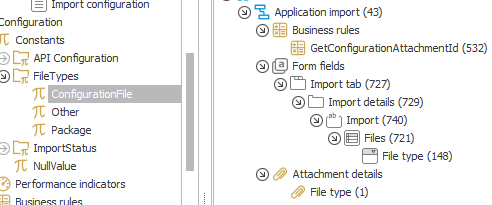
If you could imagine that a drop down / choice field is not only displayed but used with logic, always use constants instead of fixed value lists. This way you can make sure that you will find all places with the Usages tab.
Using constants instead of fixed value lists makes it easier to identify where something is used
In addition to the files item list there’s:
Import session id, a single text field.
Configuration, a multi line text field.
We need to saved the extracted configuration in a field because only those can be used in Raw mode in a REST action, see uploading the configuration.
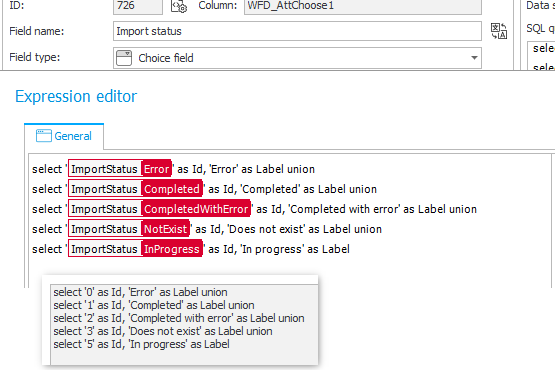
Import status another choice field.
The values of the import status
I also added a title and description field, so that I can describe what was the reason for the import.
An overview of all fields
Business rules
There are four business rules which will be used in the REST action:
Read the text from the configuration file
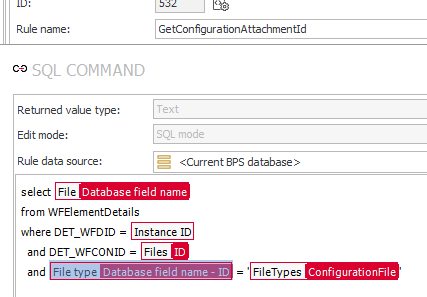
One for the configuration and package file to get the attachment id
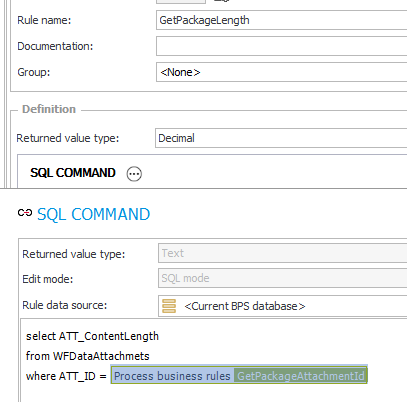
One to get the size (length) of the package, which is required for starting the import session
I created two business rules for getting the correct attachment id. An alternative would be to create one with a parameter, which passes the correct constant value.
SQL command returning the ID of the attachment based on the item list.
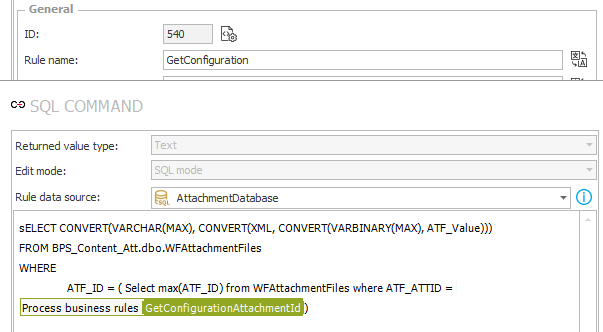
SQL command for converting the binary value of the configuration file to a text.
SELECT CONVERT(VARCHAR(MAX), CONVERT(XML, CONVERT(VARBINARY(MAX), ATF_Value)))
FROM BPS_Content_Att.dbo.WFAttachmentFiles
WHERE
	ATF_ID = ( Select max(ATF_ID) from WFAttachmentFiles where ATF_ATTID = {BRD:532})
Converting the binary value of a file to a text
Last but not least the SQL command for getting the size (length) of the package file.
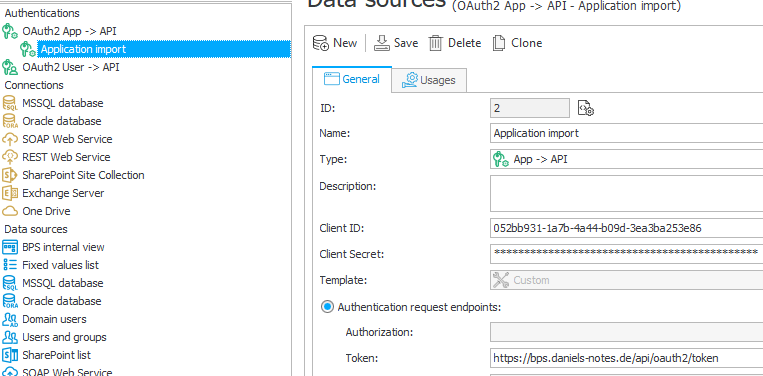
I’ve used the same application, I’ve configured here. In WEBCON BPS I’ve setup an OAuth2 App -> API authentication which in turn is used by the REST actions.
Token:
https://bpsportal.example.com/api/oauth2/token
OAuth2 App -> API configuration to be used in the REST actions
Create import session path
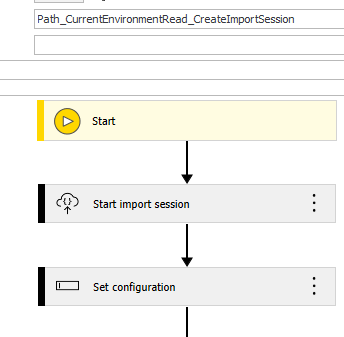
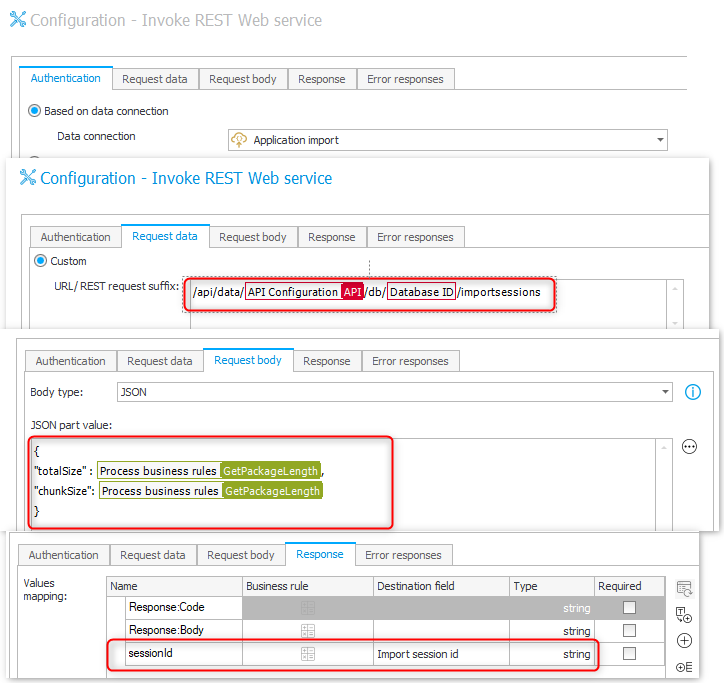
Creating the import session uses the standard REST action with business rules to get the site of the package file and an action to read the configuration file.
Actions in the path to start the import session
Configuration of the REST action for starting the import session.
REST action for starting the import session
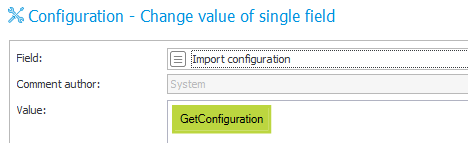
Storing the configuration in the field.
Storing the configuration in the field
Upload the package and configuration
I was not able to use the standard REST action for uploading the file. If you are interested in my tests you, can read more here.
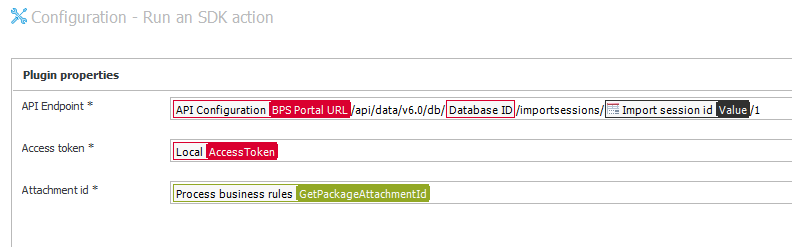
In the end, I gave up and created a custom very minimal custom action with three properties:
API Endpoint
The absolute address of the endpoint to be used.
https://bpsportal.example.com/api/data/v6.0/db/{DBID}/importsessions/{722}/1
Access token
This is retrieved by another action, as I did not want to bother with the authentication and hope to get rid of this plugin in the future anyway.
Attachment id
The id of package which should be uploaded.
The configuration of the plugin.
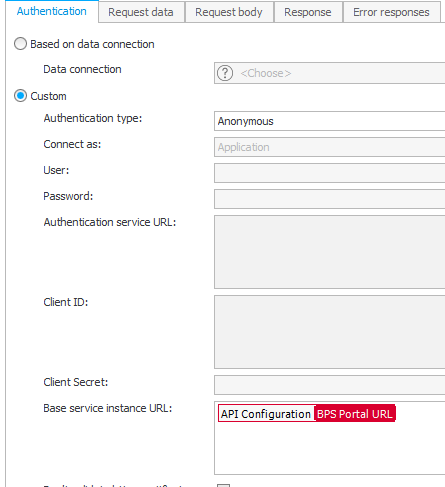
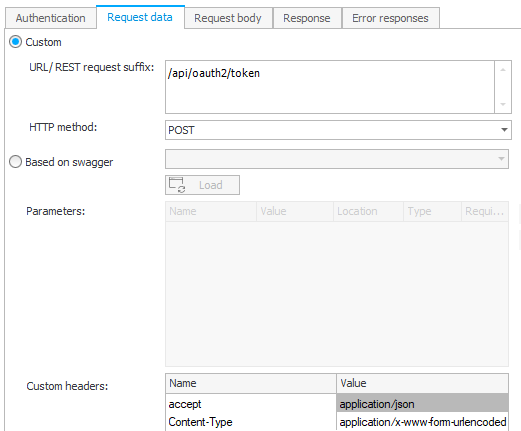
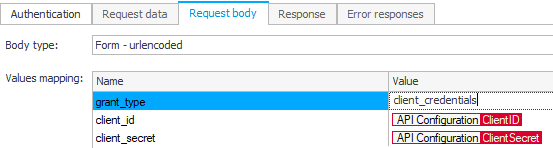
Since I decided against implementing the authentication, it’s necessary to get the access token with a standard REST action.
Authentication
Request data
URL suffix: /api/oauth2/token
Headers
accept:application/json
Content-Type:application/x-www-form-urlencoded
Request body
I stored the secret as a constant for this example.
Response
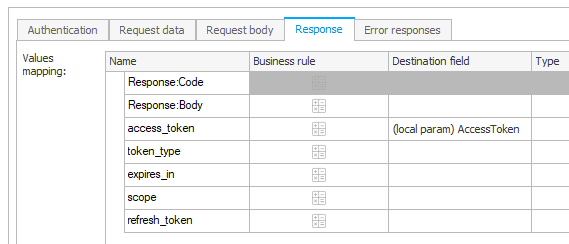
The returned access token is stored in a parameter which is passed to the upload action.
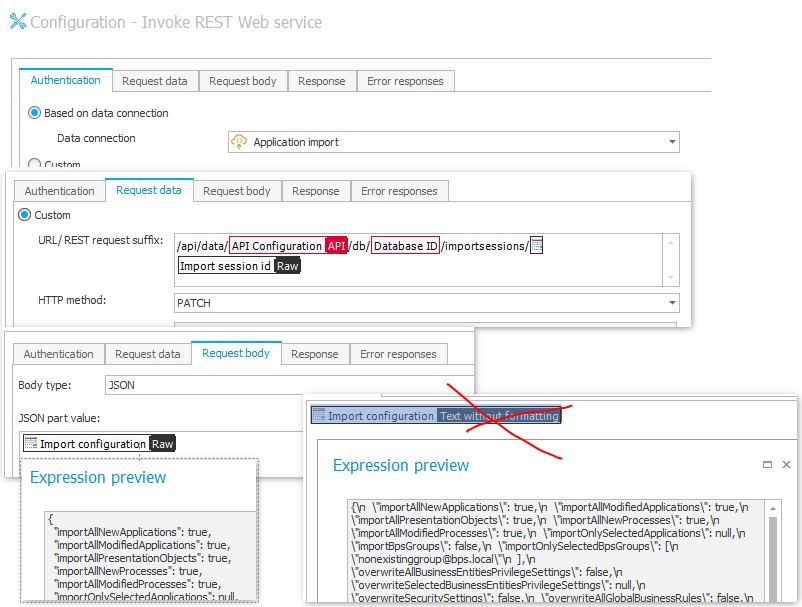
The last action is to upload the configuration which will start the import. The important thing here is to use the value stored in the field and return it in RAW. If you use the Text without formatting the value will not be a valid JSON because the characters are escaped as you can see it in the screenshot. If you would be using the business rule directly, then it would also be encoded as the field with Text without formatting setting.
Action configuration for uploading the import configuration.
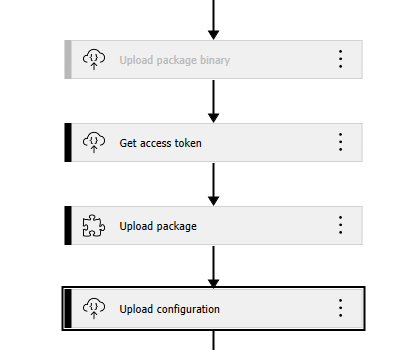
All combined, the automation for starting the import by uploading the file and configuration looks like this:
Action overview for starting the import.
Waiting for import completion
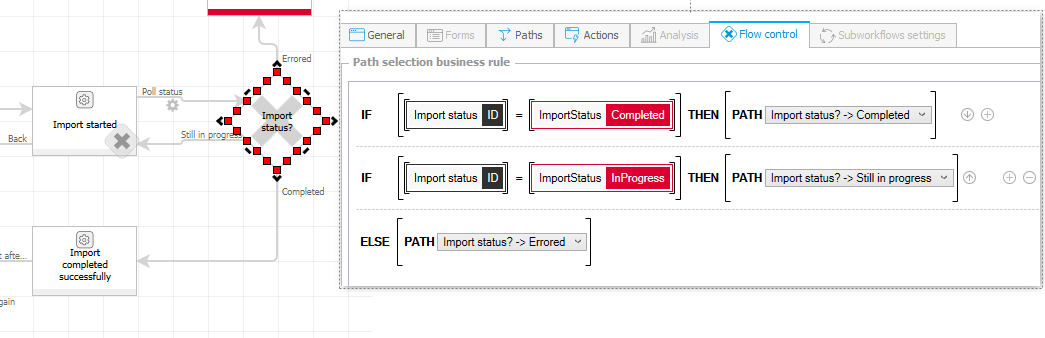
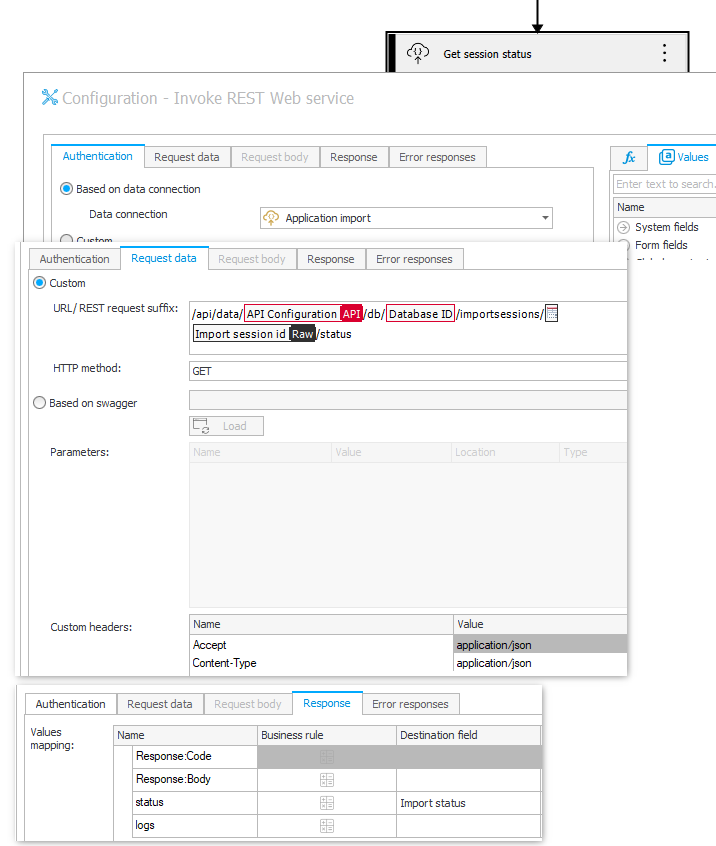
It can take a while until the import is completed. This is handled by moving the workflow instance to the flow control. During this path transition the current status of the import is polled. The flow control then decides how to continue. If it’s still in progress it goes back to the previous step.
Creating a loop to wait for the completion of the import.
This path has only one REST action which stores the result in the prepared choice field.
Action configuration for polling the import status.
Setting up the response body
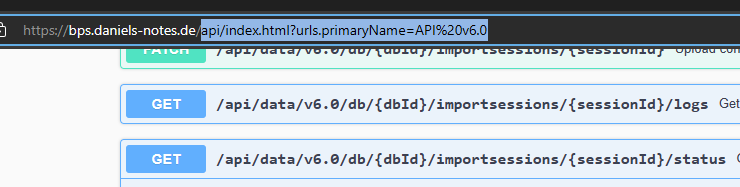
The easiest way for configuring the Response body correctly is to:
Navigate to the endpoint
API endpoint
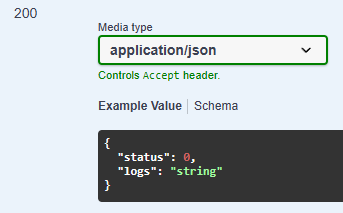
Copy the example of the success code 200
Success code result
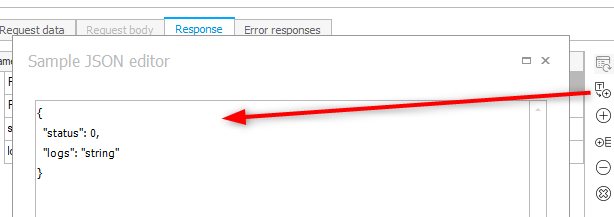
Paste it into the JSON editor
Insert the success body
Remarks
Importing the same application in multiple databases
By default, it is not possible to import the same application into multiple database. This can be changed by deactivating the flag ImportValidateAppProcPresUniqueness in the global parameters of the configuration database.
I spend quite of lot of time trying to figure out, whether I can use the standard action to upload the package. In the end I was not able to do it. Nevertheless, I want to document my results.
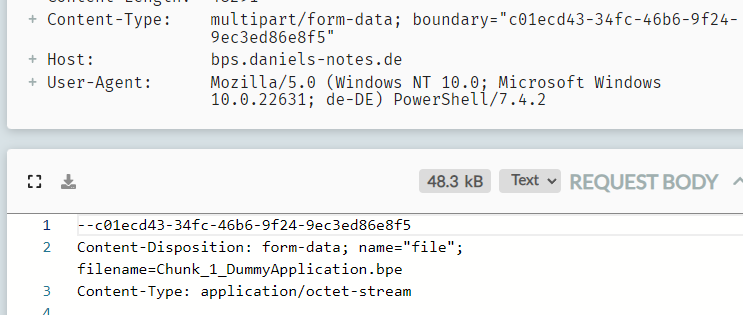
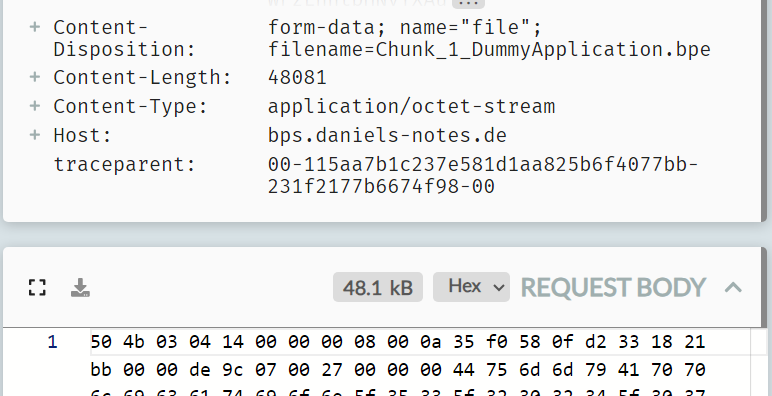
Below you see the request body which is send when I used PowerShell to upload the file.
The body starts with a boundary --GUID followed by the Content-Disposition and Content-Type in line 5 the binary part would follow.
Working multi part from PowerShell
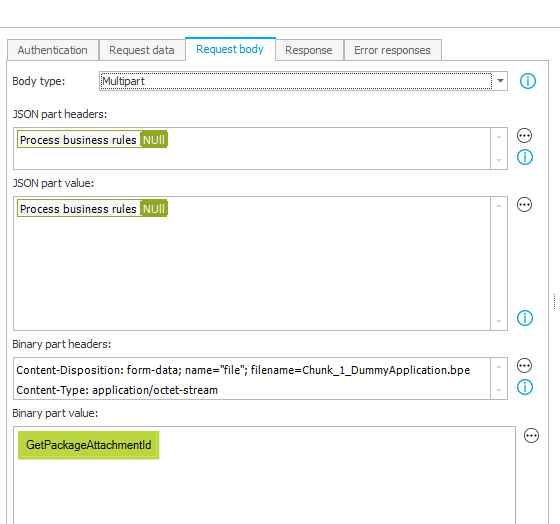
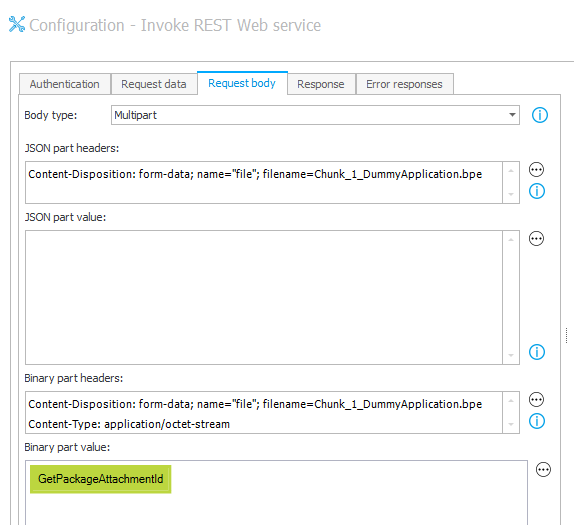
Request body type Multipart
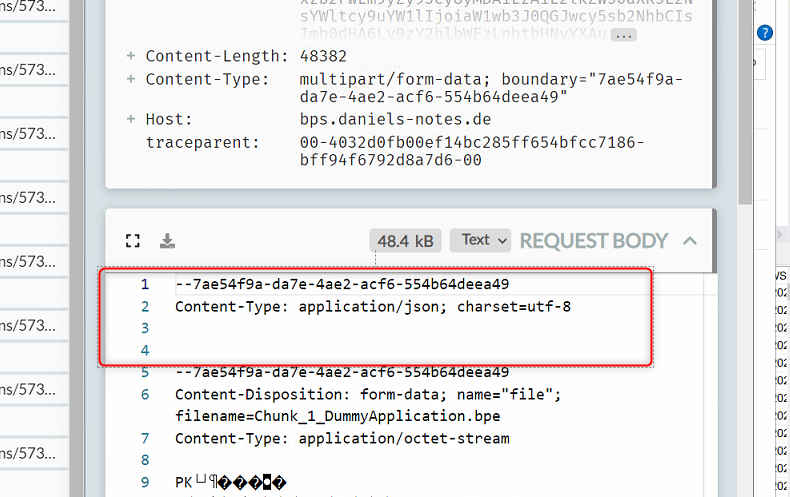
I was not able to reproduce the body using the Body type: multipart. The problem is the JSON part. Regardless of what I did there have always been two ‘starting’ boundaries. One for the JSON part and on for the binary part.
Multipart configuration
Send request of the configuration
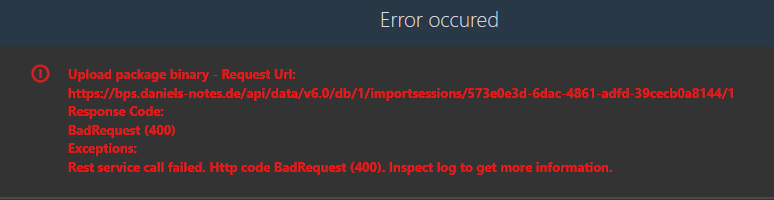
But this is not supported by the API, it causes a bad request.
Bad request with REST action
The underlying error was that the Model is not valid
Bad request because of invalid model
I was able to ‘persuade’ the API to accept the model, when I was using the binary part headers as the JSON headers.
A configuration which caused no bad request error.
hile it worked for the upload it caused an error during the import. The stored binary is not a valid zip package.
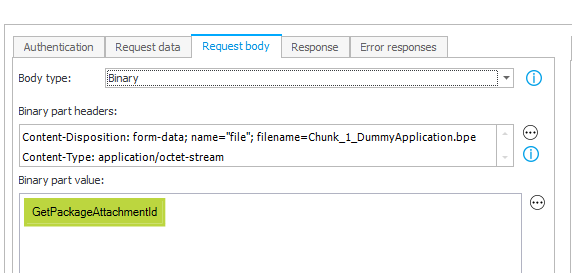
Request body type binary
Even so I didn’t expect that using Body type: Binary would work,
Binary configuration
Send request of the configuration
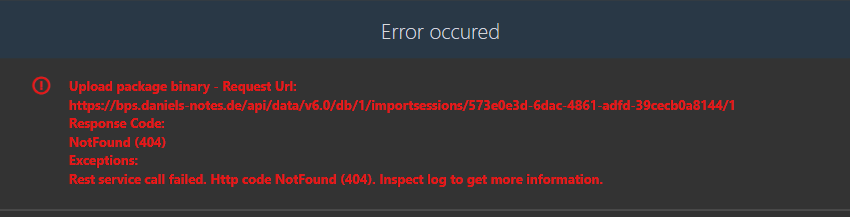
I didn’t expect that I would receive a Not found 404 error. That got me really confused.
Not found error
Additional error information
Each API call is logged in the table AdminAPILogs in the configuration database. In case of an error the column WSAL_ErrorGUID will have a value.
Get the error GUID from the AdminAPILogs table
With this GUID you can use the Search for logs by GUID option from the administration tools.
Search for logs by GUID returns additional information.
Empty and NULL handling depends on the item list action
Background and summary
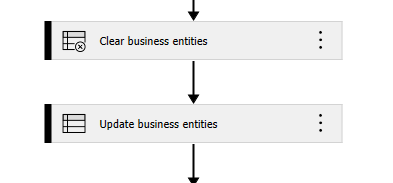
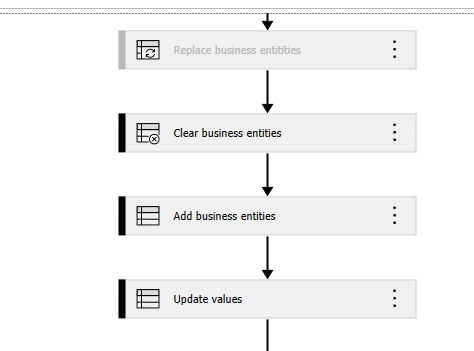
Originally, I used the Replace list item to store the data in the item list and in a later step I wanted to update it. This did work but when I wanted to display the changes I got an unexpected behavior.
Replace list item and Update item list values with Add new rows from the datasource option
These actions store an empty string value and a NULL value as an empty string value.
Update item list values with Update existing rows option
This setting will save an empty string value and a NULL value as a NULL.
Due to these different behaviors, I decided that I cannot use the replace action and have to add new rows and update all rows later.
This way, the value is always stored with the update action in all cases. However, the implementation may be.
In addition, I decided to replace the NULL value with a NULL text value. In the UI I will see the NULL text value and know that the value actually was NULL. Even if an empty string value is stored as NULL in the database, it doesn’t matter in the UI. You can’t distinguish a NULL value and an empty string value in the UI.
There’s also no issue when comparing two columns, if we only want to know, whether they are different. If both are null or have an empty string, that doesn’t make a difference. In all other cases there would be a difference and they would be part of the changes.
Baseline
I was using this SQL command and result as a baseline. The value column of the first row contains an empty string, while the second row is NULL.
The baseline data used for the tests.
Replace action
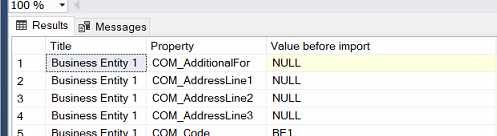
As you can see below, there’s no NULL stored in the Value before import column of the item list. All rows have at least an empty string.
The NULL value is not stored as NULL.
Replace action configuration
Result of the action execution
Update and add action
I switched from the Replace action to the Update action with a combination of Add and Update.
The result is that again the NULL values are stored as an empty text.
Update action configuration
Result of the action execution
Clear and add only
This had the same result as the replace action. There’s a little difference because I decided to replace the NULL value with a NULL text. This way I can distinguish whether something else was stored as a NULL.
Using clear and add instead of replace.
The same behavior as with the replace action.
Using add followed by an update
If the row already exists, the update will store an empty string value as a NULL value.
First add all rows and then update values.
Updating an existing row will save an empty string as NULL.
Yes, the exported application contains the credentials and I deleted the existing and setup a new credentials after the export. ;)
]]>Daniel KrügerImport application using PowerShell and REST API2024-07-15T00:00:00+00:002024-07-15T00:00:00+00:00https://daniels-notes.de/posts/2024/Importing-applications-using-RESTOverview
While I would guess that the majority of the WEBCON BPS customers are fine with the option to import applications via Designer Studio, there have been enough to request an automated process. With WEBCON BPS 2024 a public REST API was provided.
There’s already a knowledge base article describing it. In addition to the API a command line utility was created by WEBCON. This is located in the Tools folder which was the Migration tools folder in previous versions. This tool can be used to import a package.
What I’m missing from the article is an example on how to use the REST API directly. While it is documented which calls should be made in which order, I’m missing an example. This is reason for this blog post.
Importing a package
Setting up the API application
I won’t provided detailed information, on how to do it. You can refer to the knowledge base article for this.
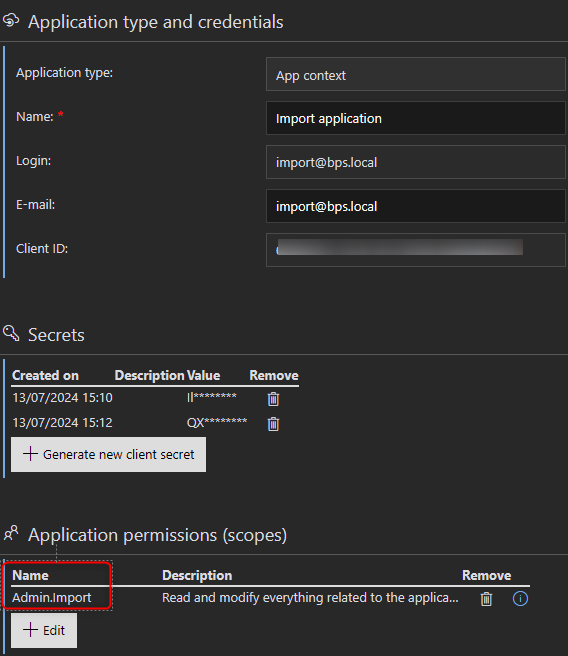
The main difference to other API application is, that this one makes use of the new scope Admin.Import.
Configuration file
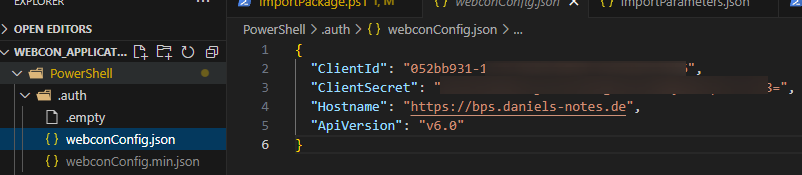
When the script gets executed it will read a webconConfig.json file from the .auth folder. If it does not exist, it will create one, open it so that you can provide the required parameters. Alternatively, you can create the file with the following content.
Remark: The .gitignore defines that all files in the .auth folder should be ignored except the .empty file. This way the client credentials won’t be committed.
Configuring the import script
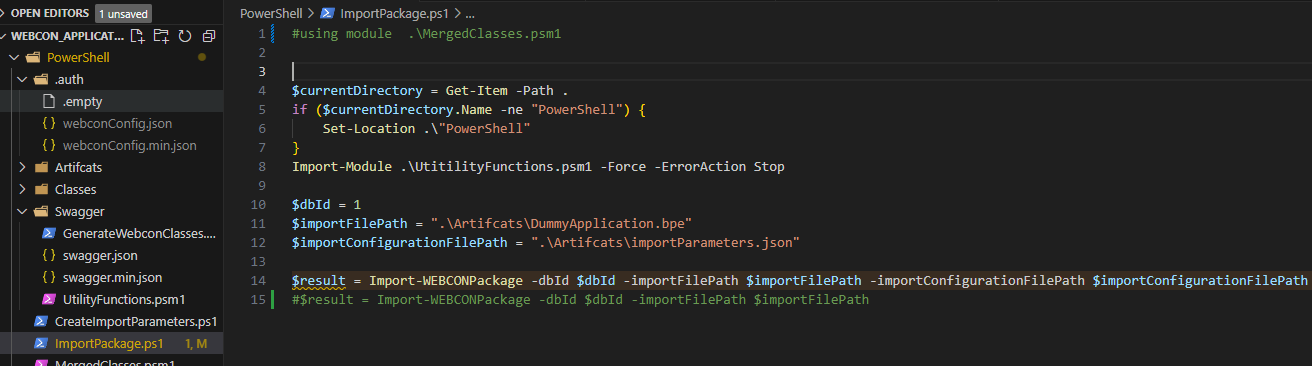
The script ImportPackage.ps1 is used for the actual import. Here you can define:
The database id, into which the package should be imported
The path to the package
A custom configuration, if necessary.
In my case I saved the exported package in the Artifacts folder.
Configuration of the import script.
Remark: I have used the script only from VS Code. Here the PowerShell session is started in the source folder. Therefore, the script changes the location to the PowerShell folder, if it is not the current directory. You may need to change this depending on your use case.
PowerShell explanation
Overview
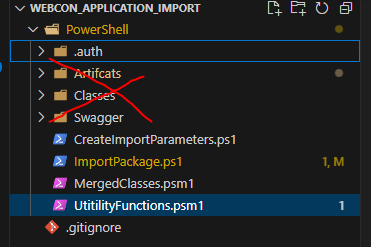
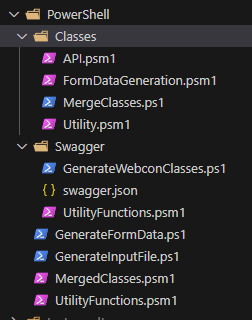
You can ignore the files in the Classes and Swagger file. The base functionality is located in the UtilityFunction.psm1
UtilityFunctions.psm1 contains the logic.
The file itself is ordered into four function areas:
Handling the configuration
Everything related to execution of th REST requests. This includes authentication, executing Get, Post and Patch requests.
The main function Import-WEBCONPackage
An internal helper function to start the import session and upload the file.
Major logic areas in the UtilityFunctions.psm1
Import-WEBCONPackage
This is intended to be used from the external script. It will start the import and return the results of the logs endpoint when the import is finished. If no configuration file is provided the default configuration is used. The status of the import is polled every second, if this exceeds 60 seconds, the script aborts and no longer polls the status.
The configuration file can be defined by setting the importConfigurationFilePath parameter.
This is used from the main function and shouldn’t be used from another function. At least not if everything is working. ;)
This function starts the import sessions and uploads the file. If the file size exceeds 300 kb, the upload is split into multiple requests. You can change this value by setting the variable maxChunkSize. I was too lazy to add parameters to each function so that it could be set by the calling function.
Custom configuration file
Creating a custom configuration file
While the knowledge base article provides information on how to define a custom configuration file. I wasn’t sure whether I understood it correctly. So, I tried to create one using PowerShell and the classes created from the swagger.json.
The result of my experiment is the CreateImportParameters.ps1 with a few tests how to configure different properties. The final object is then converted to JSON an saved as ImportParameters.json
I wanted to create a dummy file with all parameters, but that didn’t work out as expected.
I got an System.ArgumentException An item with the same key has already been added.. Maybe because I used [System.Guid]::Empty a lot of times, but it seemed that [System.Guid]::NewGuid() didn’t work either. I’m not sure about it, I didn’t test this thoroughly.
I didn’t use a completely configured file, as you can see with all the commented lines in the script. Based on the swagger.json and the generated classes, the JSON output should work. That’s the benefit of working with classes instead of creating the file in a text editor. ;)
The object is converted to the corresponding JSON
Remark: Before you execute the script, make sure the current location is the PowerShell folder, by executing the lines below from the script. Afterwards you can execute the script whole script including the using module .\MergedClasses.psm1 line. This is necessary so that the classes can be used.
Somewhere in the middle of the knowledge base article there are a few sentences about precedence. This is something you should be aware of.
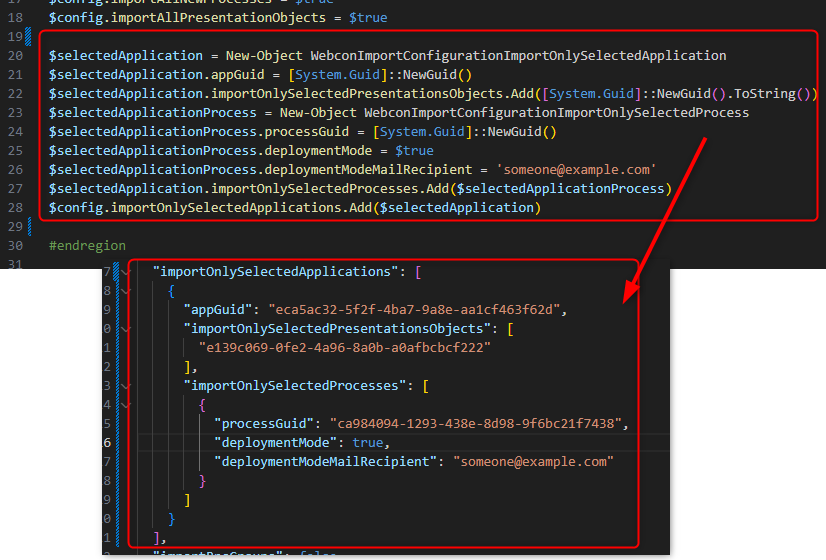
The value should be set to true/false accordingly. However, it is important to note that the indication of specific elements (“Selected” / “OnlySelected”) takes precedence over all elements to be imported (“All”). For instance, if the “ImportAllPresentationObjects” parameter is set to “true,” it will be ignored if the “ImportOnlySelectedPresentationObjects” parameter is entered in the same configuration file with the corresponding GUID of the presentation object.
If you define any Selected the corresponding All property will be ignored. The keyword All is not always used as the example with the BPS Groups shows.
Setting selected values to empty
If you want to define the configuration, that the selected property should be used you have to define it like in the examples above. If you want that the property is ignored, you need to set it to $null. Passing an empty string will cause issues. The same applies to empty arrays.
If you want to make use of the CreateImportParameters.ps1 script be aware of the following:
Remark: I’m not 100% sure about the empty arrays because the default script generated by export dialog also uses empty arrays sometimes. For the time being I will just set all to null and not only a few.
Remarks
PowerShell 7
I used VS Code with PowerShell 7 to develop the scripts. This version is typically not installed by default.
Status values
The status values are defined as a simple integer in version 2024.1.1.48. I would have expected that it’s an enum but it may have been forgotten in this version.
In PowerShell I’m using this enum to map the integer value to a more human friendly value. In case you are not aware of how enums work: Error is mapped to 0, Completed to 1 etc.
enum ImportStatus
{
    Error
    Completed
    CompletedWithError
    NotExist
    Created
    InProgress
}
Location of the import session id
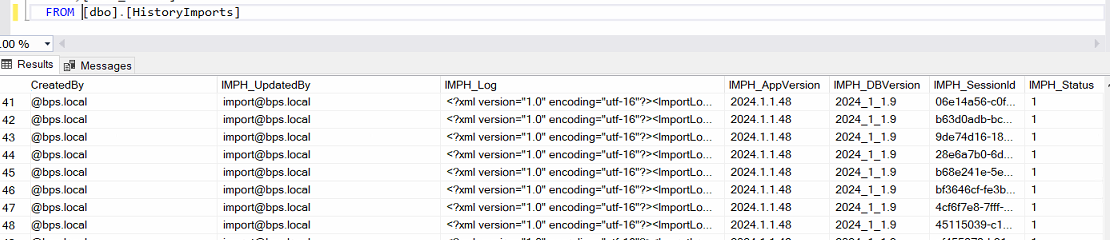
If you have lost your import session id, then you can take a look at the HistoryImports table of the content database into which the package should be imported.
The HistoryImports table stores the import session id.
Logs
I’m not sure when we are able to download logs. Maybe only if the status is Completed or CompletedWithError, but not if it’s Error.
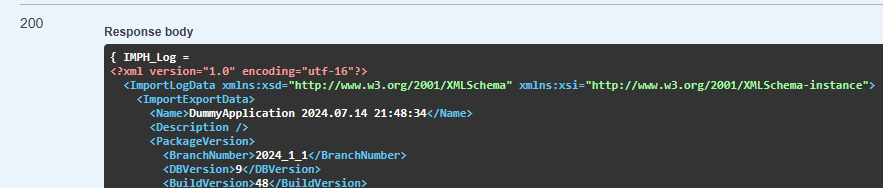
If you are able to get the logs you are in for a little surprise. In the version 2024.1.1.48 there’s a little mistake and the response is a string where the XML log of the import is assigned to a JSON property without wrapping the value in double quotes. Basically, this is neither a JSON nor a XML value. It may be easier to remove the JSON part so that the XML can be parsed itself.
2024.1.1.48 has a little error in the logs response. The XML is not wrapped in double quotes
Status ‘Error’
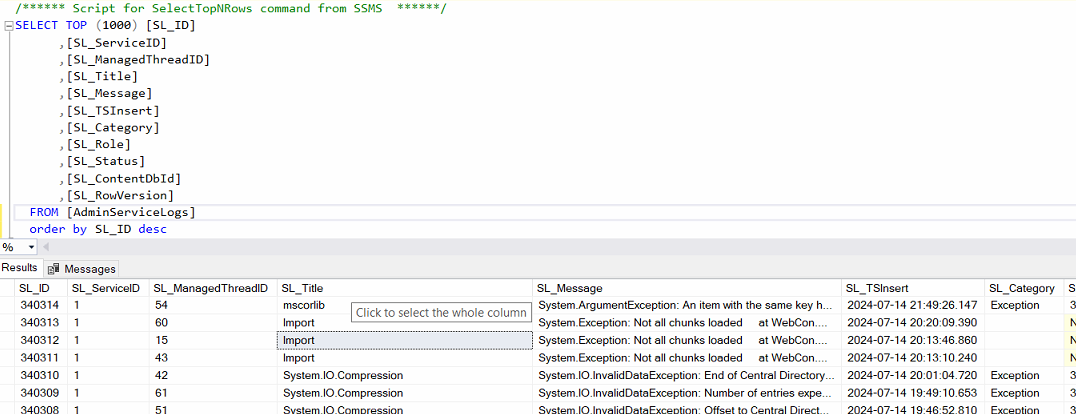
If the PowerShell exits with status Error something went wrong, and the import could not even be completed with errors. You may be able to find more information in the AdminServiceLogs of the configuration database.
The AdminServiceLogs will have more information if the status returns with Error.
]]>Daniel KrügerWEBCON BPS 2024 Change log excerpt and thoughts2024-07-11T00:00:00+00:002024-07-11T00:00:00+00:00https://daniels-notes.de/posts/2024/WEBCON-BPS-2024-Change-logRemark
When I read through the change log I have copied over a few excerpts, these are displayed as quotes in this post. Anything not in quotes are my personal thoughts. The selection criteria for these excerpts from the change log are:
Will the changes have a direct impact on my work
Do I have any thoughts about the change
Is there a ‘hidden’ gem
While reading the change log I noticed again how many parts of WEBCON BPS I don’t use in my daily work.
SOLR
Public links / share tasks
OneDrive actions
HotFolder
OCR
Then again, I noticed quite a few changes/bug fixes which I submitted. :)
Even if you don’t want to read through the whole change log, I would recommend the following:
Remark: If you are using any kind of SDKs read SDKs.
After reading the changes you may think that updating to WEBCON BPS 2024 will be a pain. I have to say, in my small dev environment it was straight forward as always. I just had to install the .Net 8 Core Hosting bundle and “click through”. I also didn’t need to install the WebView2, as it was listed in the post, in most cases it should be installed anyway.
Form changes
Widget
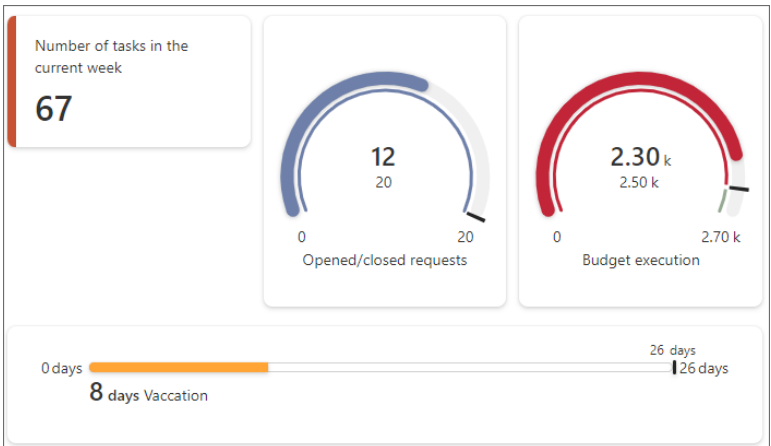
Expanded the list of form fields available in the Data presentation group by adding the Widget form field. It allows users to attractively visualize selected numerical data on the form and optionally present it against other values.
Depending on the configuration, the form field can be displayed in one of the available forms: Numeric value, Progress bar, Circular progress bar, and Gauge. It is also possible to change the color scheme of the Widget, including by implementing additional coloring conditions.
There’s always room for improvement.I hope there will be some upvotes. :)
The Download all attachments button will be visible regardless of whether the Add and delete option is enabled in the Attachment panel. The button appears in the top right corner of the Attachments panel when more than one attachment is added.
Predefined form templates
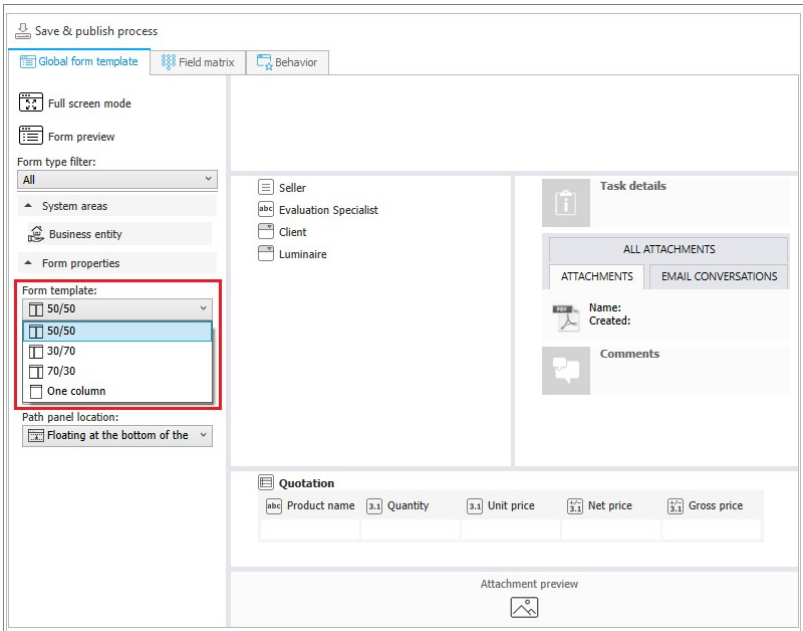
It is now possible to modify the proportions of the left and right panels of a form in WEBCON BPS. This enhancement enables users to adjust the width of the side panels to better align with the content of their forms, allowing them to make the most of the available workspace while designing forms that are more visually appealing.
Note: after the system upgrade, the forms previously defined by users will be displayed with a default 50/50 template, regardless of the process type.
I like the one column option for dictionaries. That was something I didn’t thought of. For the rest, I still prefer my solution as it’s more flexible.
Revised changing left/right layout
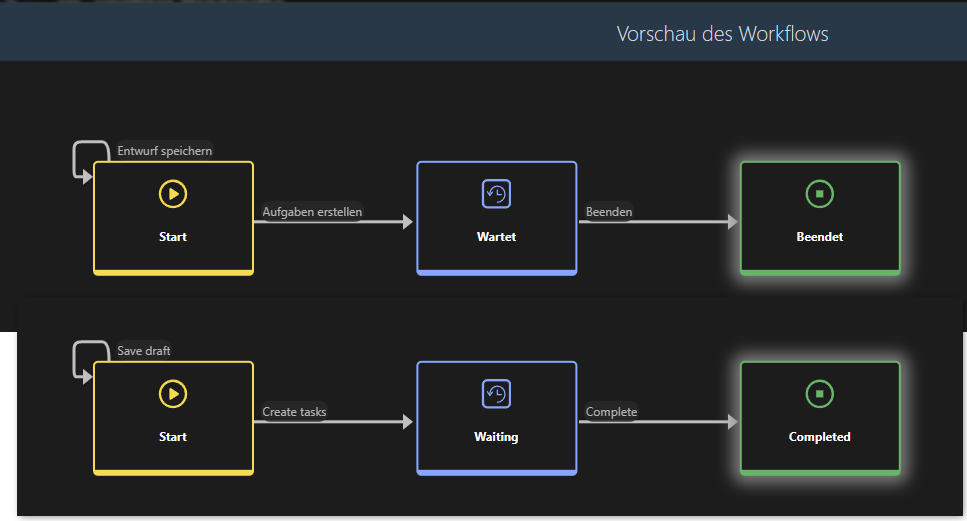
Fixed a bug causing incorrect display of translations of path and step names in the
Workflow preview on the form.
I didn’t know that the preview should render the translated steps and paths.
Blocked the ability to select the path buttons when the form saves.
The visibility of system fields (including the Attachments section) in archived workflow instances will be analogous to that in the final step before archiving.
The date format for the Multiple lines of text form field saved in Append mode has been updated to match the date format of the Comment system field. The new
format is YYYY-MM-DDTHH:SS (without milliseconds).
The Save and previous button in the Item list row editing window has been replaced by the Apply and previous button to ensure consistency with other buttons in this window.
Reports / Dashboards
Changed the configuration process for reports embedded in application dashboards. As a result, users can define data sources for dashboards which can then feed independent reports and Report Tiles created within the dashboard.
While my initial thoughts have been like Why??? It was good as it was.
I have to admit that:
Most of the time I either have hidden the reports in the navigation
or created special views for the dashboards.
There’s practically no case where I used the same report on two dashboards.
So the one draw back is, that there may be two dashboards which should display the same information and we now need to configure it twice.
I also liked the option to go to edit mode and simply use it to navigate to the hidden reports instead using the dashboard every time.
Experience will tell us, whether this is actually a problem.
The way of configuring Application Dashboards from Designer Studio has been changed. Currently, the configuration of this element of the application will be performed by the user in the browser window.
I couldn’t care less that the dashboard can no longer be configured in the Designer Studio. In 99% of the cases using the browser is better anyway. :)
New system column: “Last comment”
A new Last comment column has been added to the group of system columns available in the Reports configuration, which displays the content of the last comment in the workflow instance, together with information about its author and date of addition.
The column is available for reports with SQL and SearchIndex sources
I always have to keep in mind that the last comment is really the last one and is unrelated to the latest changes or even the latest step. If a comment was added when the workflow was started, it will be the last comment even if the workflow has now version 43 and has moved 10 steps forward.
SDKs
Important for everyone
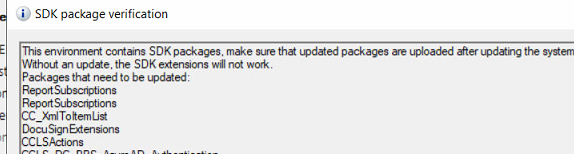
Versioning has been added for SDK plugin packages. If a plugin’s version is incompatible with the current version of WEBCON BPS, a warning will be displayed either in the Installer or in WEBCON BPS Designer Studio when updating the system or uploading the plugin. In this case, it will be necessary to migrate the plugin packages to the corresponding version.
That’s important to know, up to know you could just update to a new version and the SDKs have been running, at least until the breaking changes in 2023 version had been added. Now this won’t be possible anymore.
In addition to this: If you are not creating SDKs on your own, but have a partner do it, ask them whether they have given WEBCON the public key. Otherwise it may happen that these cannot be used.
Important for developers
Unified the default data model used in the interface part of SDK plugins, i.e. the extension FormFieldExtensionJS for the following form fields: Integrer number, Floating-point number, Date and time, Single line of text, and Multiple lines of text. When using SDK plugins that do not have business logic with their own data model, it is necessary to adapt the interface to align with the new model.
The SDK has been expanded to include a mechanism that enables loading from a plugin package independent files for service and Portal. This mechanism relies on two folders, ServiceDependencies and PortalDependencies where the respective files for Service and Portal are stored. These folders can be added to a plugin package, ensuring that the files they contain are loaded only in the specific environment (Service or Portal).
That’s something I need to check whether I understood it correctly, but I think it would have solved a few problems in the past.
System
Miscellaneous
The second important update is Migration to .NET 8.0., which leverages the latest standards and libraries, and is continuously checked for compliance with current security standards. This update has also brought significant performance benefits. For example, the time required to transition between process steps has been reduced by 25%.
How the system loads the current SQL server time to save the data in the database has been modified. This change does not impact the system’s current functions – it makes it possible to move databases between servers operating in different time zones.
That caused me a few troubles in the past which had been hard to detect. :)
Changed the format in which business rules are saved in the database – from XML to JSON. Any existing configuration will be automatically converted to JSON.
Is noteworthy in case someone queries the database directly.
Connection to MSSQL database via Microsoft Entra ID
The feature to connect to an MSSQL database through Microsoft Entra ID has been introduced. This enables Microsoft service users to authenticate with credentials appropriate for their database.
Added the feature that allows for logging the information about opening the Portal page by users. In addition to the information including the user login, the log
records the IP address of the device used for opening the Portal page. The activation of the feature requires adding the Microsoft.AspNetCore.Authentication parameter with the Information logging level to the Logging section of the appsettings.user.json configuration file.
The location where the information is logged depends on the configuration of the NLog module. By default this is the AdminWFEventLogs table of the
configuration database.
I haven’t checked it, but I assume that this is the first opening of the portal in a new browser session and not every navigation to a workflow instance.
Improved validation of user data in webcon.pl\svc.bps format in a non-domain environment, as well as connecting to and retrieving OUs and user data from such a domain when synchronizing BPS users.
Restored behavior of the {I:WFD_CreatedBy} variable as of version 2022 R3. Values returned from the CacheOrganizationStructure table on the form are again case-sensitive.
Disabled logging to the Event Viewer of errors related to actions performed when saving a form.
The behavior of the Start editing a file using OneDrive action has been modified.
If an attempt is made to start editing the same file using OneDrive again, an error message will be displayed and the path transition will be blocked.
In addition, the previous behavior of the Finish editing a file using OneDrive and Cancel editing a file using OneDrive actions has been restored. If these actions fail, the path transition will not be blocked. The action execution logs will show the corresponding information.
Improved support for special characters in the configuration of the Update attachment action executed by WEBCON BPS Workflow Service.
SOLR
There are a whole bunch of changes and improvements. The most noteworthy for me is that it is now possible to create a backup of the recent activities.
Because it is not possible to reindex data regarding user activities and recently viewed areas, a backup copy of this data will be created during the update. The backup copy will be restored in the installer, after the SOLR Search Server component is updated. The backup contains data from the last 30 days. WEBON has also made the SolrActivitiesMigrationCli tool available which can be used to create and restore a backup copy separately from the update process.
API
Added new REST API version 6.0.
REST API version 3.0 has been removed, while version 4.0 has been marked as deprecated.
The endpoint api/login used for authentication will be removed in version 2025, it is recommended to use endpoint /api/oauth2/token instead
Everyone still using the api/login endpoint should start moving forward.
Importing applications using the public API
Administrators can now import applications using the REST API in Portal. With the new tool and API application, they can define import parameters that previously required navigating separate wizard steps in WEBCON BPS Studio. This solution automates the process of importing applications and transferring configuration data between environments (DEV/TEST/PROD)
The advanced configuration really looks promising. I will dedicate an own blog post to it.
In the REST API endpoint related to application metadata, information has been added to define whether a process was created within an application or is a
Related process.
That caused me some problems for our Business Central extension which allows to configure which WEBCON workflows should be started from a page. Another user voice closed. :)
Designer studio
ToDo list
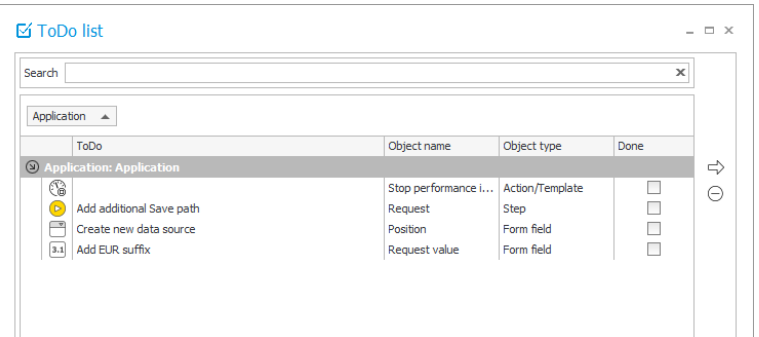
Added functionality that allows users to create a list of tasks (ToDo) for better work
management and progress monitoring. The list within the table rows presents objects,
such as form fields, actions, or rules, which are designated as requiring further
configuration.
This can be interesting, especially before you go on vacation. :)
Cyclical action
Added the capability to execute the Change value of single field action in automations performed in cycles. In this context, the action can only modify the values of local automation parameters.
That can be helpful.
To store cyclical action logs, a new table was added to the content database: WFRecurrentActionExecutions. Until now, those logs were stored in the WFActionsExecutions table. The tables contain the same columns. The service will remove logs older than 12 months.
Existing logs will not be moved to the new table.
That’s important to know. :)
Step
A new button has been added to the step edit window, allowing users to navigate to the selected step of the current workflow for editing
Changed the manner in which the system handles the ALERT and CONFIRM form rules. Consequently, the standard, JavaScript-based dialogue windows that are invoked by the CONFIRM and ALERT functions are replaced with native implementations. The change allows you to use formatted text with HTML tags , , , inside the ALERT and CONFIRM functions.
The change results in breaking backwards compatibility for those form rules which functioned in JavaScript mode and invoked in its code other form rules working in the block mode and containing the aforementioned ALERT and CONFIRM functions. For such a configuration, it is necessary to manually insert the Promise object in the JavaScript rule code.
For any other configuration, backward compatibility is preserved, and no further modifications are required for the rule configuration.
I went again from Yeah to Why??. I hate arbitrary restrictions. If someone want’s to use HTML than the person will know what he does.
Automations
Improved readability of automation configuration
The latest version provides users with a more comprehensive understanding of the automation’s functionality by allowing them to swiftly access information about individual actions and action templates within the automation configuration. By simply hovering the mouse cursor over the action/template icon within the automation definition area, a tooltip will be displayed, showcasing the action / action template name and description (entered in the Documentation field). This solution eliminates the need to carefully check the configuration of the actions and templates that comprise it.
It will be great to see the documentation of the actions in the mouse hover instead of opening the configuration.
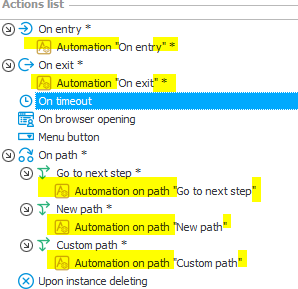
In addition, the default name of automations created in WEBCON BPS Designer Studio has been changed. When a new automation is added, its default name (previously New Automation) will be dependent on the context in which the automation is to be triggered.
Reading this I went ‘Yeah, finally’, continuing reading I just thought WTF.
For example, the default name of an action triggered On exit will be labeled as Automation “On exit”. The change does not apply to process and global automations.
Again a Why?? there’s not the least reason for using a template for the name like Automation on path "xyz". Xyz would have been sufficient. At least in my opinion, and this is my blog. ;)
Miscellaneous
The order of display for Global constants, global Business rules, and Automation has been updated to be alphabetical.
During export/import of an application, the contents of the Documentation fields in the process configuration are no longer parsed for the presence of tags specifying process variables. The previous operation could result in displaying incorrect configuration message during export.
It is now possible to create universal Form rules that contain a reference (parameter or tag) to Item list columns.
]]>Daniel KrügerLet’s Encrypt SSL certificate and IIS2024-07-06T00:00:00+00:002024-07-06T00:00:00+00:00https://daniels-notes.de/posts/2024/lets-encrypt-ssl-certificate-and-iis%20copyOverview
In todays world it should be obvious that no website should be run without securing it with a certificate. Unfortunately, I have seen cases where this is still true, and the ‘reasons’ are combination of:
It’s not available from the public.
It’s only a dev environment.
I don’t want to go through the hassle with the IT.
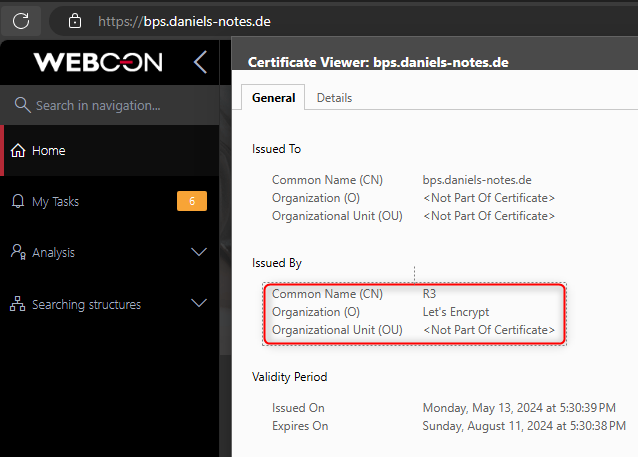
I used Let's Encrypt service to get SSL certificates for my private web server.
I’m not sure whether I have documented all initial steps to get it up and running. So, I will just provide a few information and links to the original site and go into more detail to use it with IIS.
Remark: I don’t have qualified experience in this area. There may be better ways out there, but this is how I got it working and I’m providing the information as is.
Get a SSL certificate
I’ve been using certbot to get a certificate for my site. Since I’m using IIS, I selected Web Hosting Product on Windows
The page provides detailed instructions. If my notes are valid then I’ve used the following command line to get an SSL certificate for bps.daniels-notes.de.
#certbot doesn't work from PowerShell ISEcertbotcertonly--standalone-d"bps.daniels-notes.de"
I’m using the --standalone parameter because no other site is using port 80.
My sites don’t use the port 80
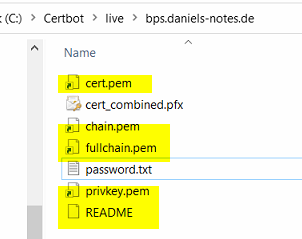
With the command a folder for the site was created and the necessary files have been downloaded.
The folder with the files for the SSL certificate.
Creating the .pfx file for IIS
After the files have been downloaded, I was provided with the next hurdle. How can I take these files so that I can use them with IIS.
The way I found was to use OpenSSL for windows to create a .pfx file from those files.
Extracted the package to the folder C:\Install\SSLCertificate\OpenSSL-1.1.1h_win32
Create a password.txt in the certbot folder with the password to use. In my case the folder is: C:\Certbot\live\bps.daniels-notes.de.
The below script will switch to the site folder, use the string password to generate the .pfx file.
Now that we have the certificate, the rest is easy.
Import the certificate.
Add it to the site in IIS
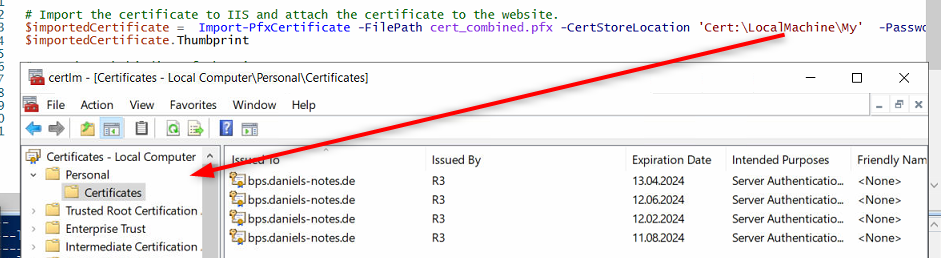
You can do it manually or use the below script. It will store the certificate in the personal certificates folder.
The certificate is imported in the personal certificates store
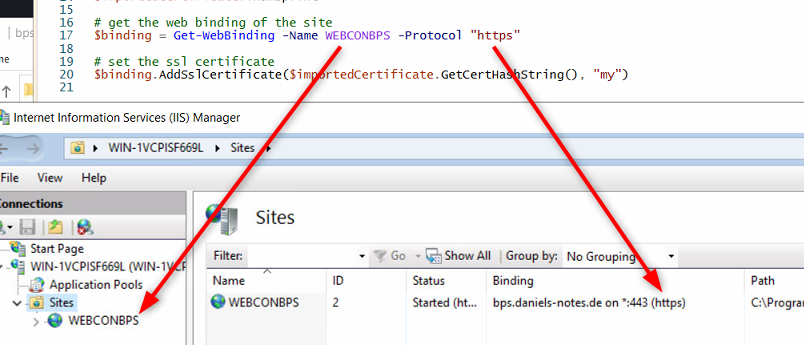
The certificate will then be added to the site with the name WEBCONBPS. This site should have a single https binding.
The certificate is added to the site which has to have an existing binding.
cdC:\Certbot\live\bps.daniels-notes.de# Import the certificate to IIS and attach the certificate to the website.$importedCertificate=Import-PfxCertificate-FilePathcert_combined.pfx-CertStoreLocation'Cert:\LocalMachine\My'-Password(ConvertTo-SecureString-AsPlainText$password-Force)$importedCertificate.Thumbprint# get the web binding of the site$binding=Get-WebBinding-NameWEBCONBPS-Protocol"https"# set the ssl certificate$binding.AddSslCertificate($importedCertificate.GetCertHashString(),"my")
Updating the certificate
Each certificate will expire after 90 days. Since no one want’s to update the certificate manually, the easiest way would be to add a task to the windows task scheduler to do everything.
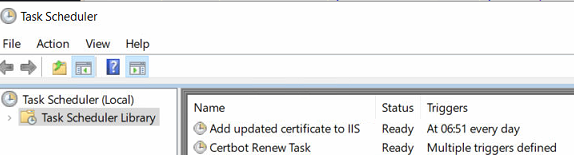
Luckily the installation of certbot already created Certbot Renew Task for us, which checks twice a day, whether certificate files need to be updated.
certbot already created a job to renew the certificate
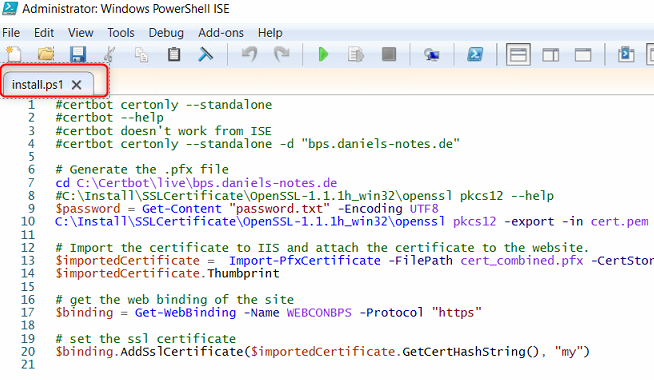
All that’s left is to add a task for the other steps. I’ve put all the code into an install.ps1 file.
The script code to create and use the certificate.
#certbot certonly --standalone#certbot --help#certbot doesn't work from ISE#certbot certonly --standalone -d "bps.daniels-notes.de"# Generate the .pfx filecdC:\Certbot\live\bps.daniels-notes.de#C:\Install\SSLCertificate\OpenSSL-1.1.1h_win32\openssl pkcs12 --help$password=Get-Content"password.txt"-EncodingUTF8C:\Install\SSLCertificate\OpenSSL-1.1.1h_win32\opensslpkcs12-export-incert.pem-inkeyprivkey.pem-outcert_combined.pfx-passwordpass:$password# Import the certificate to IIS and attach the certificate to the website.$importedCertificate=Import-PfxCertificate-FilePathcert_combined.pfx-CertStoreLocation'Cert:\LocalMachine\My'-Password(ConvertTo-SecureString-AsPlainText$password-Force)$importedCertificate.Thumbprint# get the web binding of the site$binding=Get-WebBinding-NameWEBCONBPS-Protocol"https"# set the ssl certificate$binding.AddSslCertificate($importedCertificate.GetCertHashString(),"my")
Afterwards I’ve added a task:
Choose a name and schedule to your liking
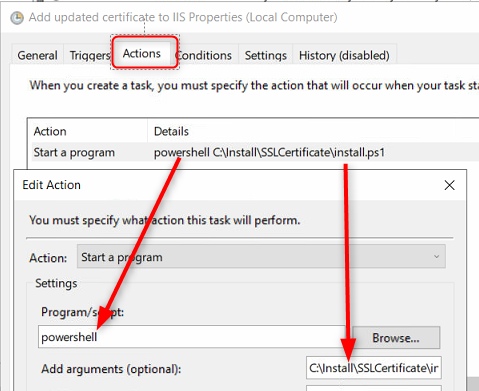
Add an action to run a program and execute PowerShell to execute the script file
Run the script from an action.
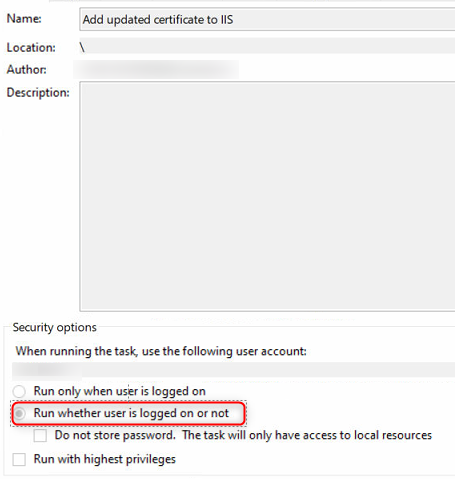
Ensure that you ticked Run whether user is logged on or not. It may be necessary to also tick Run with highest privileges but this is something you need to check on your system.
The task should be executed regardless whether the user is logged in or not.
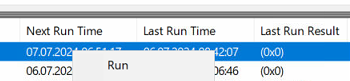
Run the script from the context menu to verify, that it works. The Last Run Result should be 0x0.
Test the script by starting it manually.
]]>Daniel KrügerChecklist for copying artifacts to another config database2024-06-10T00:00:00+00:002024-06-10T00:00:00+00:00https://daniels-notes.de/posts/2024/checklist-for-copying-artifacts-to-another-config-databaseOverview
This post will describe my approach to define which information of the configuration database and needs to be transferred to a new environment. Use cases I’ve encountered where I needed this:
Starting with WEBCON BPS Express and moving to the full version which allowed to install a test environment.
Migrating from WEBCON APPS to an own server.
Recreate a server.
Use configuration database as a checklist
I’ve built up my checklist by:
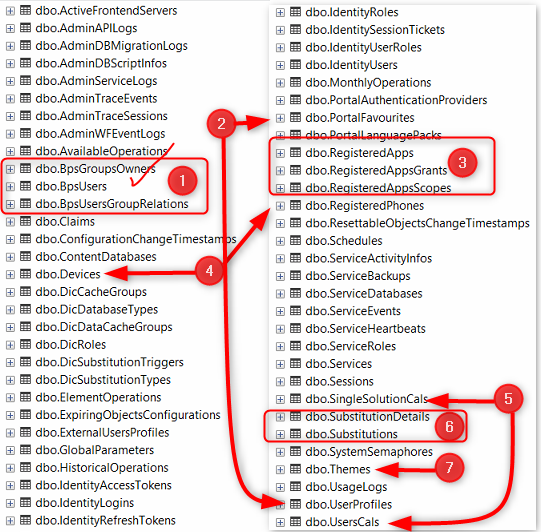
Create a screenshot of the tables
Group the related tables
Mark of the completed elements in the screenshot itself
In the end the checklist consisted of:
BPS Groups: Need to be transferred.
User profile and favorites: Can be ignored.
Registered API applications: Need to be transferred.
Devices: Can be ignored
Licenses assignments: Need to be transferred since subscription licensing is used.
Substitutions: Can be ignored
Themes: Need to be transferred
Creating a checklist from the tables in the configuration database.
I have no idea in which regard the Identity* tables are used.
Info: There’s a database documentation which contains sometimes helpful information: Database documentation.
Options to transfer artifacts
There are basically three options to transfer an artifact.
Manual via the BPS Portal or Designer Studio interface.
Using the REST API.
Using SQL statements to directly write to the database.
The first option is only an option if
there are either only a few elements to create and it’s unlikely to make errors during this
or there’s some encrypted information which cannot be decrypted by the target environment.
If you use this, you could still compare the table in the source and target environment, whether there are any obvious differences.
Besides the manual creation, the REST API is the only supported one, but not everything can be transferred using it.
Therefore I have to admit, that I also used the SQL option. Sometimes it is just easier or the only viable option and I determined that the risks could be neglected, but this was my decision and yours may be different.
Transfer BPS Groups
REST API
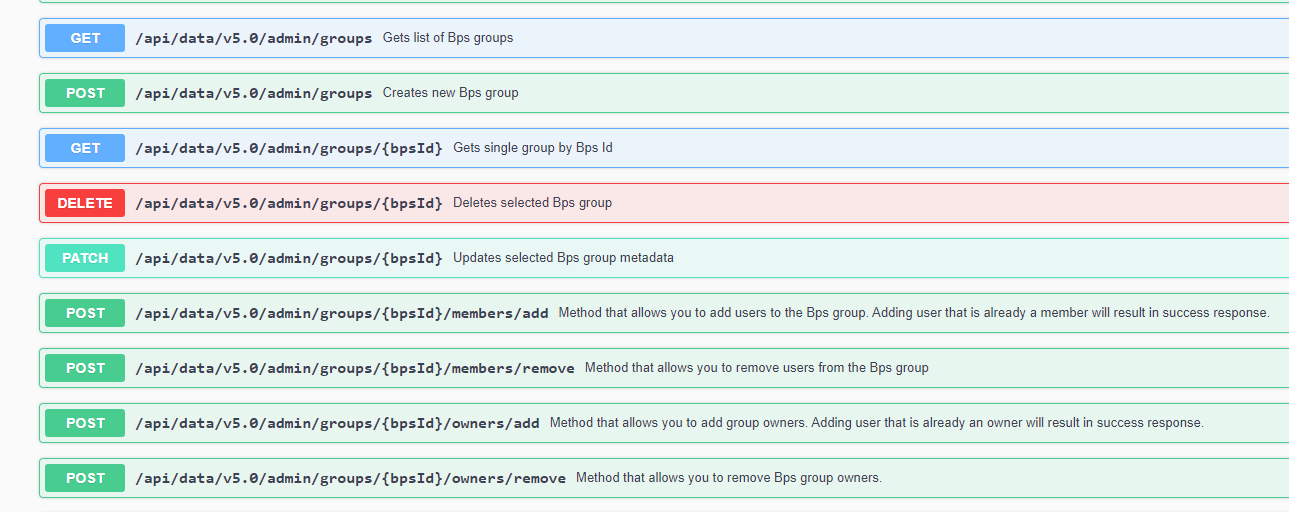
These are the available REST API methods related to managing BPS groups, owners and members.
BPS Group REST API
I don’t have a solution I can share in regard to the REST API, but this is an example of a call from PowerShell.
Info: The bpsId with the S-1-5-21-0... is the security identifier of an active directory group.
SQL statements
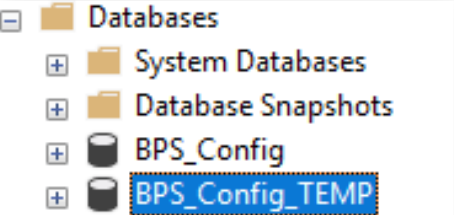
This one requires that there’s a copy of the configuration database from where the data should be copied. In my case the source database is called BPS_Config_Temp and the target database BPS_Config.
BPS_Config_Temp is a copy of the source environment.
Luckily, the table for the BSP users and relationships use the bps ids of the groups and users directly, so we can simply copy them.
The first statement only copies the BPS groups. If you have other BPS users you want to copy you need to change the where condition.
Remark: I did not test the statement for the BPSGroupOwners.
After executing the statement you should trigger a full user synchronization from the Designer Studio.
Transfer user profile and favorites
In my case it was not necessary to transfer these. If you are going to recreate a production environment this may be different.
If you need to do it SQL statements seem to be the only available option in case of large numbers of elements.
Transfer registered API applications
I recreated the existing ones manually. I have no idea, whether the secret could be transferred. But I used the tables to check, whether I setup the scopes/grants correctly.
Transfer devices
In my case it was not necessary to transfer these. If you are going to recreate a production environment this may be different.
I have no idea whether SQL statements would work.
Transfer licenses assignments
Per application vs per user license
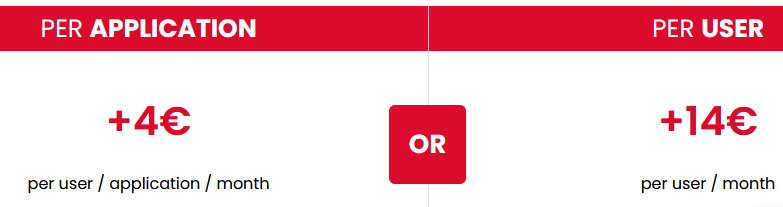
If you have the old perpetual license, you can ignore these table. If you are using the subscription model you may have a challenge ahead, at least if you use per application licensing.
License per app or per user.
While the license are called per application and per user here, you will find additional information in the documentation when you search for the following:
Unlimited-Solutions Access License (User license)
The user may access all processes and applications built in WEBCON BPS without any limitations on the number of processes or applications.
Single-Solution Access License (Application license)
Each of these licenses assigned to a user enables them to use exactly one process built in WEBCON BPS. This process must be designated by the administrator in the settings and may contain a maximum of two workflows.
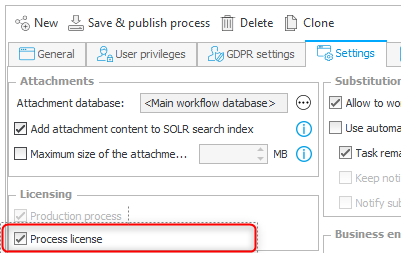
A process can be enabled to be used for a Single-Solution Access License by activating the Process license option.
Application license = Single-Soluation AUcess License = Process license
The mentioned challenge is that the application licenses are assigned to a process in a content database by using their integer id. If your content database ids differ for some reason or the process ids don’t align in the source and target database you may need a mapping between those. If you copy the content database, you can skip at least the mapping of the process ids.
REST API
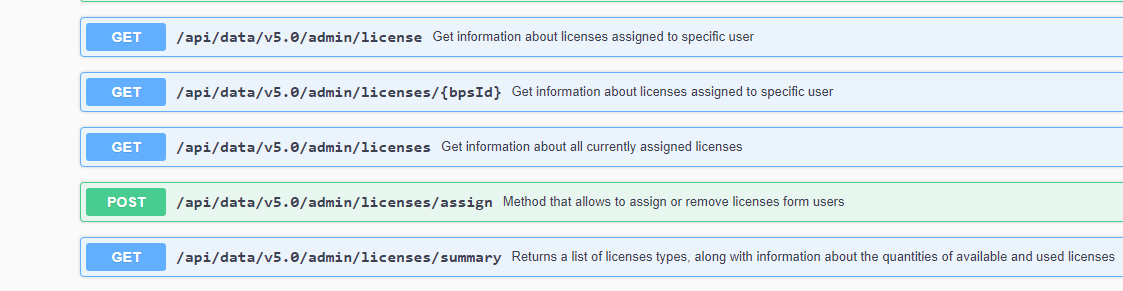
We have REST API endpoint to read the licenses from the source environment and write them to the target environment.
I haven’t used it so I can’t provide any information for this.
License REST API.
SQL
I’m assuming that you have read the SQL statements part of Transfer bps groups and have a copy of the source configuration database.
If you are not using application license this little statement is all you need. It will insert all the licenses except for
local user accounts
registered applications
Depending on your case you may want to change the statement.
/* delete from [BPS_Config].[dbo].[UsersCals]*/INSERTINTO[BPS_Config].[dbo].[UsersCals]([UCL_BpsID],[UCL_LicenseType],[UCL_Guid],[UCL_AllowDesignerDeskProjectCreation],[UCL_AllowDesignerDeskProjectPublishing])SELECT[UCL_BpsID],[UCL_LicenseType],[UCL_Guid],[UCL_AllowDesignerDeskProjectCreation],[UCL_AllowDesignerDeskProjectPublishing]FROM[BPS_Config_TEMP].[dbo].[UsersCals]where-- exclude local accounts[UCL_BpsID]notlike'%\%'-- exclude API applicationsandUCL_BpsIDnotin(selectRAP_AppLoginfrom[BPS_Config_TEMP].dbo.RegisteredApps)
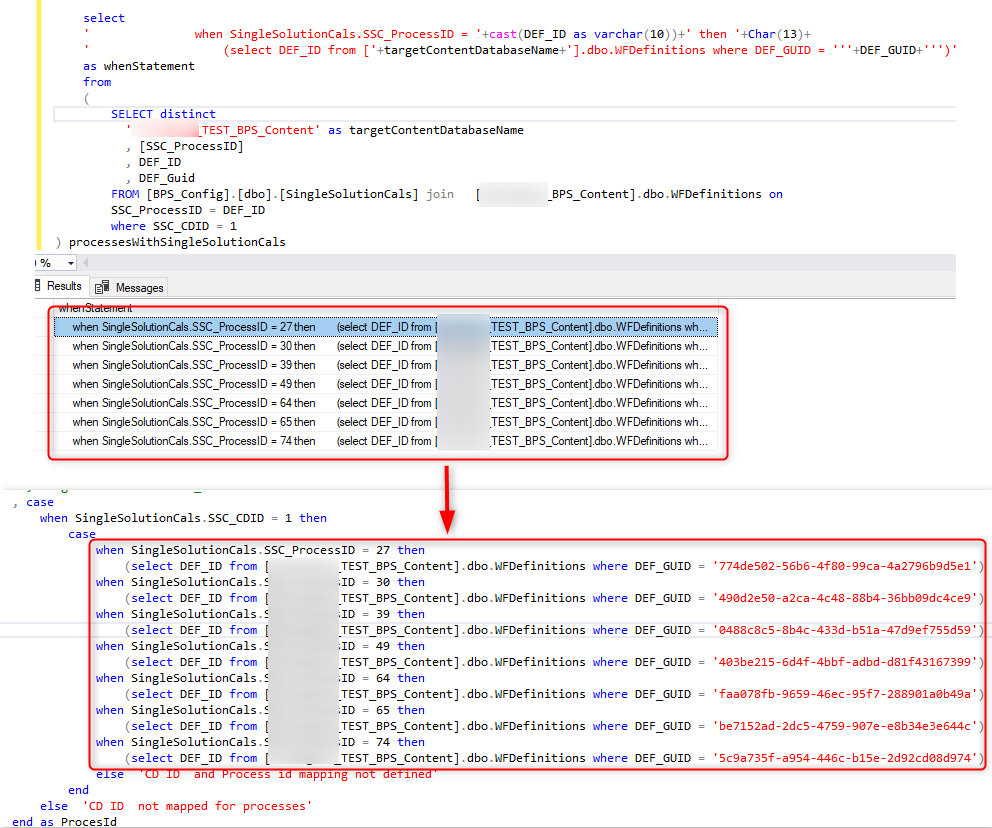
In case you have single-solution licenses you need the afore mentioned mapping for the content database id and process id. The below statement is an example of how to map the values from the source configuration database to those of the target environment.
In my case the content database id 1 of the source environment is the BPS_Content database. This BPS_Content database has the name TEST_BPS_Content on the target environment and has a different id. So, I have a mapping that the CDID = 1 should be mapped to the CD_ID of the ContentDatabase table, where CD_Name is TEST_BPS_Content.
I use a similar approach to map the processes. While we don’t have a fixed name for a process we will make use of the GUID. After all this is the same across all environments.
INSERTINTO[BPS_Config].[dbo].SingleSolutionCals(SSC_UCLID,SSC_CDID,SSC_ProcessId)selecttargetUsers.UCL_ID,casewhenSingleSolutionCals.SSC_CDID=1then(selectCD_IDfromBPS_Config.dbo.ContentDatabaseswhereCD_Name='TEST_BPS_Content')else'CD ID not mapped'endasContentDBId--, SingleSolutionCals.SSC_CDID,casewhenSingleSolutionCals.SSC_CDID=1thencasewhenSingleSolutionCals.SSC_ProcessID=27then(selectDEF_IDfrom[TEST_BPS_Content].dbo.WFDefinitionswhereDEF_GUID='774de502-56b6-4f80-99ca-4a2796b9d5e1')whenSingleSolutionCals.SSC_ProcessID=30then(selectDEF_IDfrom[TEST_BPS_Content].dbo.WFDefinitionswhereDEF_GUID='490d2e50-a2ca-4c48-88b4-36bb09dc4ce9')whenSingleSolutionCals.SSC_ProcessID=39then(selectDEF_IDfrom[TEST_BPS_Content].dbo.WFDefinitionswhereDEF_GUID='0488c8c5-8b4c-433d-b51a-47d9ef755d59')whenSingleSolutionCals.SSC_ProcessID=49then(selectDEF_IDfrom[TEST_BPS_Content].dbo.WFDefinitionswhereDEF_GUID='403be215-6d4f-4bbf-adbd-d81f43167399')whenSingleSolutionCals.SSC_ProcessID=64then(selectDEF_IDfrom[TEST_BPS_Content].dbo.WFDefinitionswhereDEF_GUID='faa078fb-9659-46ec-95f7-288901a0b49a')whenSingleSolutionCals.SSC_ProcessID=65then(selectDEF_IDfrom[TEST_BPS_Content].dbo.WFDefinitionswhereDEF_GUID='be7152ad-2dc5-4759-907e-e8b34e3e644c')whenSingleSolutionCals.SSC_ProcessID=74then(selectDEF_IDfrom[TEST_BPS_Content].dbo.WFDefinitionswhereDEF_GUID='5c9a735f-a954-446c-b15e-2d92cd08d974')else'CD ID and Process id mapping not defined'endelse'CD ID not mapped for processes'endasProcesId--, SingleSolutionCals.SSC_ProcessIDfromBPS_Config.dbo.UsersCalstargetUsersjoinBPS_Config_TEMP.dbo.UsersCalssourceUsersontargetUsers.UCL_BpsID=sourceUsers.UCL_BpsIDjoinBPS_Config_TEMP.dbo.SingleSolutionCalsonSingleSolutionCals.SSC_UCLID=sourceUsers.UCL_ID
While I created the mapping for the CDID manually, I was too lazy to do so for the process id mapping. I created those using the below SQL statement on the source environment for the content database.
-- Get when statement for the singlesolutions calsselect' when SingleSolutionCals.SSC_ProcessID = '+cast(DEF_IDasvarchar(10))+' then '+Char(13)+' (select DEF_ID from ['+targetContentDatabaseName+'].dbo.WFDefinitions where DEF_GUID = '''+DEF_GUID+''')'aswhenStatementfrom(SELECTdistinct'TEST_BPS_Content'astargetContentDatabaseName,[SSC_ProcessID],DEF_ID,DEF_GuidFROM[BPS_Config].[dbo].[SingleSolutionCals]join[BPS_Content].dbo.WFDefinitionsonSSC_ProcessID=DEF_IDwhereSSC_CDID=1)processesWithSingleSolutionCals
Generating the process mapping for one database.
Transfer substitutions
In my case I decided against transferring substitutions. I reinstalled a test environment and copied to the settings from a production environment. So, I don’t need the substitutions.
While this was the decision I made for my case, it may be different the next time.
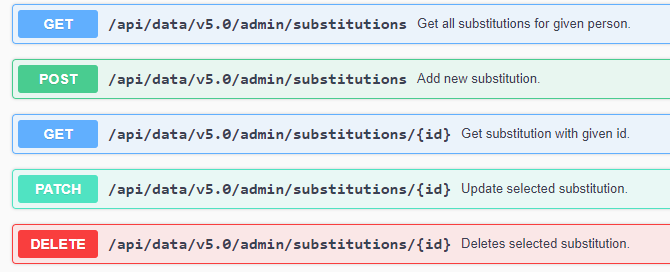
The official way to transfer the substitutions would be to use the REST API.
Substitution REST API
Transfer themes
There are only a few themes at most which need to be transferred, using the BPS Portal interface is sufficient for this.
This is the documentation on how to create themes and at the end of the post the export/import options are described: Color themes
Global parameters
While I would never copy the information of the global parameters, I compare the data in the source and target environment to verify everything was setup.
]]>Daniel KrügerChange service account2024-06-09T00:00:00+00:002024-06-09T00:00:00+00:00https://daniels-notes.de/posts/2024/change-workflow-service-accountOverview
Even so changing the account is actually straight forward, I wasted to much time because I didn’t click on the obvious second Save button.
I’m creating this post in case someone else is doing the same and encounters this error message after ‘changing’ the account.
Error: License Service connection error. Please configure license service connection (endpoint not found).
Changing the account
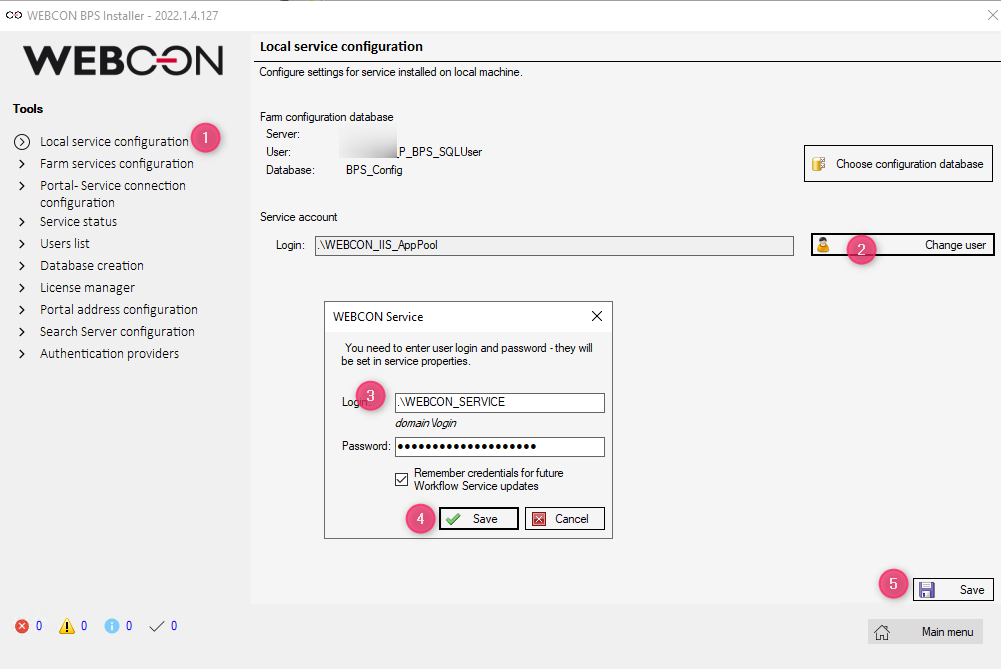
Here are the necessary steps, after starting setup.exe and going to Tool and application management:
Select Local service configuration
Select Change user
Provide the user name and password
In my case we are using a local user.
Save the user
This takes a while and it at least updates the global parameter ServiceLogOnAccount in the configuration database. It does not update the account of the windows service.
Save the changes
This was the the step I forgot. This will update the account of the windows service and something else.
Changing the service account user.
What does not work
It is not sufficient to change the windows service account, even after updating the parameter ServiceLogOnAccount.
I don’t know it, but my best guess is, that the ServiceConfig.xml contains some related information and get’s updated in step 5.
]]>Daniel KrügerHandling translations in WEBCON BPS2024-05-26T00:00:00+00:002024-05-26T00:00:00+00:00https://daniels-notes.de/posts/2024/translationsOverview
WEBCON BPS offers numerous options to provide translations. While there are already a lot of sources, there’s not one which provides a complete overview. This post is intended to provide an overview of all the options, either with links to the sources and/or explanations/tips.
The topics are:
If you are new to the whole translation topic, I can recommend this video.
Info: In case I missed something, feel free to add it as a comment or get in touch with me, so that this overview can be updated.
Remark: Please take a look at the referenced user voices.
User interface
Available languages
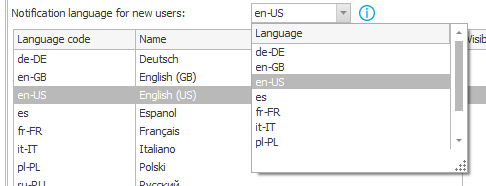
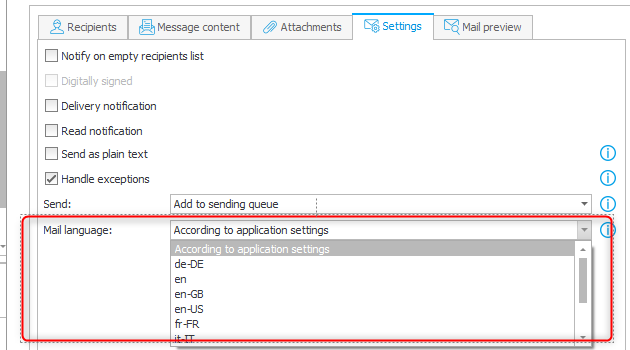
There are two different sources which need to be configured depending on the type of translation you want to provide.
Interface language packs
Defines the translations for the default elements which also sets the date format.
Translation languages
The language for which a translation of a configuration element can be defined.
Additional resource:
SYSTEM LANGUAGES
Applies to version 2019.1; author: Jarosława Markopolska
This article is an extension of Translation of WEBCON BPS Portal user interface content and contains more information about language configuration in WEBCON BPS Designer Studio:
System language setting
Mass notification language setting (added in BPS 2020.1.3)
Application language setting
Notification language setting for new users (added in BPS 2020.1.3)
Interface language
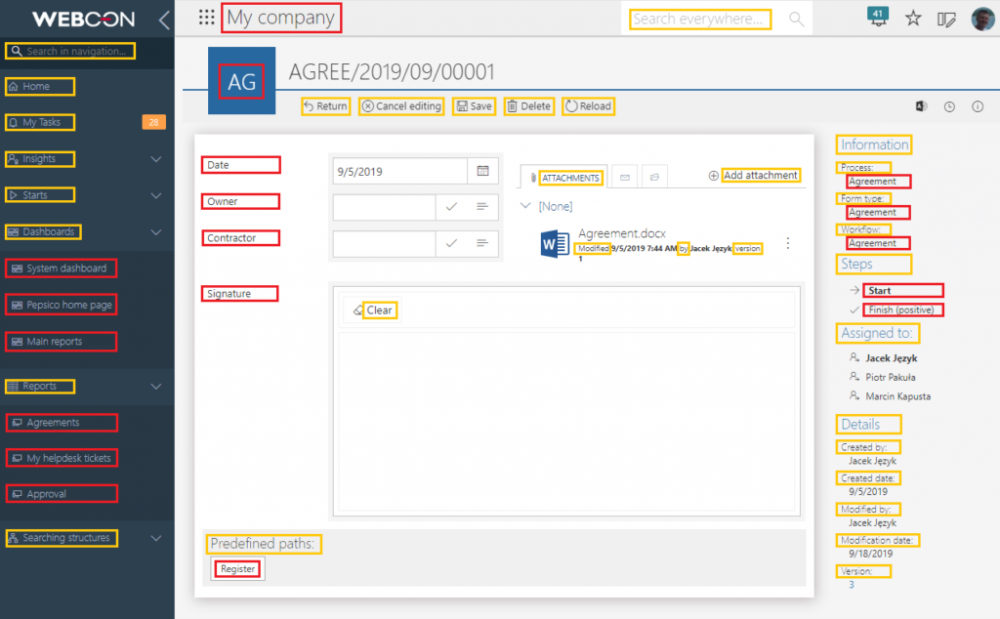
If you want, you can modify the existing user interface translations or create a completely new language pack. The user interface language elements are marked with a yellow rectangular while the configuration elements are red. Configuration elements are those created by the user, for example: Applications, Dashboards, Report, Processes, Fields etc.
Yellow interface elements, red configuration elements
An user friendly option to generate / update translations is the BPS Translator.
BPS Translator key features
All phrases in all languages in the same spot\
Overview of all translations currently in use
Add new translations for individual phrases, and suggest changes to existing ones
Translate to and from any language
Preview translations for a phrase in different languages
Create translations for languages not yet available in WEBCON BPS
UI configuration elements
Single element translation
Designer Studio
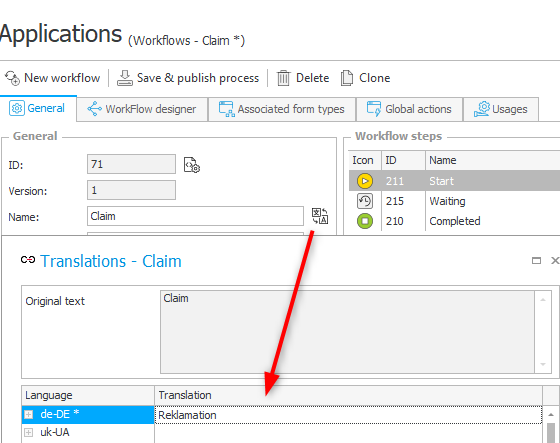
This is the oldest and most prominent option to define a translation for a configuration element. Wherever you see the translation icon, you can bring up the window, to define the translations. These are typically:
Name of an element
Description of an element
Documentation of an element
Translating an element in Designer Studio
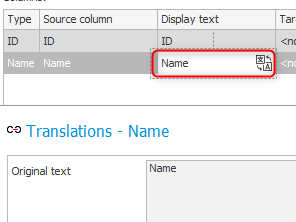
Sometimes you need to click into a cell to display the icon:
Translating a choose column.
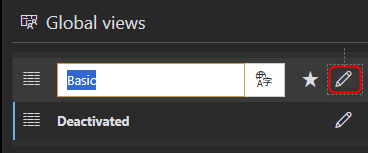
Of course, you can translate columns, and views in reports too. You just need to activate the edit mode.
Translating report elements.
Remark: You should only use translations for columns in reports, when this is necessary. If you defined those for a field, they will get used by default. But not in choose fields. If you are annoyed by these please take a loot at the user voices.
BPS Portal
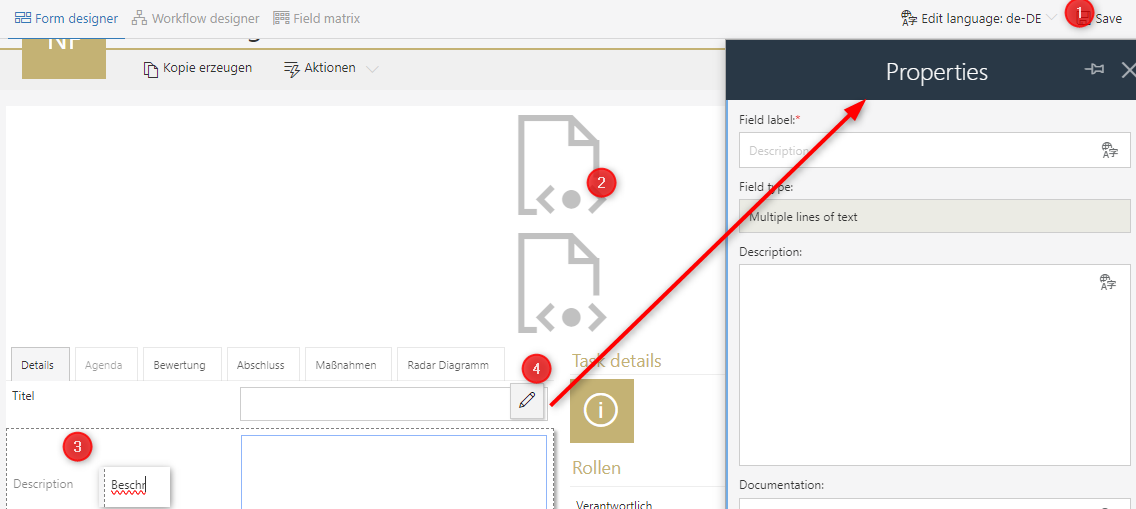
WEBCON BPS 2023 added an additional collaboration option with the business users. They can view the form, field matrix and workflow as well as provide translations via BPS Portal. Search for the term Using the application and Edit mode in the linked post, to see how it is done.
a user who has been granted the privilege Designer Desk edit in Portal directly in the process configuration.
In case the user does not have a personal license to access Designer Desk, all designers will open in read-only mode and the user will be prompted accordingly.
Tl;dr;
In edit mode and sufficient privileges, you will see a Processes navigation menu from which you can choose the process. Afterwards the form is displayed and:
You can select the language which should currently be displayed. This makes it easy to see missing translations.
Those can be ignored, as they are HTML fields.
You can click into a text to translate it.
Description/Documentation as well as multi languages can be defined using the properties window.
Business users can translate elements using the portal.
It comes in handy, if you have a convention like putting all system fields in a group with the name usageFields. This way, the users know that these are not relevant for the user interface and only will be visible in admin mode/documentation.
A naming convention helps to tell users which fields are not visible to normal users.
Bulk translation with Excel
If you already have an existing application and need to translate it, you may want to do it in one go. You can export the translations for a single process to an Excel file. This file will contain a whole bunch of worksheets for the different elements. It takes some time to get used to it, but it will help you in the end. It’s not necessarily the best option for the business users though.
Here are a few tips / guide lines:
Close the Designer Studio
If you don’t close it, hit reload all, after an import. Otherwise, you may have old information and will overwrite the new translations with old ones.
Translating application elements
There’s no separate option to export the translations for an application. You always export the translations for a process with all application elements. Dashboards, Reports etc. My advice is to translate the first process, import it and afterwards you can export the translations of all other processes, because:
Last one wins
The last imported file wins. If you import the exported files in the wrong order, because only one contains the application translations, they won’t be translated.
No need to translate report columns
If you provide translations for your fields, you don’t need to translate these. Calculated columns are an exception to this rule.
Spell check with Word
You can copy the translations to Word for a spell check. If you don’t have line breaks in your translations, you can copy them back. Alternatively replace the line breaks with an unused character and revert it later. You can enter a line break in the replace function with ctrl+j
The invisible line break character can be entered with ctrl+j
Multilingual choose values can not be translated
Worksheet navigation
Right clicking on the left/right cursor next to worksheets will open a selection.
Right click the cursors to open the worksheet selection.
Before WEBCON BPS 2023
Before BPS 2023 there was a separate tool, which required a direct connection to the database. I haven’t used it in a long time, but I remember that some elements weren’t supported.
WEBCON BPS translation tool
With the as is license, WEBCON additionally provides an external tool, which exports all translatable phrases from a process to an Excel spreadsheet. This spreadsheet contains additional columns, named after the languages defined in Designer Studio.
Starting with WEBCON BPS 2023
With the release of WEBCON BPS 2023 the translation tool was replaced with an built-in solution. This is available from the Designer Studio as well as BPS Portal.
Export and import of translations in WEBCON BPS
Applies to version: 2023 R1 and above; author: Krystyna Gawryał
Note: Translations can be exported/imported within one environment and one main version of WEBCON BPS.
This video demonstrates the export/import from BPS Portal:
Bulk translation in WEBCON BPS 2023.1.2.44
In version 2023.1.2.44 I noticed an issue. While this was fixed in the meantime, there’s at least one environment out there, which still has the issues. So I’m keeping this as a reference.
The issue is, that importing the translation break the transport.
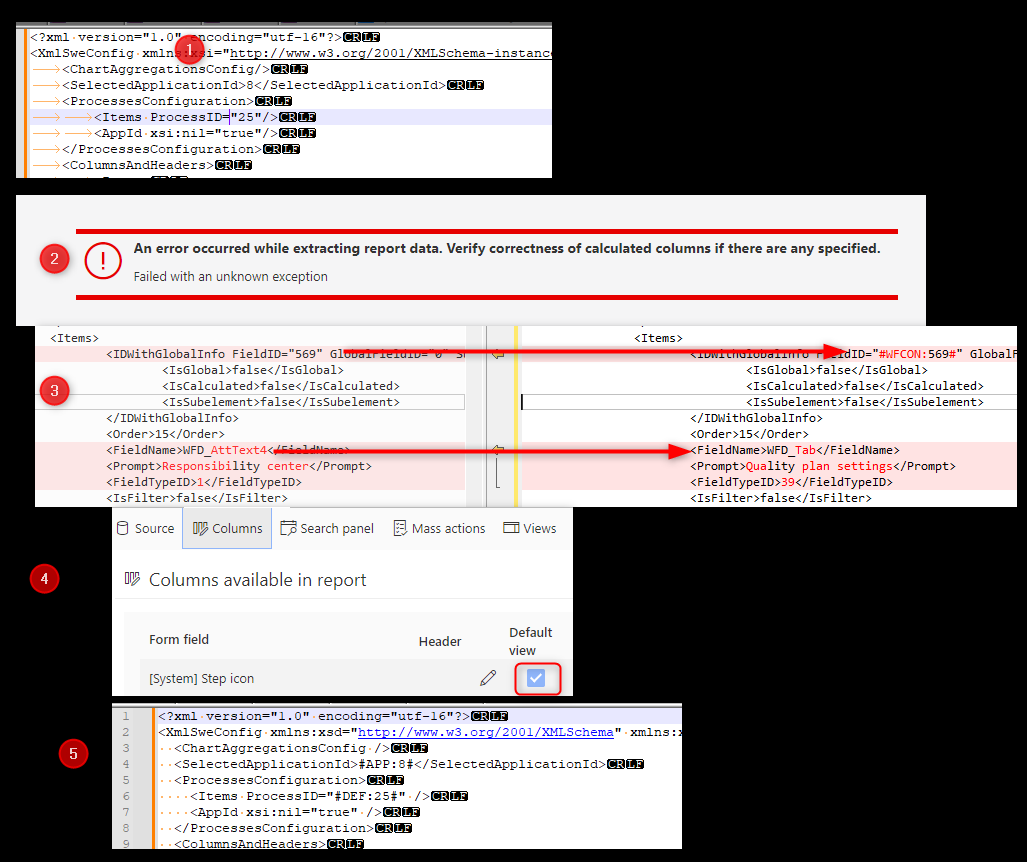
After importing the translation the report configuration will look like this in the database. There’s nothing wrong with it and it works just fine in the current environment.
When you export the application and import it to another environment, you may be in for a surprise.
Comparing the configuration shows some difference. In my case the field 569, was not visible in the first screenshot, was an AttText4 field in the source and a WFD_Tab field in the target environment. This caused the problem.
This can be corrected, by changing anything in the report definition. For example, by clicking the default view checkbox twice.
Afterwards, you can save the report which will restore the variable definitions. Take a close look and compare the ProcessID value in 1. and 2.
Ids are not marked as variables after an import
You can execute this SQL statement to verify if there’s something for you to do. It should not return any rows.
Up to know we focused on the user interface, but WEBCON is not limited to it. You can also provide translation for data stored in choose fields.
Choose field
Syntax
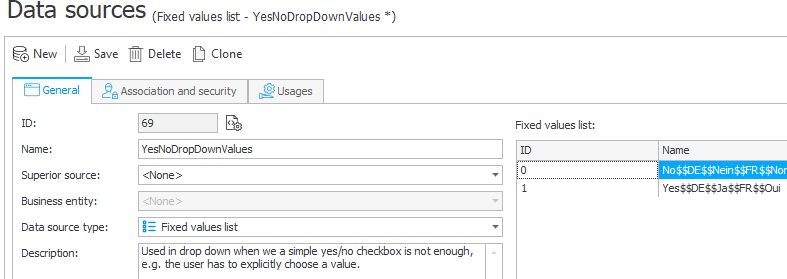
We can define multilingual values for a choose fields.
Multilingual choice fields
Applies to version: 2019.1.x and above; author: Jacek Język
DEFAULT_NAME\(LANG_CODE\)LANG_NAME\(LANG_CODE\) LANG_NAME …
Limitations of the size of the data stored in the base – values of fields and choice columns saved in the database can be 1000 characters long. This limits the phrase length and the number of the translations themselves which together cannot be longer than 1000 characters.
Translation changes in the data source are not taken into account for the saved value until the form was saved with the new translation.
Example of a multilingual choose field value.
Build multilingual string with Excel
In my Little excel helpers for WEBCON BPS, there’s a worksheet for building the string using an Excel worksheet. This is especially helpful, in case you have multiple language want to prevent errors due to missing $ characters. :)
Remark: In the Excel file, there also worksheet to create the html for multilingual icons. I would use a different approach, as the Text function was not available then. At least, when I have the option to use it. We can’t use a business rule for calculated columns in BPS internal views or reports.
Retrieve specific language value in an action
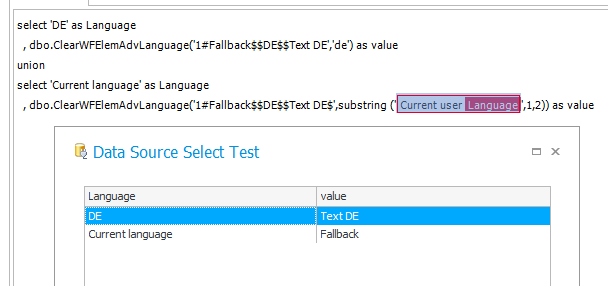
In case you need to retrieve the value of a specific language, you can make use of the dbo.ClearWFElemAdvLanguage function.
Remark: Unfortunately, this approach is not available for other choose fields.
Survey
Starting with 2023 R3 we have the option to translate not only the field name but the questions and values of the survey fields. Due to the nature how they are handled, adding translations will not affect old workflow instance.
I have never used this, so I’m just referencing the documentation:
Step 8: Absence types
The option allows you to select one of the two system data sources of leave types. For the Polish language, it is the DefaultVacationTypesPL source which includes the following leaves: Holiday, On demand, and Personal. For the English language, the source is DefaultVacationTypesEN which includes leaves called Vacation and Personal.
DD/MM/YYYY or MM/DD/YYYY date format
If you are not a native English speaker you probably won’t bother, whether the translations are provided as English (United States) _en-US_ or English (United Kingdom) _en-GB_. What you may care about is the date format:
GB: DD/MM/YYYY
US: MM/DD/YYYY
Depending on your case you should use the English language which fits your date format the best.
Multilingual mails, these are a beast on their own, but WEBCON did a pretty good job here too.
If you are interested in this topic, you should read this post:
While the fundamentals of the post still apply, you may be choosing different approaches today.
Automations haven’t been available and while the execution condition is still available most people would use the if or even switch operator today.
Depending on the complexity of the mail, the Text function could also be an alternative to defining two separate mails.
Enforce one language
Global level
If all your users should only use one language, you can enforce this on a global level. This may come in handy, if you do now want that users can choose from different languages and/or date formats.
Enforce one language.
Application level
If you don’t want to enforce the language for the whole platform but for a few applications, you can set the language on the application level itself. This option is available in the General tab of the application at the bottom.
Define language of an application
Mails aka Notification
We need to distinguish two different situations:
New users who never logged in
Users who already logged in
If a user has logged in, a user profile was created with a language. This language is typically set based on the language preferences of the browser.
You can define the language of notifications / mails for the first group on a global or application level
Define notification language for new users.
While this option is useful for new users, you can also define the language of a custom notification. This may be helpful, if you define the text of the mail in one language but there are elements which would be translated automatically. This way you can prevent a mix of languages.
Setting the language of a notification
SDK
Last but not least, we can define, that a configuration value can be translated. This could be used if we want to display an error message which should be configurable as well as translatable.
After this is setup correctly, we will get a grid in the configuration. We can define the default value as well as adding columns for a language and the respective translations.
Define configurable translatable values
We can simply access the property in C#. WEBCON BPS will return the value for the current language.
]]>Daniel KrügerAsk me Anything: 14th May2024-05-09T00:00:00+00:002024-05-09T00:00:00+00:00https://daniels-notes.de/posts/2024/ask-me-anything-2024-05-14YouTube Live event
I’m again to late to promote the event on my own blog but the second ‘Ask Me Anything: WEBCON BPS’ live event will be on the 14th May.
Target group
You don’t need to be experienced in WEBCON BPS, if you are wondering how and whether you could solve a problem /digitize a process with WEBCON BPS you are welcome too.
If you have a question /comment during the event, you can post it via the chat. If something is interesting for others too, you could use reactions. This will make it easier for me to identify these.
I will try my best to keep track with the chat.
If I don’t receive any questions in advance, I will just start the Ask Me Anything with the main topic of my latest post: Using Playwright to execute tests against WEBCON BPS.
After the event
What will happen with unanswered questions? In case this happens, I will answer have in mind to answer them one way or the other:
Comment
Blog post
A follow up video, which is not live.
Another Ask me Anything episode
At least I assume, that there will be at least a second episode. :)
Type of questions
As the title suggest you can ask me anything, but there are areas in which I have no experience at all:
Barcodes
Large databases
Mail approval
OCR
Performance indicators
WEBCON BPS AI
That doesn’t mean you can’t ask, but there’s a high chance that I either don’t know the answer or I’m not confident of the answer, as I have no practical experience. In other areas my experience ranges from “There’s a chance that my answer is wrong” to “I’m sure the answer is correct.”
If there are questions related to integrating ERP systems, I have only experience with Business Central.
The questions can be either in English or German, I don’t speak any other language.
]]>Daniel KrügerAutomated UI Tests for WEBCON BPS - Part three data generation2024-05-05T00:00:00+00:002024-05-05T00:00:00+00:00https://daniels-notes.de/posts/2024/playwright-part-threeOverview
This is the third post of my series Automated UI Tests.
My goal of this series to make it easy to create tests with Playwright for WEBCON BPS. Since there’s still a lot of work, I will only cover the changes to the last post.
The main focus this time wasn’t Playwright but a little side project. I wanted to get rid of the manual creation of the FormData definition. This defines:
The layout of the form and fields.
Which value a field has / should have.
Whether the value should be set or whether it should only be tested, that it exists.
You may wonder, why would I do this, when there are only a few field types supported at the moment. But this is exactly the reason. I don’t want to modify the FormData every time on my own. :)
This video will show you how it works.
Form data generation
General
The form data defines the available fields on the form, how it’s named, the value of the field etc.
Since we have all the information already available, I wanted to create a solution to generate this Form data. There have been two options:
Create a script which needs access to the database
Use the REST API
I’ve chosen the API approach which I regret a bit. The reason for this is, that I wanted to use PowerShell classes and generate these classes using the swagger.json, which defines all classes for the REST API. This took far longer than expected.
Anyway, it’s now possible to:
Define the database and workflow.
With this information you can generate an Excel file to define the data for the steps.
Generate the Form data for all steps using the Excel file.
Remark: Currently only a limited number of field types are supported. I didn’t add any more field types in this iteration.
Authentication
This approach uses the REST API. If you don’t know what this is, you should read the official documentation.
If you are already familiar with it, these are the steps you need to take:
Create a a new application from the admin panel https://hostname/adminpanel/apiApplications
Create a secret for the application and note it down.
Grant the application permission (scope) App.Metadata.Read.
Application definition
Assign the application to the Metadata access privilege of the applications using Designer Studio
Metadata access privileges for the application
Afterwards you can head over to the Playwright folder. There’s an .auth folder in which you can add a webconconfig.json file and add the following content to it.
Remark: The .gitignore file defines a rule which ignores all files in the .auth folder except the .empty file. So, it is relatively save to use it in GIT repository without leaking the secret.
Generating the input file
The input file is generated by the GenerateInputFile.ps1 in the PowerShell folder.
The most important information is, before executing the script, change the current directory of the PowerShell session to PowerShell. If you are in VS Code you simply execute these lines:
This script utilizes the great PowerShell module ImportExcel which doesn’t use Microsoft Excel and therefore it’s really fast and flexible.
If you run the script the first time the module will (should) be installed automatically.
At the moment the file will consist of a single worksheet FieldInformation. There will be one column for each field and one row for each step.
Example of a generated input file.
Info: The values are masked, to focus on the important information, not because the data is secret.
Ok, some field types and steps are ignored. These are defined in the UtilityFunctions.psm1.
After the file is generated, it will be displayed by default and you can define which value a field should have in which step. Please make sure that decimal field is also of type decimal in Excel and not text. Otherwise, this may cause problems.
Remark: Make sure that you save the modified file under a different name, or you may lose your input.
Generating the form data
This script requires a $targetFolder in which the form data files should be placed. Below this folder, the following structure will be generated:
Workflow
Step 1
formdata.ts
Step 2
formdata.ts
Step 3
formdata.ts
The rest of the script is really similar to generating the input file.
Afterwards you need to define the pathId. Since a step can have multiple path, all of these are commented and you need to uncomment one. In case you forget it, you will get reminded of it, because the execution of the tests won’t be possible because the pathId is a required property.
The whole PowerShell script was written with VS Code and PS 7.x. This script won’t be executable from the old PowerShell ISE. It’ would be the best to us VS Code for it, also you also could install PS 7.x on you system and start a PS session using this version.
Folder structure
Placing the PowerShell files in a subfolder instead of the root directory caused a lot of problems. But I didn’t want to create a new repository for this.
If you just want to use the provided scripts, you can ignore:
Folder Classes
Folder Swagger
File MergedClasses.psm1
Folder structure
Regardless of what you want to do, whenever you create a new PowerShell session, change the current directory to PowerShell before you do anything else. This can done by executing these lines from one of the Generate* files:
I should have read about PowerShell classes before starting with them, they made this a lot more troublesome.
For those of you who are interested I can recommend this blog post:
https://blog.danskingdom.com/How-and-where-to-properly-define-classes-and-enums-in-your-PowerShell-modules/
Most of the trouble was caused by my lack of knowledge and these have been the pain points:
I didn’t place may PowerShell files in the root folder.
The using statement is relative to the current folder. I need to change the folder before the using statement is processed.
Classes are loaded ones. If you change anything you need to restart the PowerShell session.
Referencing classes from another file adds another level a complexity, which I didn’t solve correctly.
Even so I still hold on to my subfolder I created a script which merges the class definitions into a single file, which is then used by the actual script.
Generating classes from swagger
I went down the rabbit hole to use PowerShell classes, so I also wanted to use classes for the REST API. At the same time, I didn’t want to create these classes myself. Especially if there’s a swagger file available.
You can download the swagger.json here
The classes are generated using the GenerateWebconClasses.ps1 script in the Swagger folder.
The most important lines are these:
# Variable prepartion so it's easier to debug $resolvedDefinitions=[System.Collections.Generic.Dictionary[string,boolean]]::new()$classInherits=[System.Collections.Generic.Dictionary[string,string]]::new()# Actual code for generating the classesNew-WebconPowerShellClass-StartingDefinition"4.0.FormLayout"-Definitions$swagger.components.schemas-output$output-ResolvedDefinitions$resolvedDefinitions-ClassInherits$classInheritsNew-WebconPowerShellClass-StartingDefinition"4.0.Step"-Definitions$swagger.components.schemas-output$output-ResolvedDefinitions$resolvedDefinitions-ClassInherits$classInheritsNew-WebconPowerShellClass-StartingDefinition"3.0.AssociatedFormTypesCollection"-Definitions$swagger.components.schemas-output$output-ResolvedDefinitions$resolvedDefinitions-ClassInherits$classInherits
You can call the function New-WebconPowerShellClass for each top level class in which you are interested. The function will the iterate through all the referenced classes. You can repeat this multiple times before writing the classes to a file.
The classes have two constructors, the simple one will accept the json response of the API for this class. The second one will allow you to pass a script block to handle the JSON response for more sophisticated classes.
The WebconFormLayout constructor is executed using the json response
In addition a script block is passed to the constructor
In the constructor this script block gets executed and the json as well as $this is passed.
$this is a reserved word which is the reason that I used the term $instance. Regardless of the name, I can access the properties of the instance and do something with the JSON.
In this example I initialize the correct configuration class for the field type.
Passing a script block to handle more complex scenarios.
I haven’t tested this in another scenario, but it could work out fine.
Outlook
These is the overview of the outlook I provided in the first post, and the completed ideas. Please understand completed as it seems to work but more testing under different circumstances would be required.
Ensure positive transition was successful
✅ Enrich “Form data” to get the step title for a step id.
Adding documentation to source code
Azure AD authentication
Field Support
Choose dropdown
Choose auto complete
Date time
Yes / No
✅ Integer
Float
Data table
Data row
✅ Switching tabs
✅ Expand collapsed groups
Value verification
✅ Values set by form rules
✅ Values set by form rules set by business rules
Target fields of choose / autocomplete fields
Item list support
Test generated document content
Test mandatory fields
Submit workflow
Verify field is part of error message
Close dialog
Modal dialog support?
Menu button availability
Path availability without execution
✅ Automatic creation of ‘Form data’ model
✅ JSON generation for a step
✅ Representing the form layout
Person has an assigned task
Open an element from a task list.
There’s no order, no roadmap and of course no timeline.