SharePoint Online REST API integration
Overview
Info: My SharePoint days are long gone and there may be other / better ways, but this was working for me in a development environment (January 2025).
This is a documentation of the necessary steps to create an App registration in Microsoft Entra ID which can then be used to access the SharePoint REST API. I’m documenting it because I’ve wasted way more time with this than expected. The reasons for this are:
- Missing knowledge on my side
- Outdated information due to changes
- Incomplete answers
In addition, I’m providing an example how we can get the access token ourselves.
Info: I copied values from WEBCON BPS in which variables are used. I replaced them with {VariableName}. You will need to replace the whole value, including the {} with the actual WEBCON BPS variable.
Info: Update 2025-01-26: I added a post about the new REST custom authentication SDK type: SharePoint Online certificate authentication
Info: Update 2025-09-19: I’ve misinterpreted some information and I need to correct something: While it’s true:
- that the best /easiest, and maybe the only way, for granting permissions to SharePoint is the PNP framework
- and that you can only register apps using certificates You can either add a secret to the created one or use an existing registration to grant it the privileges.
Registering the application
Authentication via certificate
If you are able to authorize your REST request with client id and a certificate, everything will be easy. You can simply use the PNP PowerShell and follow the guide.
Install and prepare PNP PowerShell in VS Code. The latest version does not work in PS ISE. In replaced the variables in the below code with values to make it easier to understand.
Install-Module PnP.PowerShell -Scope CurrentUser
import-module PNP.Powershell
# This will create an application used for the user authentication if 'Interactive' is used.
# It will output the GUID of the application which will be needed later.
# 01234567-89AB-CDEF-0123-456789ABCDEF
Register-PnPEntraIDAppForInteractiveLogin -ApplicationName "PnP PowerShell" -Tenant domain.onmicrosoft.com -Interactive
Create the application
# https://pnp.github.io/powershell/cmdlets/Register-PnPAzureADApp.html
[SecureString]$CertificatePassword = Read-Host -Prompt "Certificate password" -AsSecureString
Connect-PnPOnline -Url "https://domain.sharepoint.com/sites/site1" -Interactive -ClientId "1234567-89AB-CDEF-0123-456789ABCDEF"

$app = Register-PnPAzureADApp -ApplicationName "WEBCON to SharePoint" -Tenant "00000000-1111-2222-3333-444444444444" -CertificatePassword $CertificatePassword -SharePointApplicationPermissions "Sites.Selected" -GraphApplicationPermissions "Sites.Selected" -Interactive
# Get the client id of the new registered app 55555555-6666-7777-8888-999999999999
$app.'AzureAppId/ClientId'

# https://pnp.github.io/powershell/cmdlets/Grant-PnPAzureADAppSitePermission.html
Grant-PnPAzureADAppSitePermission -AppId "55555555-6666-7777-8888-999999999999" -DisplayName "WEBCON to SharePoint" -Site "https://domain.onmicrosoft.com/sites/site" -Permissions Write
Disconnect-PnPOnline
Info: This is not supported by WEBCON BPS 2025 with the standard data source connection options. There’s are new SDK type CustomAuthentication and I’m playing around with it.
Authentication via client secret
At the time of this writing Microsoft disabled this option by default and it will be retired:
Starting April 2, 2026, Azure Access Control service (ACS) usage will be retired for SharePoint in Microsoft 365 and users will no longer be able to create or use Azure ACS principals to access SharePoint. Learn more about the Access Control retirement
That being said, I still needed this approach, and it should be valid for the next 13 months.
The first steps are the ones I expected:
- Create the App registration in Microsoft Entra Id
- Define a secret
- Grant API Permissions and admin consent

- Grant permissions in SharePoint
Openhttps://domain.sharepoint.com/sites/site/_layouts/15/AppInv.aspx, provide the ClientId and thePermission Request XML<AppPermissionRequests AllowAppOnlyPolicy="true"> <AppPermissionRequest Scope="http://sharepoint/content/sitecollection/web" Right="FullControl" /> </AppPermissionRequests>
Afterwards I wanted to test it, and this was the time when I went down into a rabbit hole.
When I used this app for accessing a SharePoint REST API I got the response Token type is not allowed.
If you are looking for an answer you will soon find this answer which tells you to enable the custom app authentication again using PowerShell.
Install-Module -Name Microsoft.Online.SharePoint.PowerShell
$adminUPN="<the full email address of a SharePoint administrator account, example: jdoe@contosotoycompany.onmicrosoft.com>"
$orgName="<name of your Office 365 organization, example: contosotoycompany>"
$userCredential = Get-Credential -UserName $adminUPN -Message "Type the password."
Connect-SPOService -Url https://$orgName-admin.sharepoint.com -Credential $userCredential
set-spotenant -DisableCustomAppAuthentication $false
After installing the module and executing it I got the error Microsoft.Online.SharePoint.TenantAdministration.SyntexFeatureScopeValue can not be found in assebmly....
I won’t go into details what I tried but to make a long story short:
VS Code / PowerShell 7 does not support Microsoft.Online.SharePoint.PowerShell. You need to execute this in the PowerShell ISE. Then it is working as expected.
Getting an access token for REST actions
Info: This is an example how you can get an access token if the combination of OAuth2 App -> API and REST Web Service does not work for you. It won’t help, if you want to use data source but it can be used to execute Invoke REST Web service actions
If you are working with SharePoint Online you will probably use the REST actions in multiple processes. Therefore, I suggest the following:
- Create a global automation with input and output parameters
- Make use of the automation in the processes
Global automation
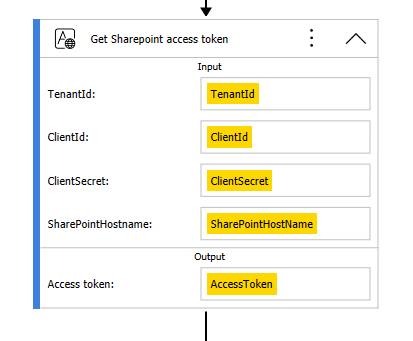
I’ve created this global automation with the following parameters:
- Input
- TenantId (GUID)
- ClientId (GUID)
- ClientSecret
- SharePointHostname (domain.sharepoint.com)
- Output
- Access token
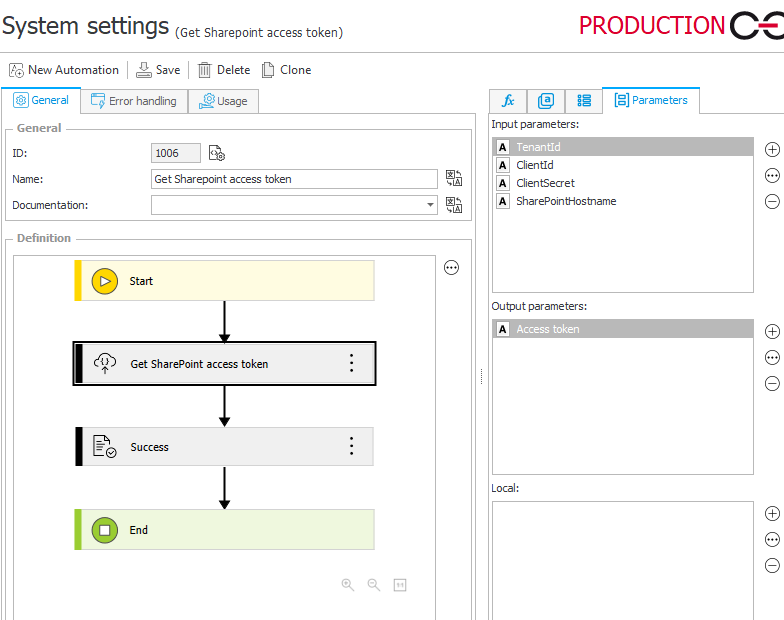
You will need at least the Get SharePoint access token action, which is of type Invoke REST Web service:
- Authentication
The authentication is set to anonymous, after all we want to retrieve an access token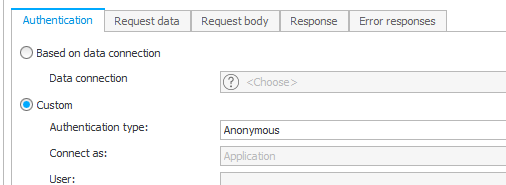
- Request data
Set the URL tohttps://accounts.accesscontrol.windows.net/{TenantId}/tokens/oAuth/2and theHTTP methodtoPOST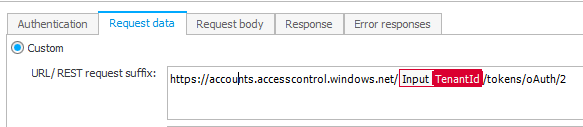
- Request body
Is of typeForm - urlencodedwith the following valuesgrant_type client_credentials client_id {ClientId}@{TenantId} client_secret {ClientSecret} resource 00000003-0000-0ff1-ce00-000000000000/{SharePointHostname}@{TenantId}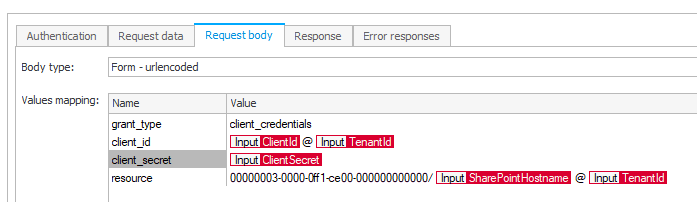
- Response
You can use the below json to populate the response. Afterwards assign theaccess_tokento the output parameter{ "access_token": "", "expires_in": "86399", "expires_on": "1737144421", "not_before": "1737057721", "resource": "00000003-0000-0ff1-ce00-000000000000/xyz.sharepoint.com@00000000-1111-2222-3333-444444444444", "token_type": "Bearer" }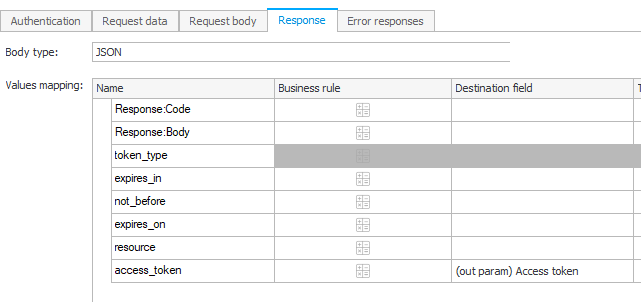
Using the global automation
It’s probably self-explaining how the global automation would be used in a process. In my case:
- I’m retrieving the information from a dictionary
- store them in local parameters
- pass them to the global automation
What may be more interesting is how the access token is used in the Invoke REST Web service action. I will provide an example which uploads a document to a SharePoint document library.
- Authentication
The authentication is set to anonymous!
I’ve grown used to useBase service instance URLfor the complete request URL because of this.
For some reason business rules and parameters are not encoded in this field but in theURL/REST request suffixof theRequest datatab.https://domain.sharepoint.com/sites/site1/_api/web/Lists(guid'{ListGUID}')/RootFolder/Files/Add( overwrite=true,url='{AttachmentNameParameter}')?$expand=ListItemAllFields&$select=ListItemAllFields/ID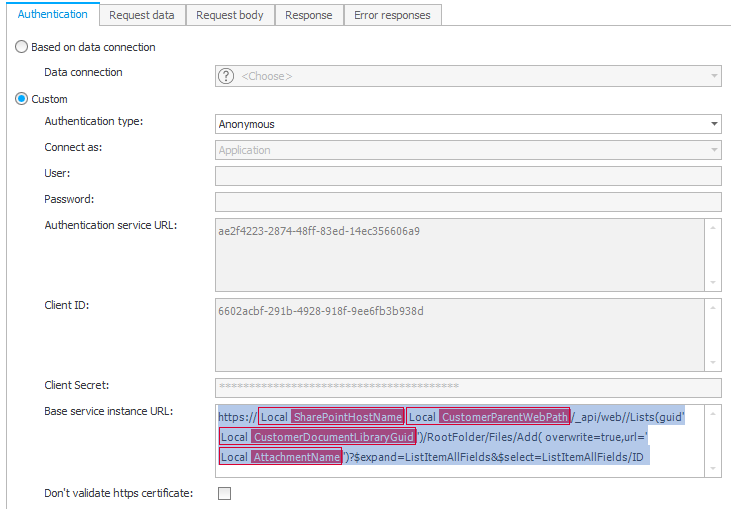
- Request data
Set theHTTP methodtoPOSTand define theseCustom headersAccept application/json;odata=verbose Authorization Bearer {Acccess token} If-Match *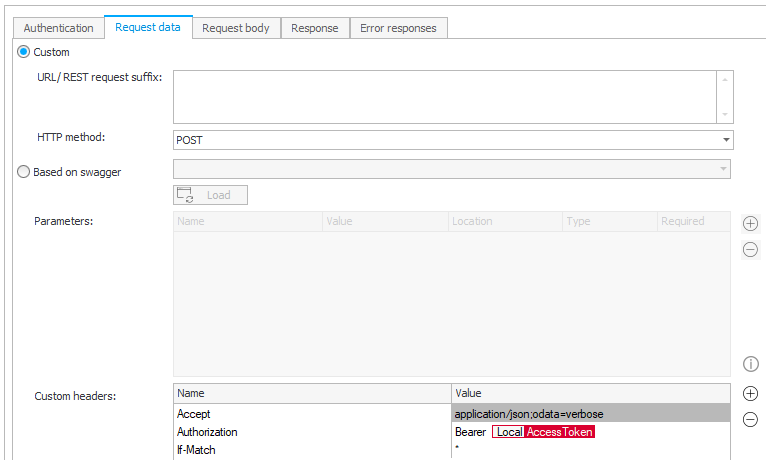
- Request body
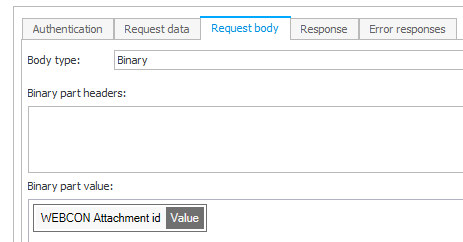
- Response
You can use the below json to populate the response. Afterwards assign theIdto a parameter. You will probably need it to add metadata or delete the file later.{ "d": { "__metadata": { "id": "", "uri": "", "type": "SP.File" }, "ListItemAllFields": { "__metadata": { "id": "1452bbe9-d5f3-4300-97e8-2932345153a2", "uri": "", "etag": "\"1\"", "type": "" }, "Id": 25, "ID": 25 } } }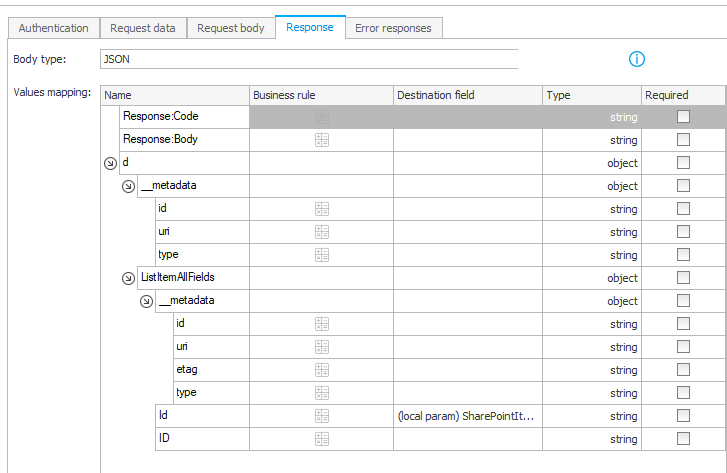
Storing the client secret
If you have read this far, you are probably not able to use the standard OAuth2 App -> API for connecting to SharePoint. Therefore, we have a little problem with the client secret. How and where can we store it? Unfortunately, this something you need to decide on your own.
I have opted for this approach:
- A dictionary to store the configuration values, so that I can define different connections for each business entity.
- encrypting the field with a custom SDK: Password field.
The later could be neglected:
- if you can ensure that only persons can access the dictionary who know the secret anyway
- the database can only be accessed by those people too.
Comments