Creating tags dynamically
Overview
A lot of times you need to classify data using choose fields. Sometimes you have to select these from a provided list and sometimes you would like to enter the values on the fly. In this post I will refer to the first one as a centralized source and to the later one as decentralized. While you could think of them as similar, as you are selecting values from a list, I choose different terms for the following reason.
- The centralized data source has a backing dictionary which is used to store and manage the data.
- The decentralized data source has no backing dictionary. You can simply select a value from already existing ones or add a new one ‘My tag’. Afterwards, you can select ‘My tag’ in other workflow instances. If it has been removed from all workflows, ‘My tag’ will no longer selectable be selectable.
Info: While this post is related to Adding a new choice field value without leaving the page and Modal dialog v3 it’s contains a little improvement for adding values via the modal dialog. The “dynamic” part is completely new.
Decentralized data source
Implementation
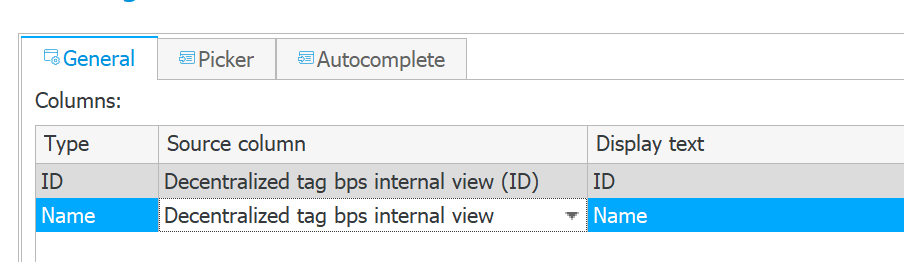
This is quite simple and the ‘magic’ for providing the created values is the data source definition of this field.
It simply returns the id and label of this field from the same form types.
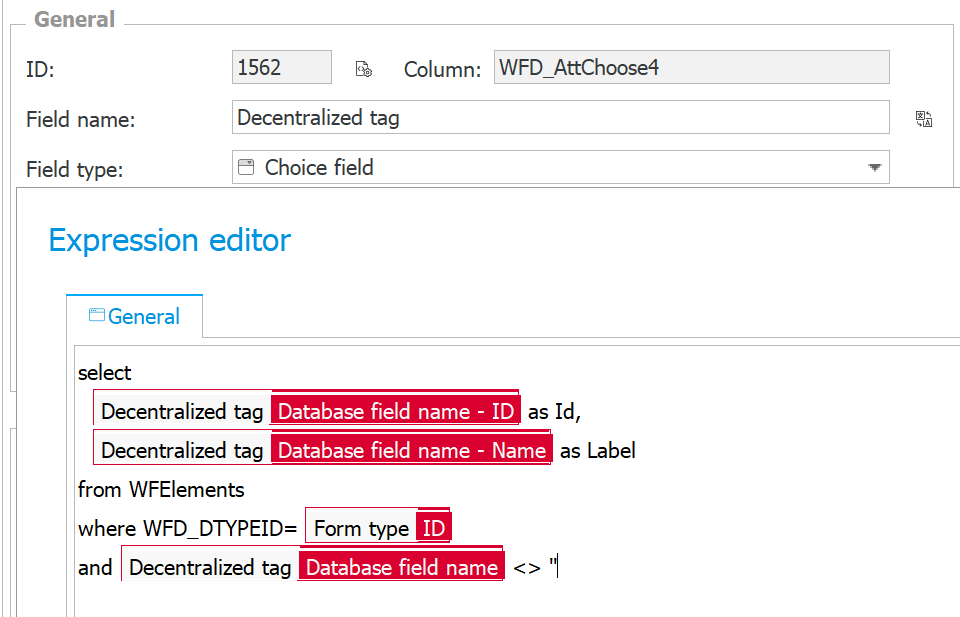
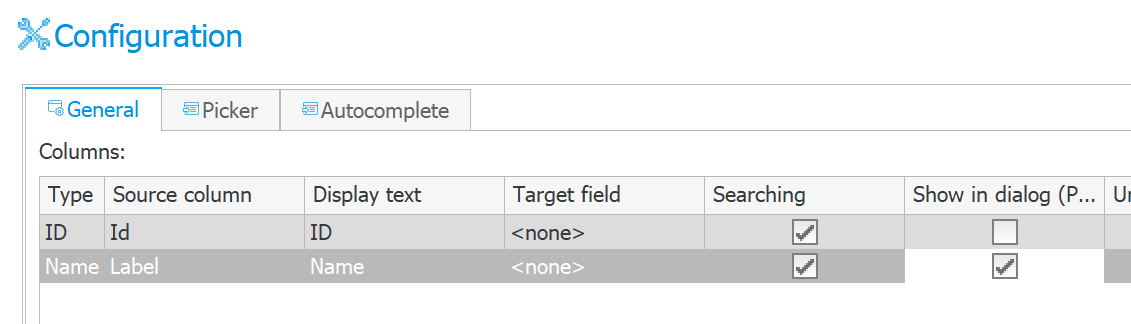
The only thing left is to configure the fields,
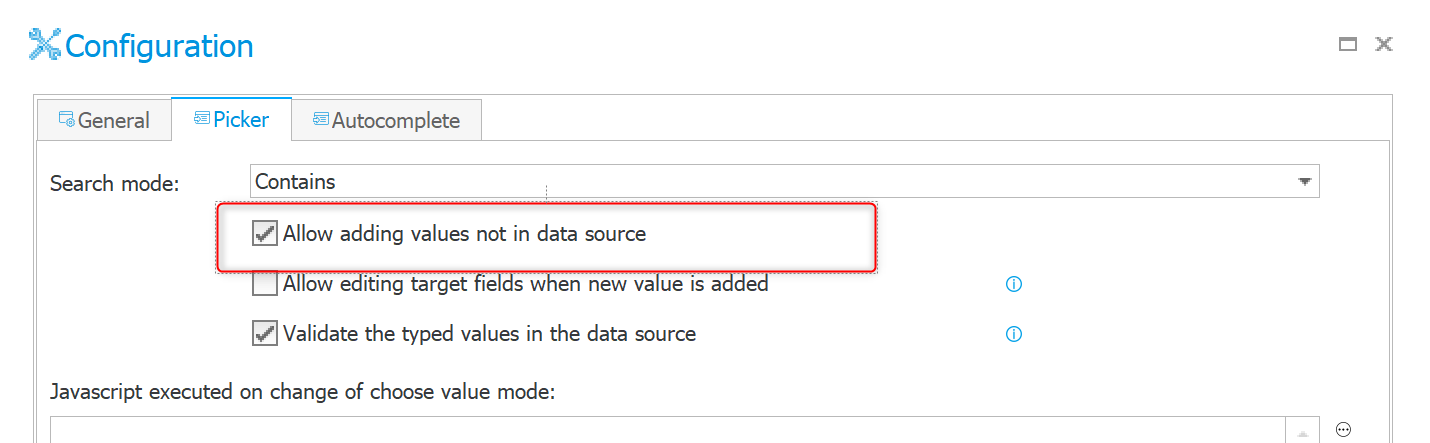
and allow adding values to the data source in the advanced configuration tab.
I’m so used to creating SQL commands that this was my first approach, but it also works with BPS Internal views.
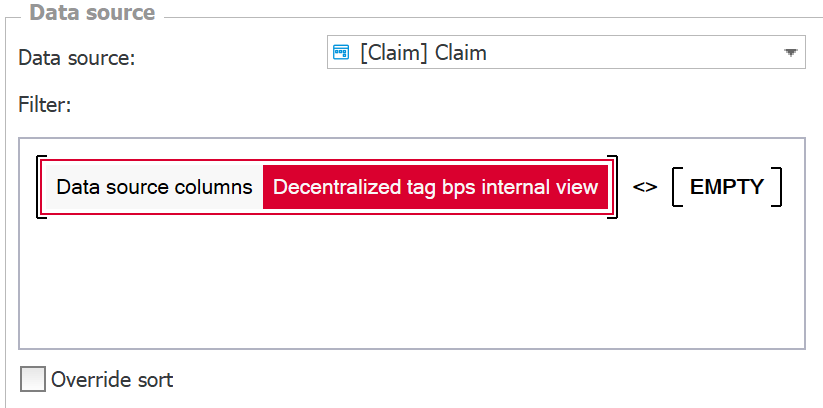
Just make sure to use the ID of the choose field for type ID.
Usage
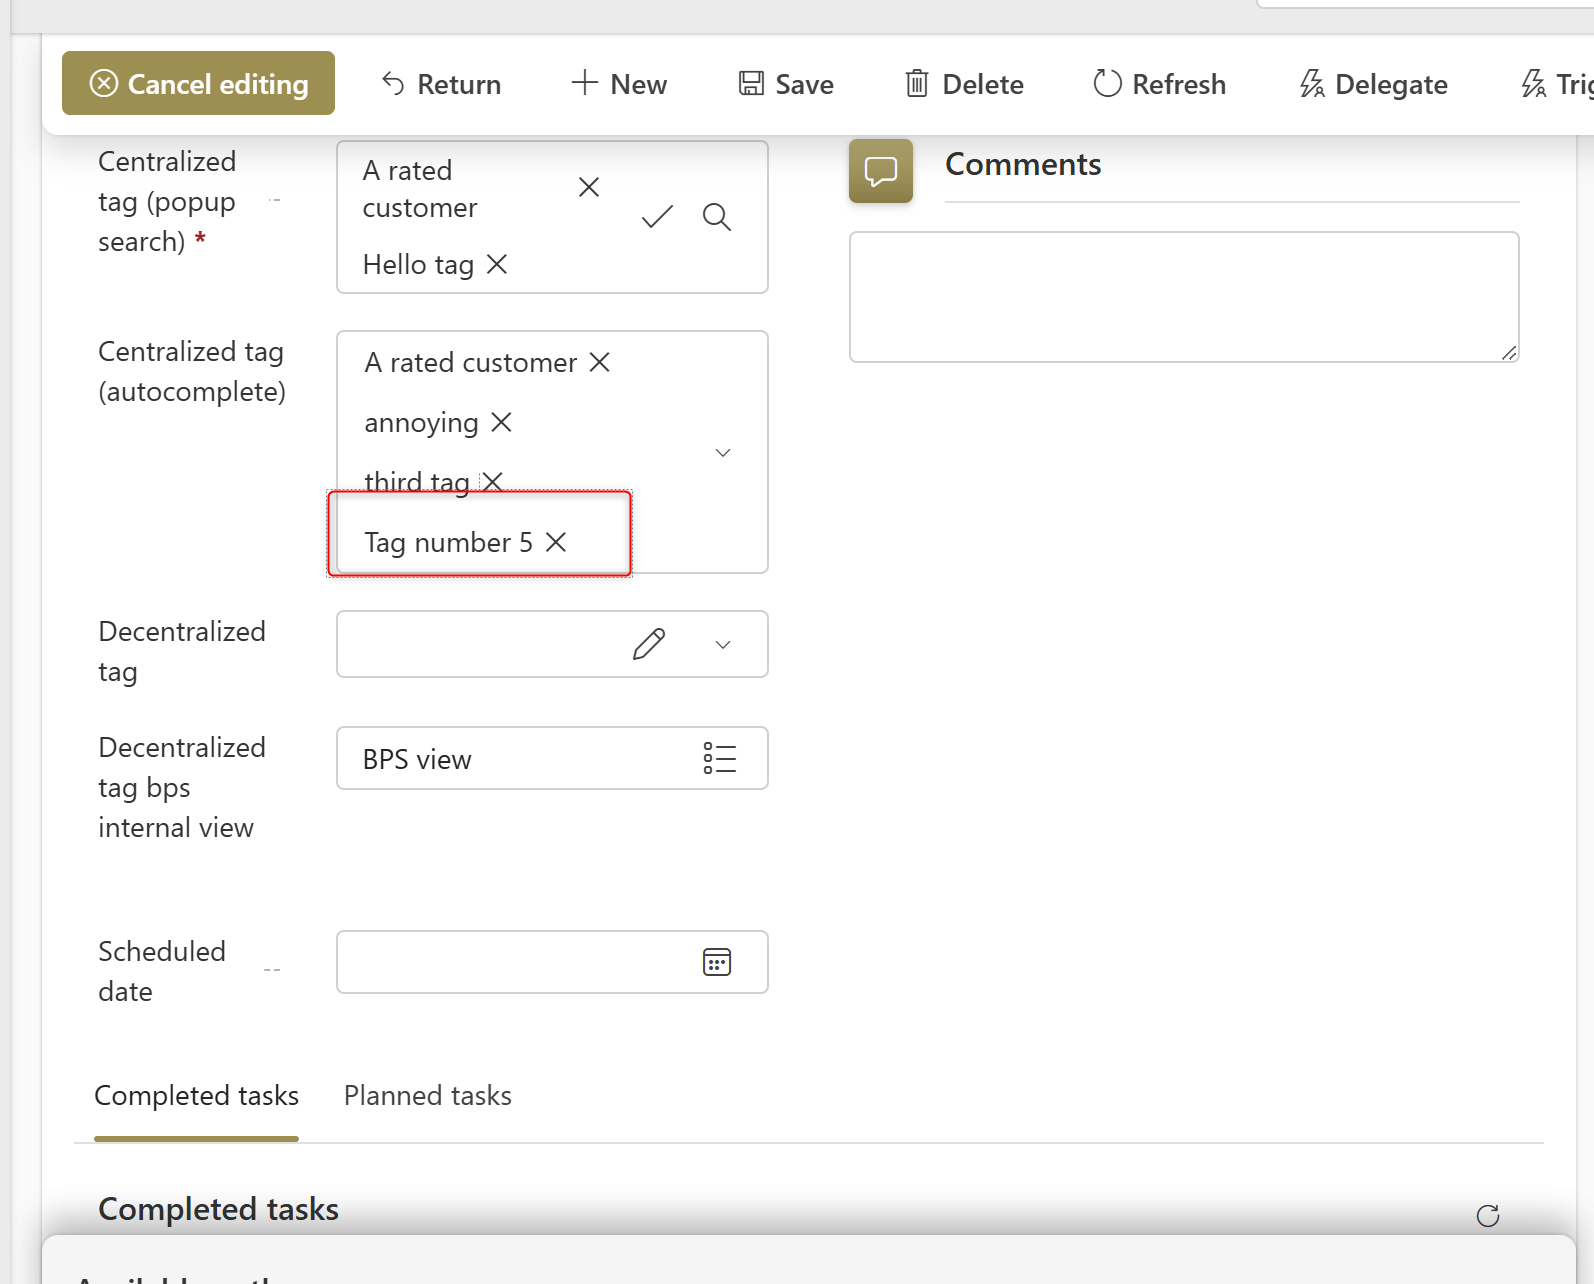
Now your employees will be able to: 1) Select one of the existing tags 2) Create a new one by clicking on the pen to enter the edit mode.
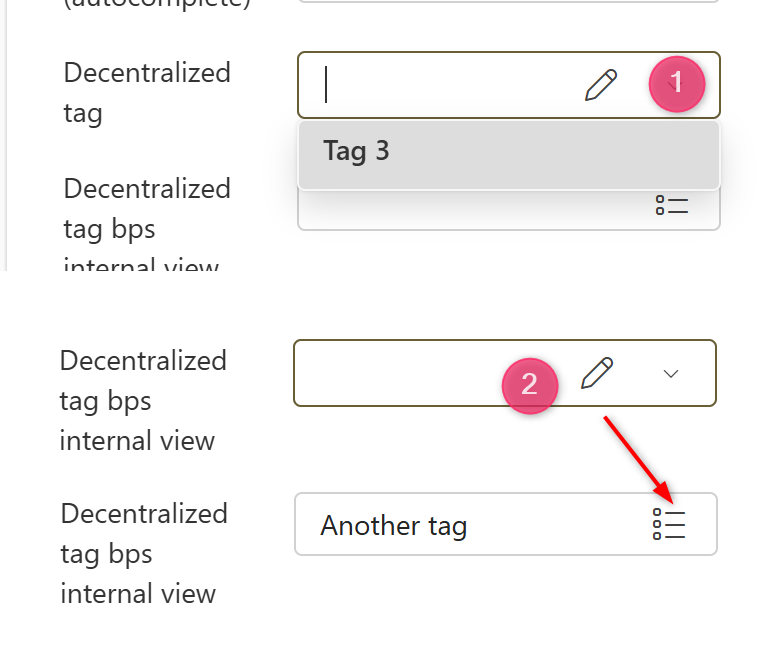
Info: It’s good to know, that adding new values is achieved by creating a new GUID which is prefixed with a dash. This also means that you could effectively create the label multiple times, which have different Ids. While this doesn’t make a difference in the form it surfaces in reports. There you would have multiple entries for the ‘same’ label.

Centralized data source
General approach
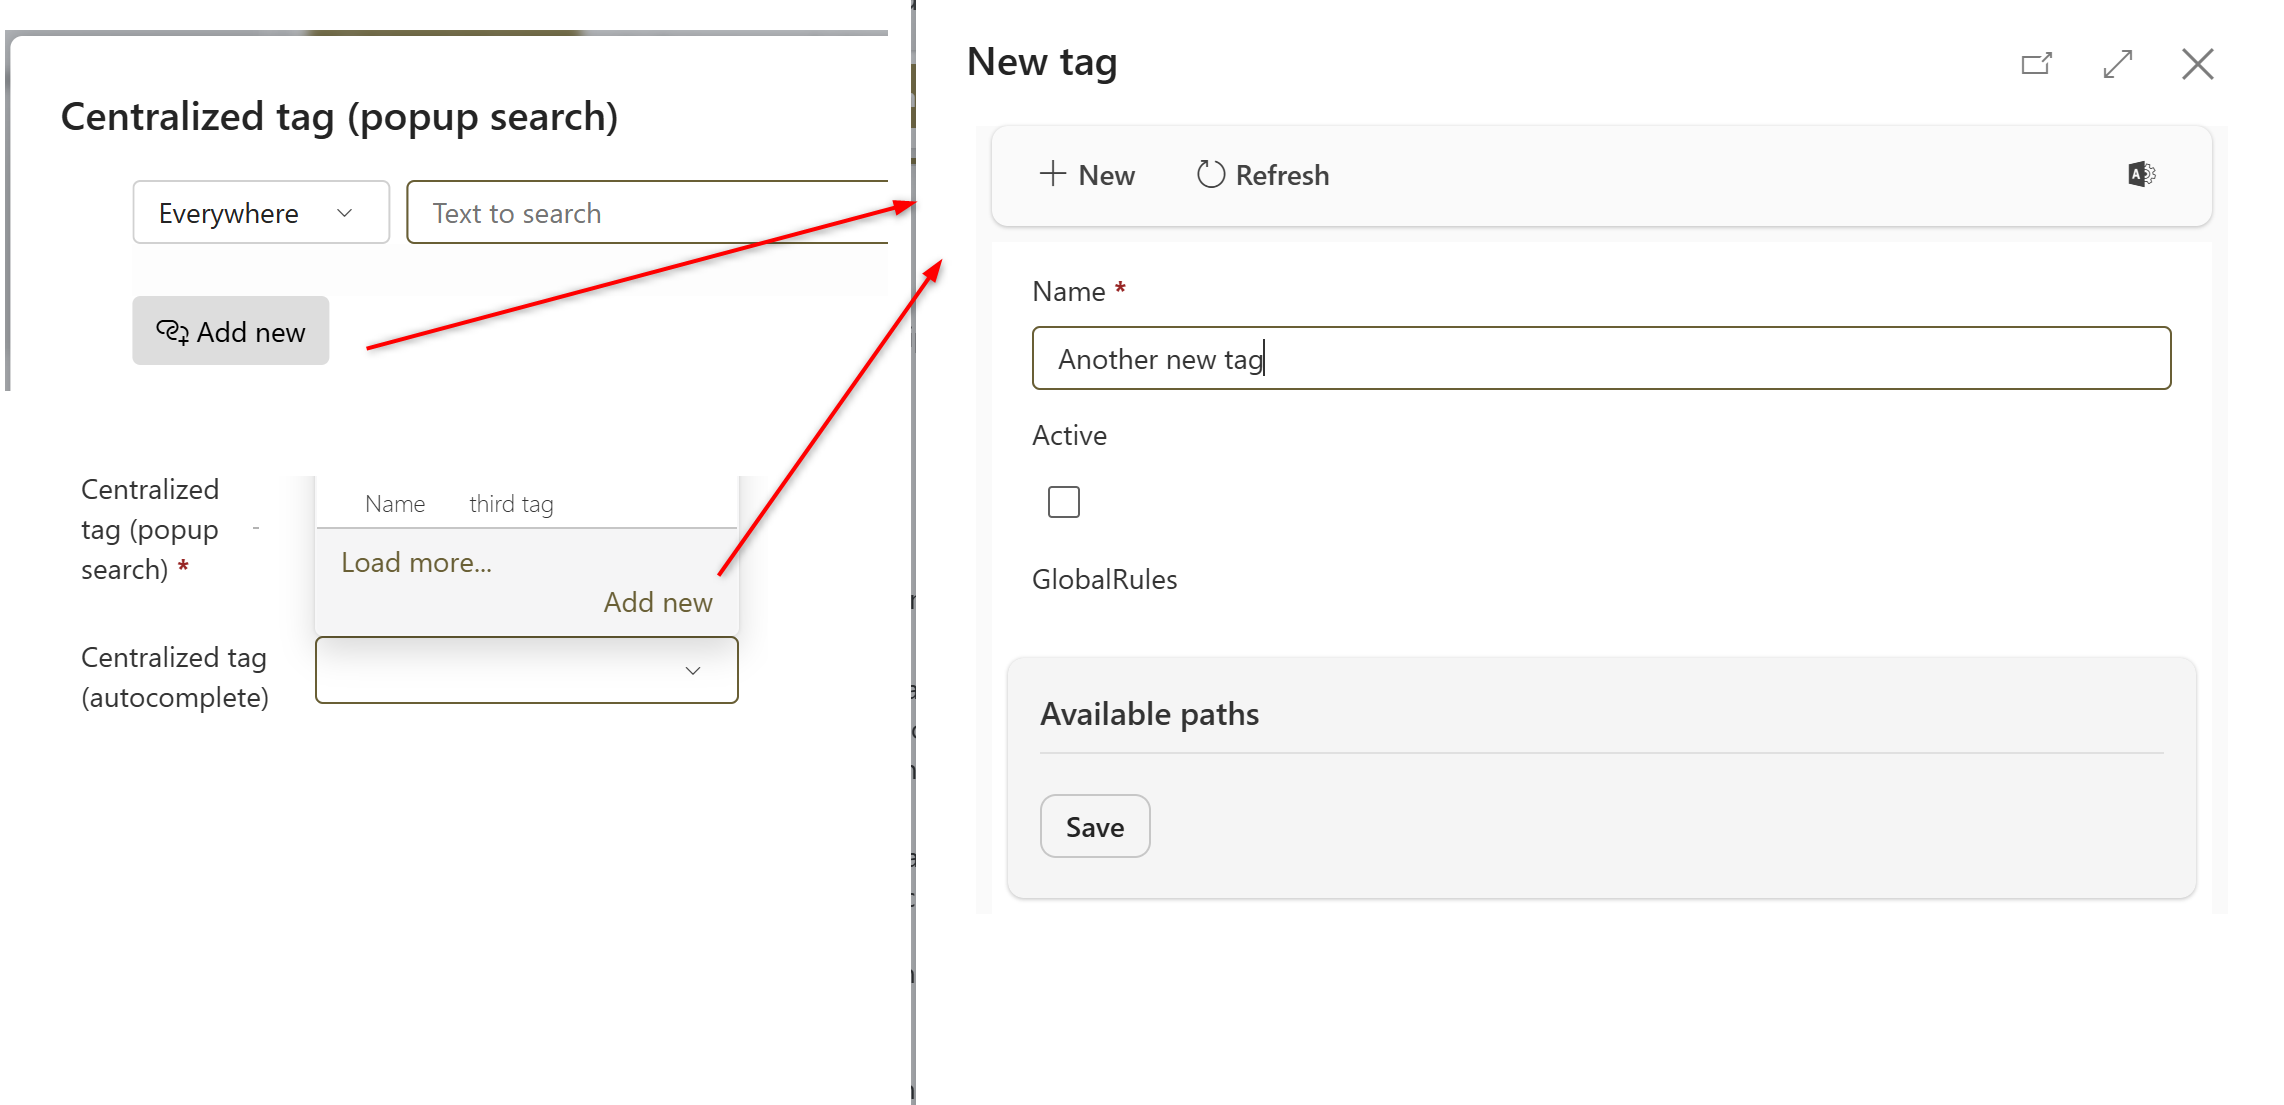
This one is a little bit more complex, as the values of this choose field are stored in a dictionary. The biggest difference to the previous implementation versions from 2022 is, that it overwrites the Add new button of the popup search and autocomplete.
This requires JavaScript and therefore we need to:
- Create global form rules
- Create a HTML field for execution
- Update the configuration of the choose field
Global form rules
The new values will be added via a dialog, if you are not familiar with this, please read up on it here as I won’t go into details how the workflow instance needs to be modified which should be displayed in the dialog. I typically call the workflow which will be displayed in the modal as ‘child’ and the other one ‘parent’.
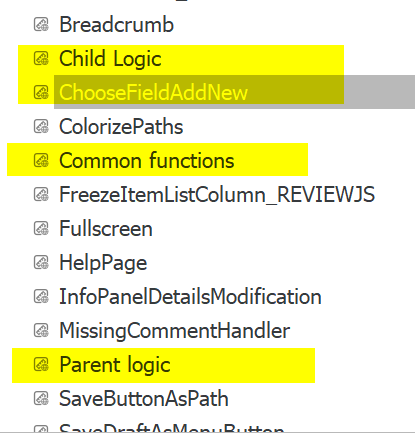
All in all, we need the following global form rules:
- Common functions
This will be used by the parent and child workflow instance. - Parent logic
I had to update the JavaScript to display my modal dialog in front of the popup search. This will be used by the parent workflow instance. - Child logic This will be used in the child workflow instance.
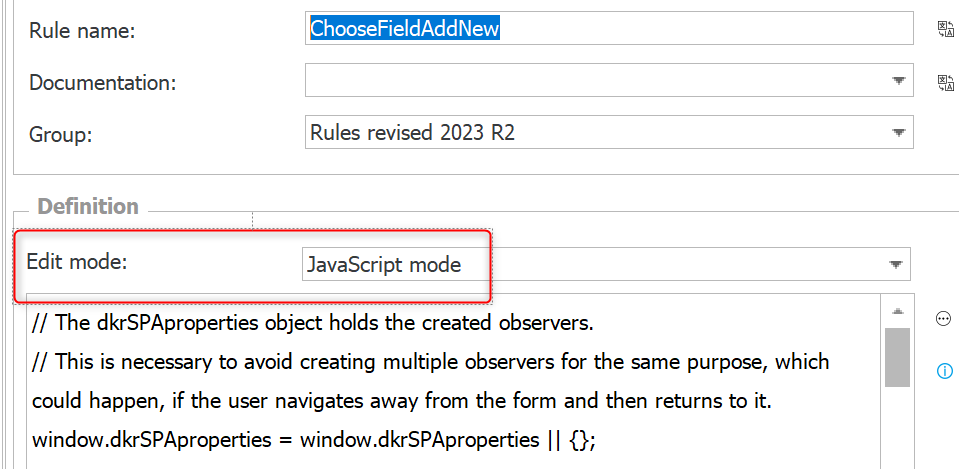
- ChooseFieldAddNew This rule contains the logic to modify the buttons. It was more complicated than I imagined it to be.
If you have never done it before:
- Create a global form rule
- Change mode to JavaScript
- Copy the JavaScript from the linked file to it
HTML Field
As I mentioned, I will only cover the parent workflow configuration in this post. You can refer to this post for the child implementation.
This is a little more complex, as we need to define which workflow should be displayed to save the data. In addition, it’s depends on the select behavior Popup search or Autocomplete of the choose field.
1) In both cases we need to load the form rules
2) This block is used for Popup search
3) This block is user for Autocomplete
This is the script block for the popup search:
openNewTagModalPopupSearch = function () {
    const input = document.querySelector('span.picker-search__input input')
    ccls.modal.dialog.startWorkflow(`"default":"New tag", "de":"Neues Tag"` // Define the title of the modal dialog
        , `"workflowId": #{WF:99}#, "formTypeId": #{DT:106}#` // Define the workflow and form type to be started
        , `"#{FLD:1573}#":"${input?.value}"` // The field to which the entered value should be passed
        , 'height:90%; width: 50%'
        , dkr.chooseFieldAddNew.executeSearchAgain)
}
This is the script block for the autocomplete.
openNewTagModalAutocomplete = function () {
    const input = document.querySelector('div##{FLD:1582}# input');
    ccls.modal.dialog.startWorkflow(`"default":"New tag", "de":"Neues Tag"` // Define the title of the modal
    dialog
        , `"workflowId": #{WF:99}#, "formTypeId": #{DT:106}#` // Define the workflow and form type to be started
        , `"#{FLD:1573}#":"${input?.value}"` // The field to which the entered value should be passed
        , 'height:90%; width: 50%'
        , newTagCloseFunction)
}
newTagCloseFunction = async function (parameters) {
    ccls.modal.dialog.closeFunctions.setGuidForField(parameters, '#{FLD:1582}#');
}
The main differences between both start functions are:
- The selection of the currently entered values
- The function which is executed after closing the dialog. In case of the popup search, the search is triggered to display the new value. In contrast the autocomplete adds the GUID of the newly created instance to the existing auto complete values. Yes, this works for multiple values, too.
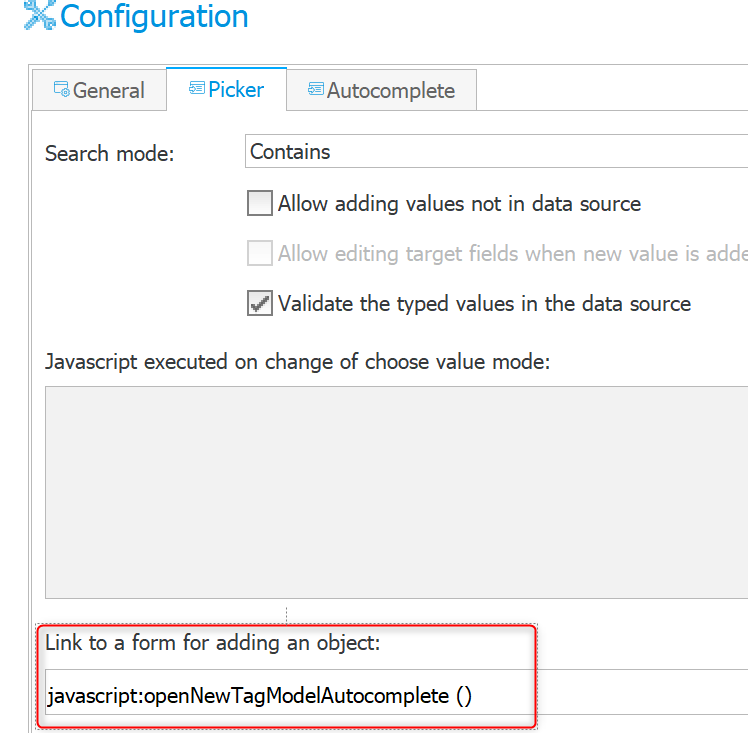
Field configuration
The last step is to configure the field by defining the correct link depending on the selected behavior of the field. In case you haven’t changed the name of the functions in the script blocks these are:
javascript:openNewTagModalAutocomplete()javascript:openNewTagModalPopupSearch()
Usage
While implementation requires more effort than the decentralized approach, your users can simply
- Click on “Add new”
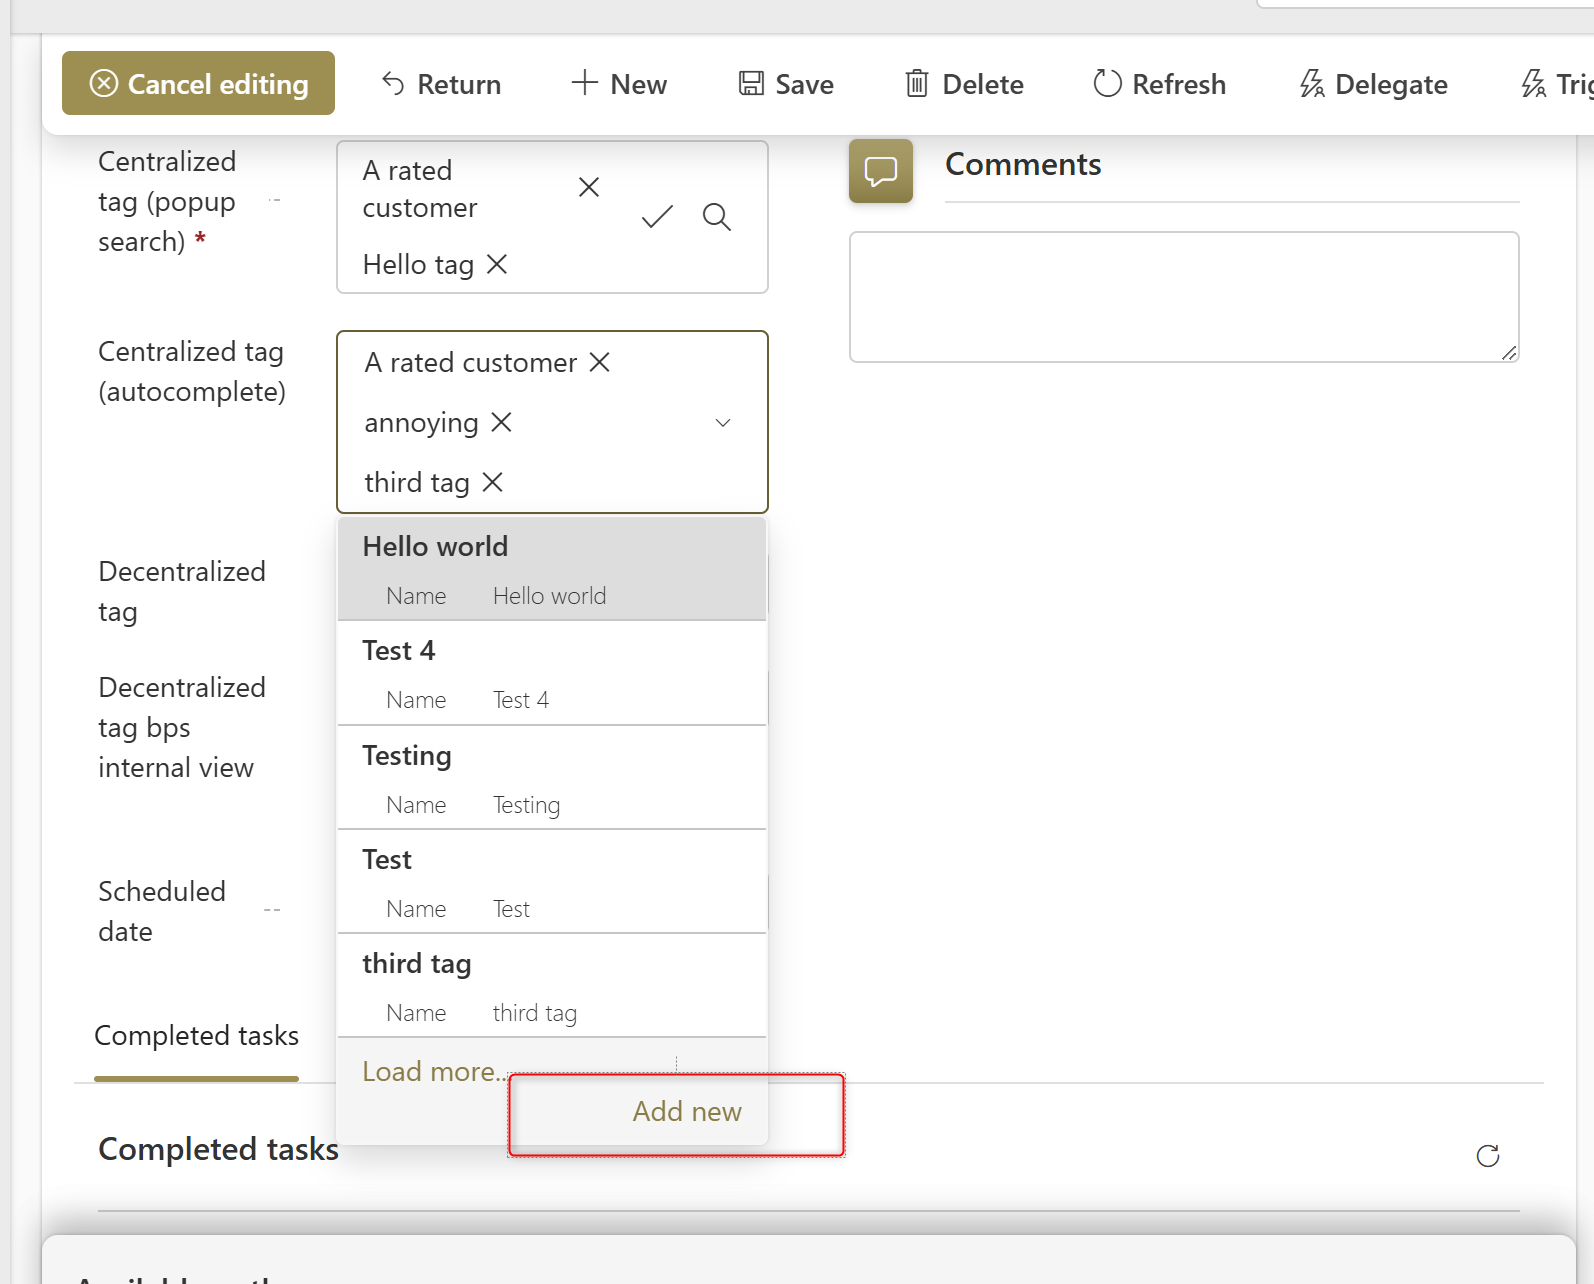
- Enter the new tag
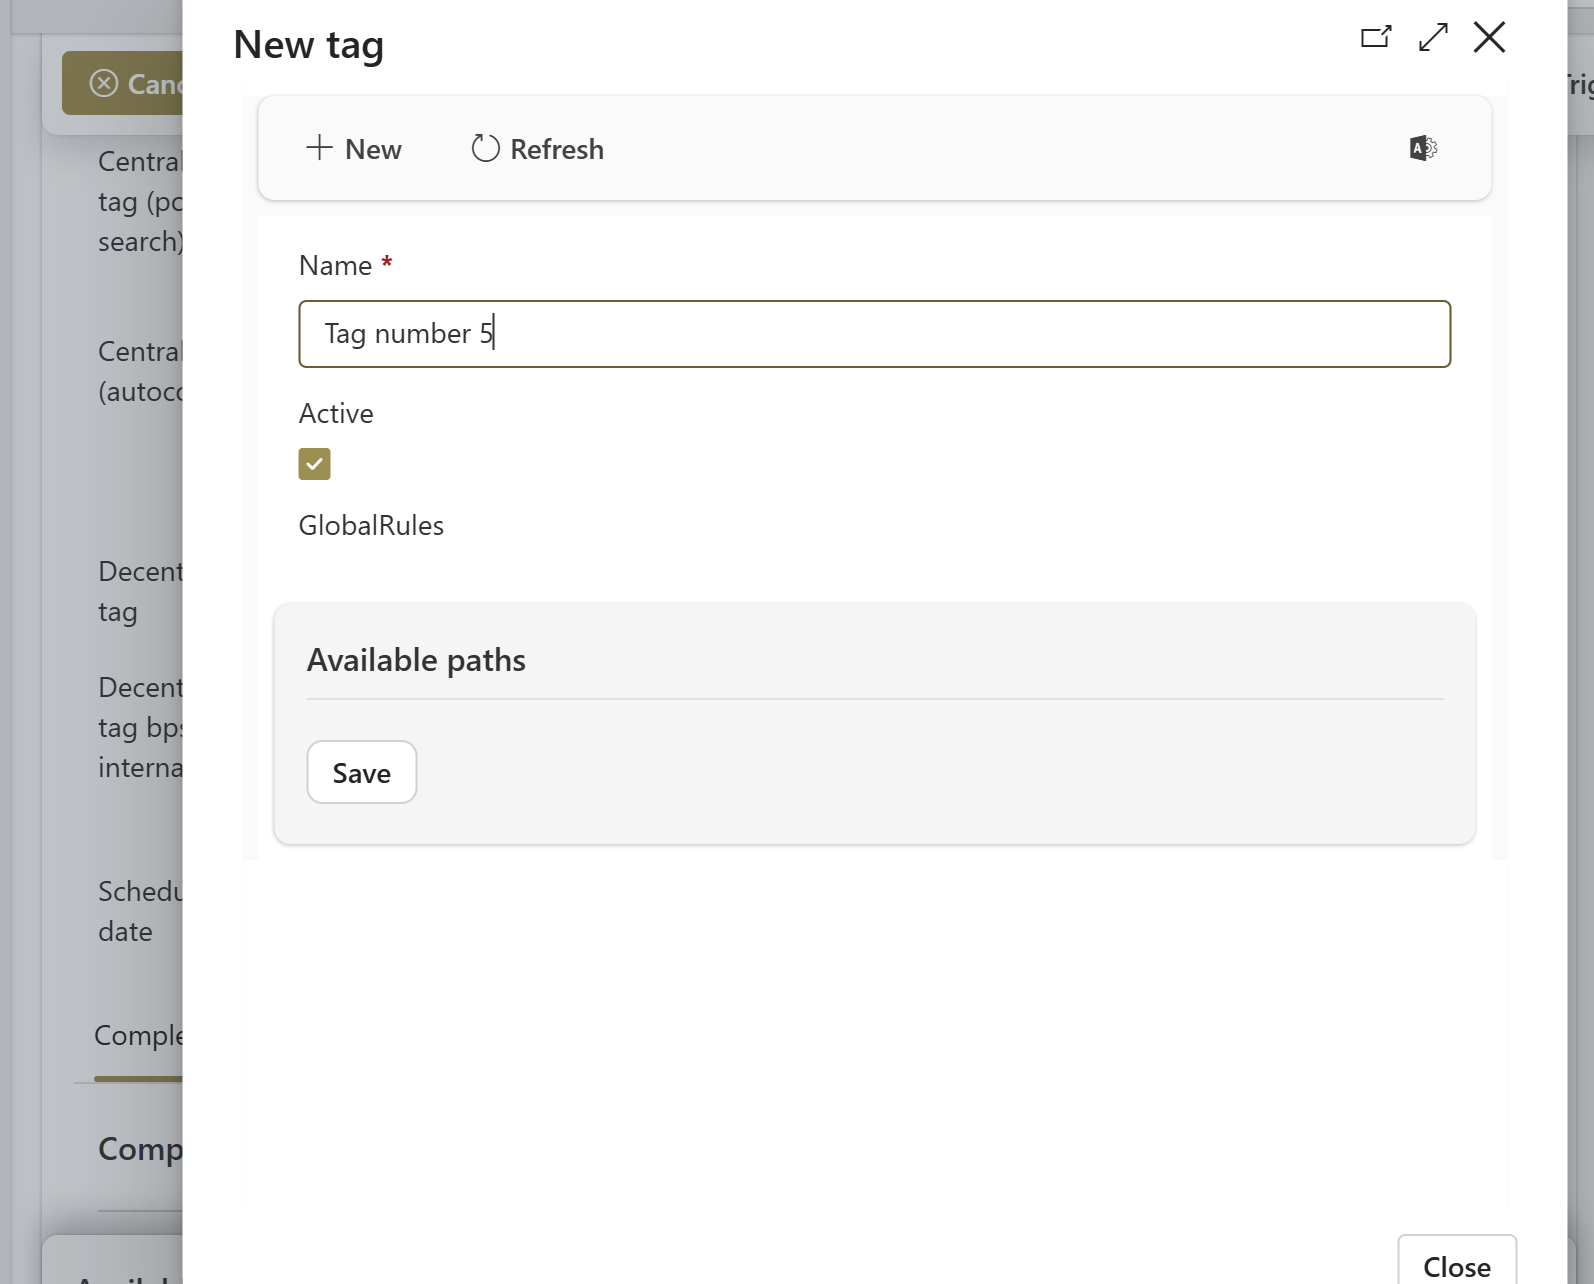
- Save it and the new value will magically be added to the existing ones.
Outlook
The idea behind this script is to make it easy for the user to add new entries, while still being able to manage these.
- You could add validation to the entered value to follow a guideline
- Deactivate outdated values, so that they can no longer be used.
This means, that it’s assumed that any user can create new entries. If this isn’t allowed, the users will get an error when clicking on Add new. You could work around this by:
- Modify the observer functions to hide the button based on a configuration value, display a message when its clicked etc.
- Set this configuration value in the HTML field
- The value is determined by a business rule
Remarks
There are numerous observers because of the way this has been implemented by WEBCON.
- In case of the
autocompletewe must handle different variations, which all destroy the existingAdd newbutton- There are no values
- There are values
- The available values are changed
- The popup search uses the WEBCON modal dialog and we don’t know for which choose field this has been opened. If you have multiple choose fields with the
Add newbutton enabled, the current implementation could fail. You may need to modify the code whereaddNewButtonPopupSearchQuerySelectoris used.
Download
You can download the script here.
Comments