Modal dialog v3
Update 2024-02-04
Warning: I’ve updated the modal dialog JavaScript with the following changes in the context of the post Adding a help page which I implemented using WEBCON BPS 2023.1.3.29. I haven’t tested it with other versions. I have added the link to the previous version to the #Download chapter.
Changes:
- Added option to open a provided URL in a modal
//ccls.modal.dialog.displayAttachment('dialog title', 'https://example.com'); ccls.modal.dialog.displayUrl = function (title, url, dimensions) { - Added option to show an attachment by providing database id and attachment id
//ccls.modal.dialog.displayAttachment('dialog title', {"dbId":1,"attachmentId":456}); ccls.modal.dialog.displayAttachment = function (title, parameters, dimensions) - Modal can be moved around
- Change: The “new tab” icon now really opens a new tab and doesn’t replace the existing one.

I didn’t describe the dimensions parameter, as there is no difference to the other functions.
Update 2023-09-13
Warning: With the advent of WEBCON BPS 2023 R2 I decided to not only introduced a minimized version of my JavaScript but to add a breaking change. The basic explanations still apply and only the configuration/implementation has changed. You can find out more about how to implement it in UX form rules revised / 2023 R2 compatible and the reasons in Bandwidth usage.
Update 2023-07-08
Check the GitHub files for an updated version. The JavaScript has been made compatible to work with BPS 2022 as well as BPS 2023. Functional changes:
- jQuery usage removed
- The opened child dialog will reuse the current theme. May have been different if the embedded them is different from the user.
- Closing the dialog will release the checkout of the element. There may be entries in the developer tools console which are like “extend checkout” failed. I couldn’t pin them down but I assume that it’s a timing issue. When the X is closed on the dialog, the child element releases the checkout. Afterwards the child informs the parent dialog, that it’s released which in turn finally closes the dialog. Maybe the “extend checkout” is called during this timespan.
- In addition to Adding a new entry to a dictionary it’s also possible to update a cell in an item list row.
It uses the same approach but has a different function and the additional parameters
targetColumn, row.// internal function for setting the field, can be called from a custom function // can be used to populate a picker which uses the instance id as id of the picker value of an item list // if row is not provided or -1 the last row will be used. ccls.modal.dialog.closeFunctions.setInstanceIdForItemListColumn = function (parameters, targetItemList, targetColumn, row) { ccls.modal.dialog.closeFunctions.setGuidForItemListColumn = function (parameters, targetItemList, targetColumn, row) {
Overview
In this post I will describe how to use the provided JavaScript and Business Rules to start / display (child) workflows within a modal dialog. You can even use wizard steps or do something with the newly created workflow instance. For example, using this to add a new entry to a dictionary and automatically populating the picker field.
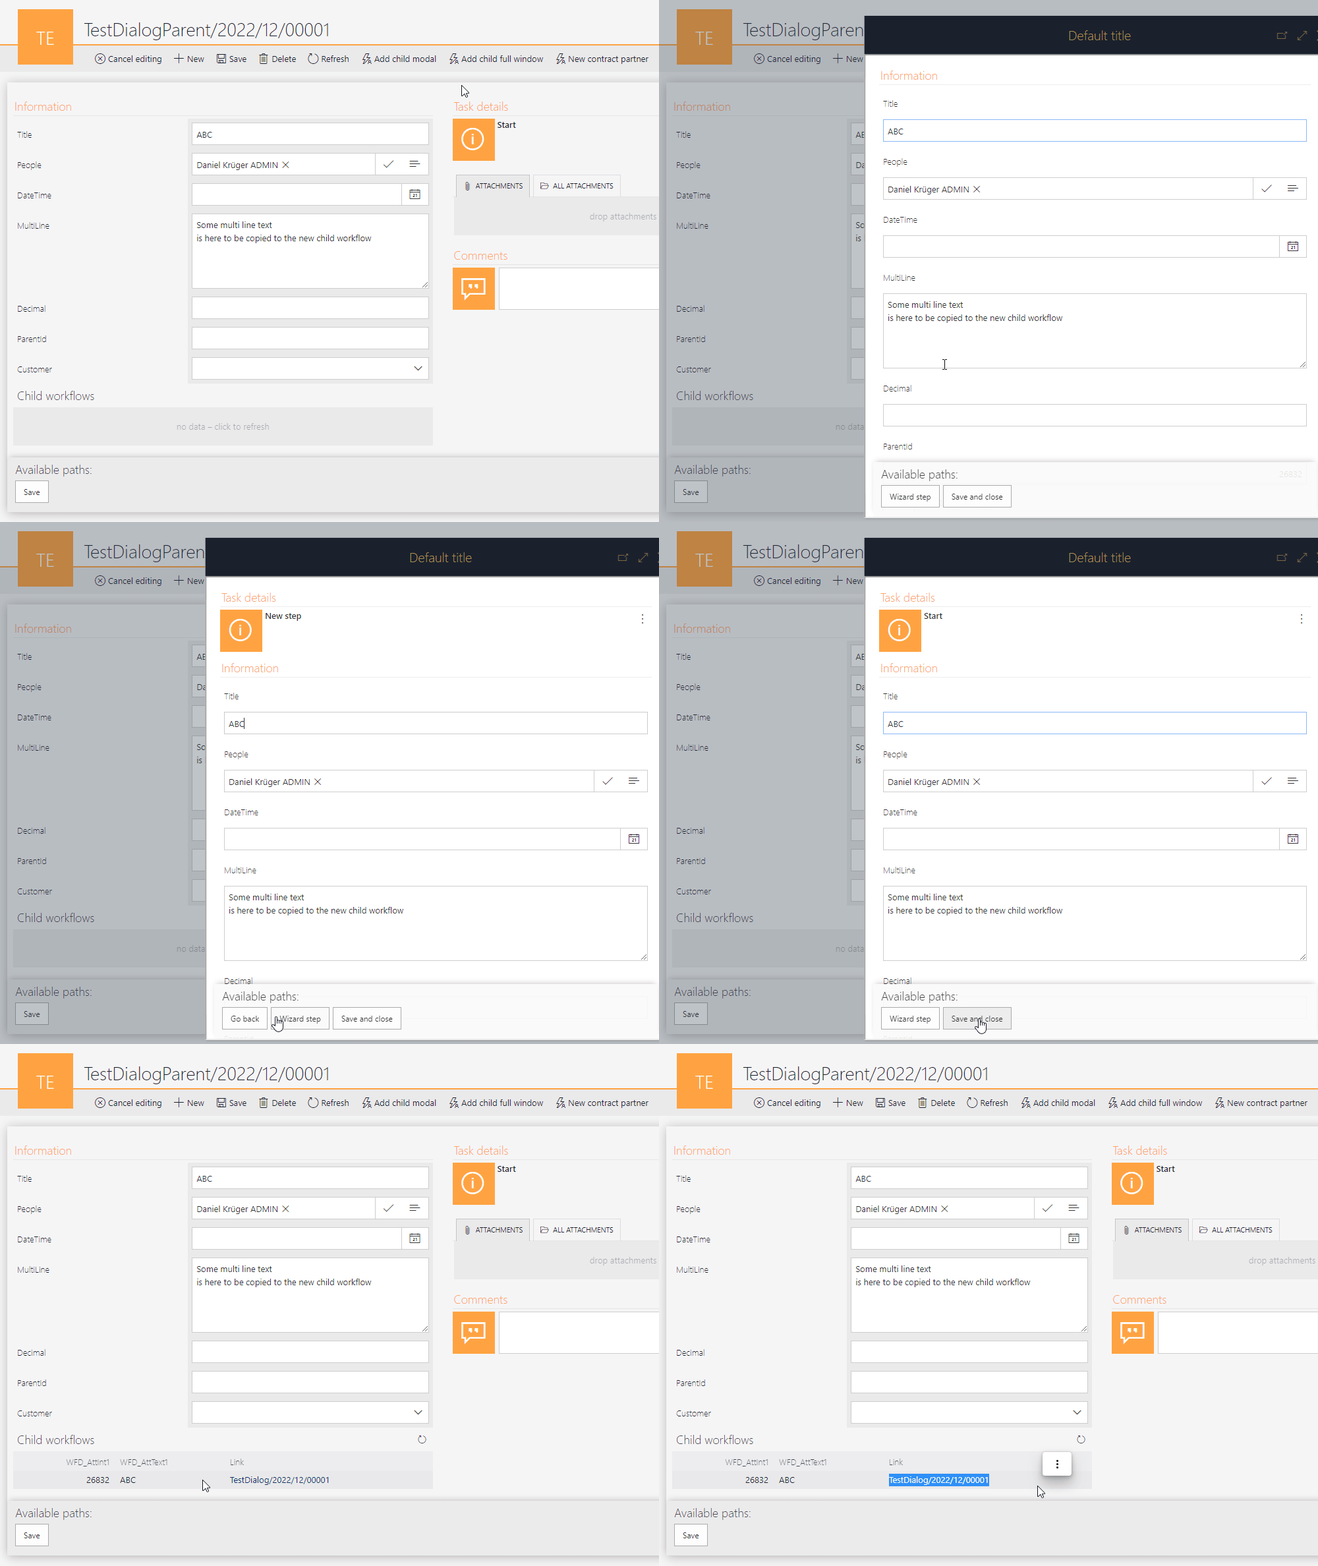
Remark: Even if you are for some reason not interested in the dialog, the way how it has been done and the JavaScript itself may help you for other use cases.
Remark: I’ve tested this in edge on a desktop pc.
Why version 3?
I called this v3 because the idea started with Adding a new choice field value without leaving the page. The second version has been created by Markus Jenni from Nexplore Enhance User Experience with Modal Dialogs. This version has taken ideas from both to create the next version which is mostly a complete redesign which offers an easier implementation, avoids potential problems, and adds new features.
Setup
Global business rules
We need to create two business rules to generate the JavaScript which will be used to open the dialog. Since we can’t easily transport a single business rule, I will provide the rule and parameters here.
| Parameter | Type | Description |
|---|---|---|
| Title | Text | Title of the dialog"default":"New action", "de":"Neue Aktion" |
| urlParameters | Text | JSON similar definition but without leading and trailing {}"workflowId": {WF:21}optional: , "dbId":null |
| searchParameters | Text | JSON similar definition but without leading and trailing {} Example: "TargetColumn":"SourceColumn""WFD_AttText1":"WFD_AttText10" |
| dimensions | Text | Dimensions of the modal dialog.height:90%; width: 50% |
| closeFunction | Text | Optional: If not provided, non will be used. |
SQL Command
select CONCAT('javascript:ccls.modal.dialog.displayWorkflow(','''{BRP:-2}''',',''{BRP:-3}''',',''{BRP:-4}''',',''{BRP:-5}''',',{BRP:-6}',')')
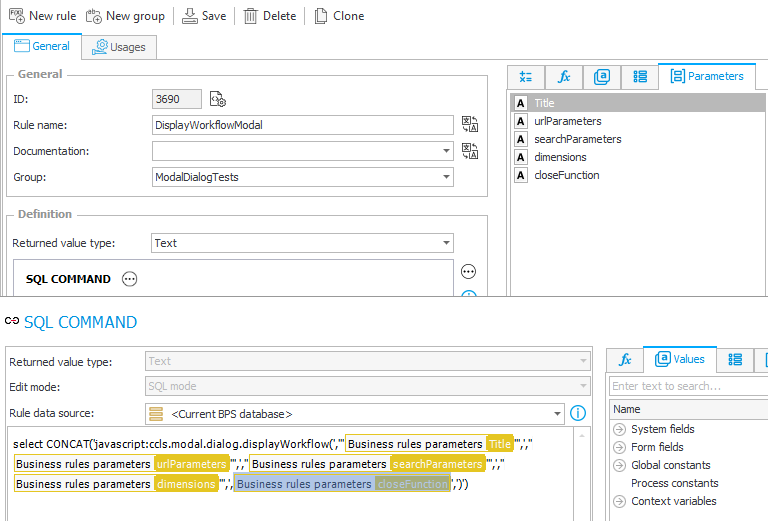
| Parameter | Type | Description |
|---|---|---|
| Title | Text | JSON similar definition but without leading and trailing {} If no label is provided for the current language, the default value will be used "default":"New action", "de":"Neue Aktion" |
| urlParameters | Text | JSON similar definition but without leading and trailing {}"workflowId": {WF:21}, "formTypeId": {DT:27}optional: , "businessEntity":null, "dbId":null,"parentInstance": {WFD_ID} |
| searchParameters | Text | JSON similar definition but without leading and trailing {} Example: "TargetColumn":"SourceColumn""WFD_AttText1":"WFD_AttText10" |
| dimensions | Text | Dimensions of the modal dialog.height:90%; width: 50% |
| closeFunction | Text | Optional: If not provided, non will be used. |
SQL Command
select CONCAT('javascript:ccls.modal.dialog.startWorkflow(','''{BRP:-8}''',',''{BRP:-9}''',',''{BRP:-10}''',',''{BRP:-11}''',',{BRP:-12}',')')
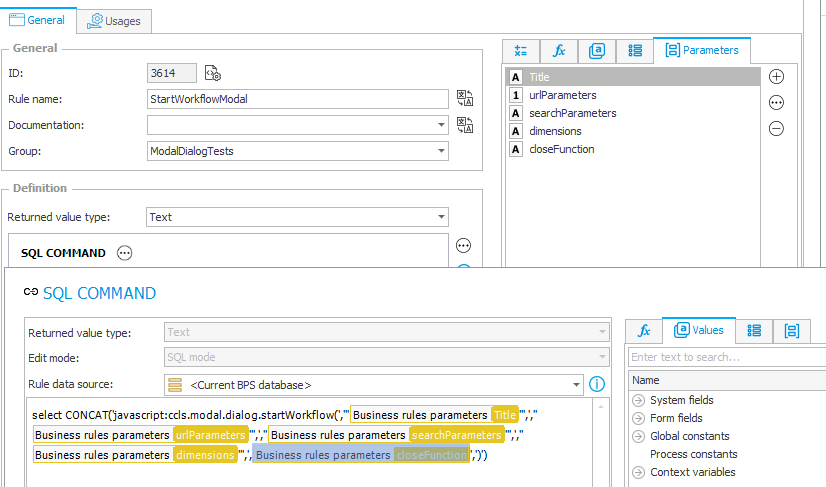
Global form rules
This is easier, create the form rules in JavaScript mode. Afterwards you can copy the content of the JavaScript files found in the download chapter to their respective rule.
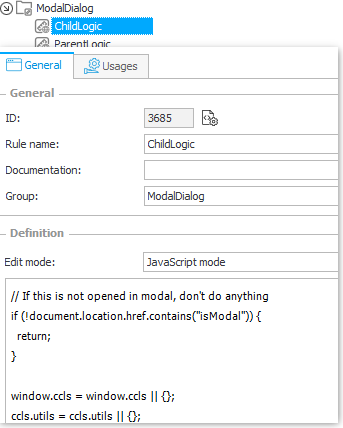
Use cases
Workflow preparation
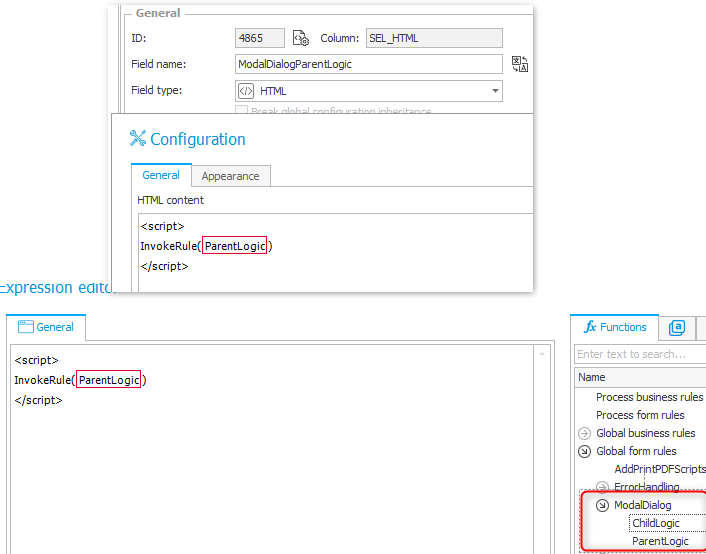
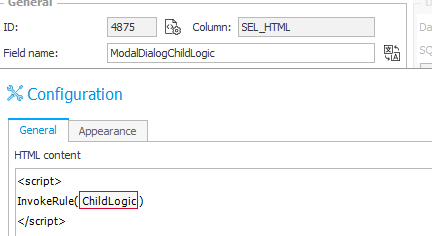
Add two new HTML fields, one will be used in the parent workflow and one in the child workflow. In the HTML field you will add a script tag and invoke the respective global form rule. Make the fields in the field matrix visible and you are good to go. Yes, no further settings are required. Even if you want to use the Wizard mode you don’t need to do anything else. You can begin using the start and display workflow business rules.
<script>
InvokeRule(#{BRUX:3687:ID}#)
</script>
Start a child workflow
In the simplest case you can add a menu button which uses a hyperlink action. The example below will do the following:
- Create a dialog with the title ‘Default title’ if any other language, then German is used. Parameter value
"default":"Default title", "de":"Title de" - Defines the workflow and that it will be started in the current db using the current business entity. That the current workflow is used for the parentInstance parameter is not displayed. Parameter value
"dbId": null, "businessEntity": null, "workflowId": {WF:276}, "formTypeId": {DT:329}, "parentInstance": {WFD_ID} - Defines to which fields which values should be copied. The example may mislead you, because in this simple example both workflows share the same fields, so it looks strange, but this is not a limitation as you may have noticed in the description of the parameter. Parameter value
"{WFCONCOL:4883}":"{WFCONCOL:4883}", "{WFCONCOL:4882}":"{WFCONCOL:4882}", "{WFCONCOL:4881}":"{WFCONCOL:4881}","{WFCONCOL:4880}":"{WFCONCOL:4880}","{WFCONCOL:4879}":"{WFCONCOL:4879}","{WFCONCOL:4878}":{WFD_ID} - The dialog will be 90% of the height and 40% of the width. Parameter value
height:90%; width:40%
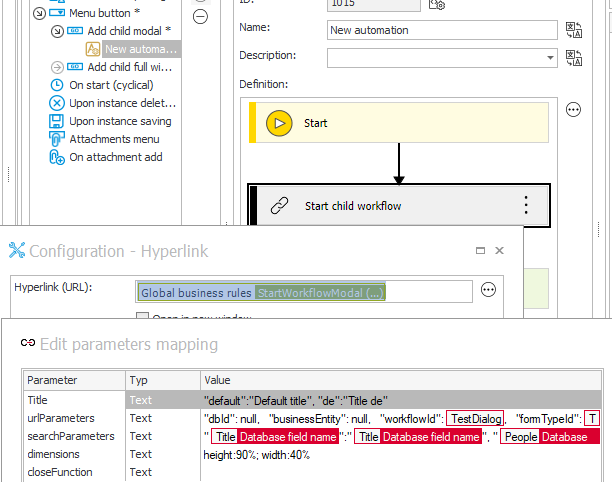
The execution of the button will generate the URL and display it in an iFrame inside the modal dialog. Upon closing the dialog any data tables will be reloaded, so that a created instance will be displayed.

Display a workflow in a dialog
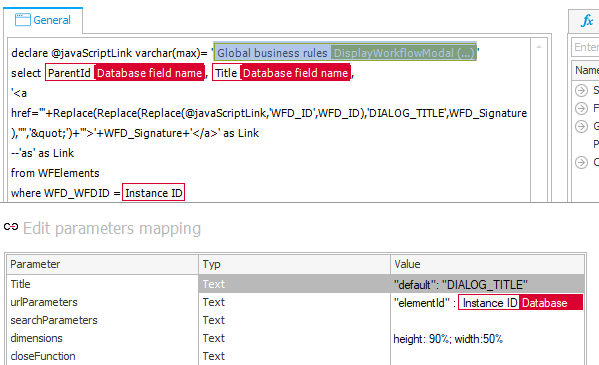
You could display any workflow in a dialog. The following logic is used for workflows in a data table, as some users have a hard time using the preview. You can copy the SQL command and select your business rule. It’s important to use the following parameters.
| Parameter | Value |
|---|---|
| Title | "default": "DIALOG_TITLE" |
| urlParameters | "elementId" : {SYSCOL:WFD_ID} |
DIALOG_TITLE will be replaced with the signature of the workflow instance, but this could be changed in the actual SQL command.
declare @javaScriptLink varchar(max)= YOURBUSINESSRULE-- Business rule display workflow modal
select {WFCONCOL:4878}, {WFCONCOL:4883},
'<a href="'+Replace(Replace(Replace(@javaScriptLink,'WFD_ID',WFD_ID),'DIALOG_TITLE',WFD_Signature),'"','"')+'">'+WFD_Signature+'</a>' as Link
--'as' as Link
from WFElements
where WFD_WFDID ={WFD_ID}
Add a close button
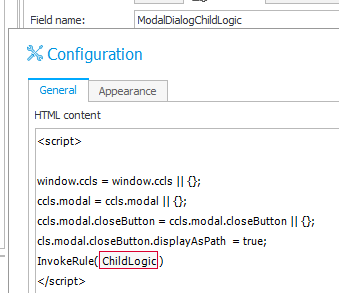
You can optionally add a close button in the child dialog, just in case the X in the modal is not enough.
<script>
window.ccls = window.ccls || {};
ccls.modal = ccls.modal || {};
ccls.modal.closeButton = ccls.modal.closeButton || {};
ccls.modal.closeButton.displayAsPath  = true;
InvokeRule(#{BRUX:3685:ID}#)
</script>
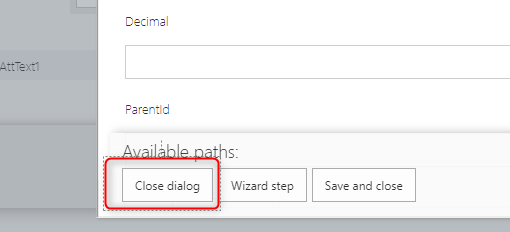
Info: If you want to change the label of the close button refer to the chapters below.
Remark: The ccls.modal.closeButton.displayAsPath = true; must be set before the rule invocation. Therefore, we need all four lines.
Adding a new entry to a dictionary
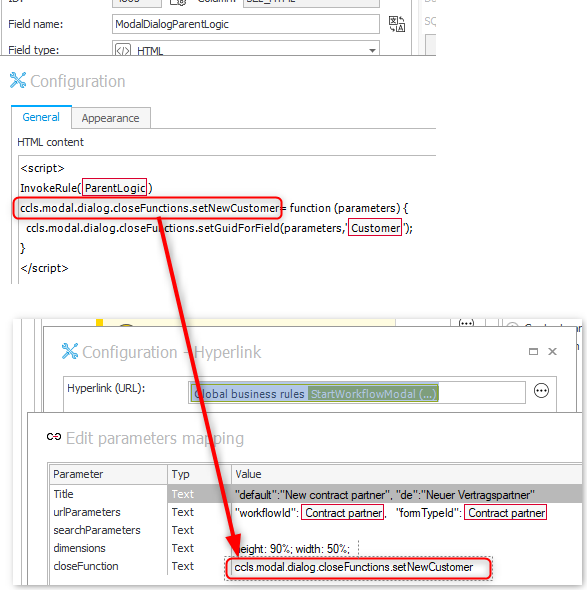
In case you have a picker field you can provide an option to create a new entry in the source in a modal dialog and automatically set it in the picker field. For this you need to define a new close function after invoking the parent logic form rule.
You need/verify two things in the provided example.
- You can use either
ccls.modal.dialog.closeFunctions.setGuidForFieldorccls.modal.dialog.closeFunctions.setInstanceIdForField. It will depend on the value you use as the id of the picker field. If the source is a dictionary, you will commonly usesetGuidForFieldwhile you would usesetInstanceIdForFieldin the other cases. - The field parameter needs to refer to your field.
The whole function name will then be used for the ‘closeFunction’ parameter.
<script>
InvokeRule(#{BRUX:3687:ID}#)
ccls.modal.dialog.closeFunctions.setNewCustomer= function (parameters) {
  ccls.modal.dialog.closeFunctions.setGuidForField(parameters,'#{FLD:4945}#');
}
</script>
Remark: The custom close function can be defined after invoking the form rule. Since the rule is already invoked, we can simply add our function and can omit the lines which were necessary to display the close button.
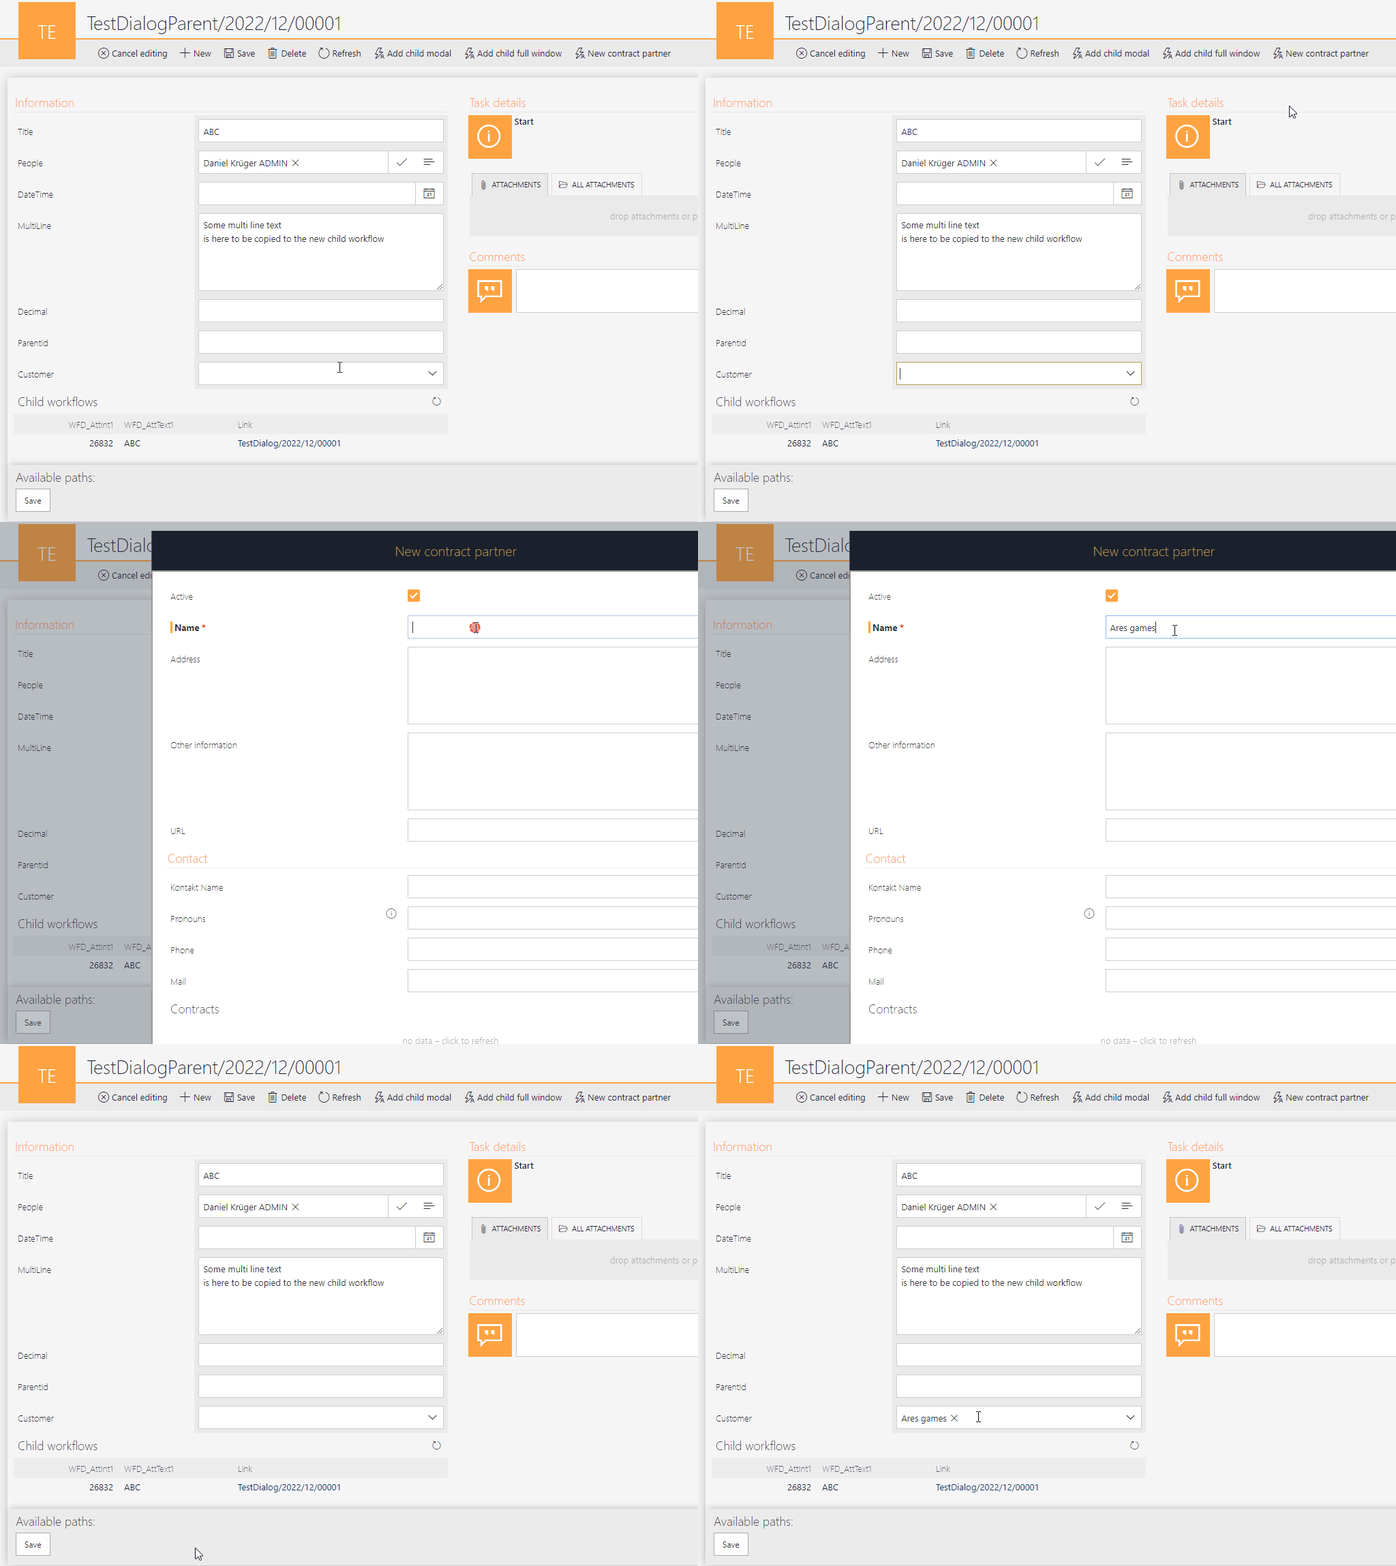
You could also add a button below the picker like it’s described in the first version. Instead of onClick event you could invoke the menu button and hide it with a form rule.
Dialog features
The dialog offers three options:
- Replacing the current page with the URL displayed in the dialog. A return URL will be added to the current page. The entered data in the dialog will be lost. If the data on the parent window has been modified, the user will need to confirm that the data will be lost.

Full window, expand and close the dialog. - The dialog window can be expanded to full size and reverted to the defined size.
- Will close the dialog.
Explanations
Strange parameter values
The strange looking parameter values are actually treated as JSON. Due to the fact, that the {} are used in the WEBCON BPS variable we cannot use them, so {} are added to the text within the script and then the string will be parsed as JSON.
Adding / changing the child dialog close button labels
If you want to change /add label to the close button you can search in the child dialog JavaScript file for these lines and add one for your language.
  // Labels
  switch (G_BROWSER_LANGUAGE.substr(0, 2)) {
    case "de":
      ccls.modal.closeButton.label = "Dialog schließen";
      break;

    default:
      ccls.modal.closeButton.label = "Close dialog";
      break;
  }
Debugging
If you need to debug the JavaScript you can add the following query parameter
- Debug parent logic: debug=modalDialogParent
- Debug child logic in a full window: isModal=1&debug=modalDialogChild
If you started the parent window in debug mode, then the modal dialog will be started in debug mode too.
Theme depending styling of the “close” button
In the child dialog you will find lines on how to check which theme the user has selected and define different colors to match the themes.
// Color for light themes
  let themedColor = "#ffab0045";
  let themedColorHover = "#ff9c00c4";

  // Color for dark themes
  if (darkThemes.indexOf(window.initModel.userTheme) > -1) {
    themedColor = "#ff9c00c4";
    themedColorHover = "#ffab0045";
  }
JavaScript
Visual Studio code has been used to generate the JavaScript files. If you have it to you can make use of the defined #regions, which will improve the reading a little. There’s a lot of documentation in the JavaScript files, so if you are missing something here, you may find more details there.
Download
The minified version for the BPS 2023 R2 version can be found here. while the usage is described here.
Older versions
- The original, archived form rule code for this post can be found here.
- Before update 2024-02-04: https://github.com/Daniel-Krueger/webcon_snippets/commit/7d60f774d82f807e5c4fac82b327967b353de196
Comments