Import applications using an application
Overview
My previous post Import application using PowerShell and REST API was the first step of my goal to create an application which can be used to import applications.
You may wonder why, and you are right to do so. Just because we can doesn’t mean that we should do it. My reasons may be driven from my perspective as a WEBCON partner who’s customers a mainly in the regulated industry. This typically requires documenting ‘everything’ if something is automated, it is less documentation work.
My reasons are:
- We have an audit trail /version history for each import.
- We have the history of the imports in the system itself and not somewhere else.
- It can be executed by anyone without specific knowledge or privileges to do so. Ok, this may cause problems with new processes and missing privileges. But this is another topic.
- Best of all, we can create a ‘snapshot’ of specifics elements before the import and compare these after the import. This is especially helpful, because some elements are always overwritten, and you may need to change them back after the import.
If you find yourself in one of these points you should continue to read.
Import application phases
The process consists of three different phases.
- Creating a snapshot of the current environment
- The import itself
- Updating the snapshot information with the current data

While some of these steps could be merged together, I prefer a more detailed approach.
Environment snapshot creation
General explanation
In these steps I capture all relevant information which may get changed. Some of these changes could be prevented with a correct import configuration, but not all. These are for example:
- Application group names
- Business entities properties
Both elements will always be overwritten. There is neither a configuration option in the import dialog of the Designer Studio nor in the configuration file.
Even if you have a configuration file, it may be outdated. Creating a snapshot before, will help you to identify unexpected changes.
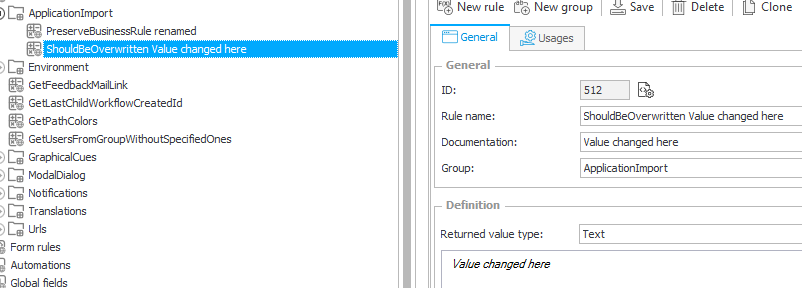
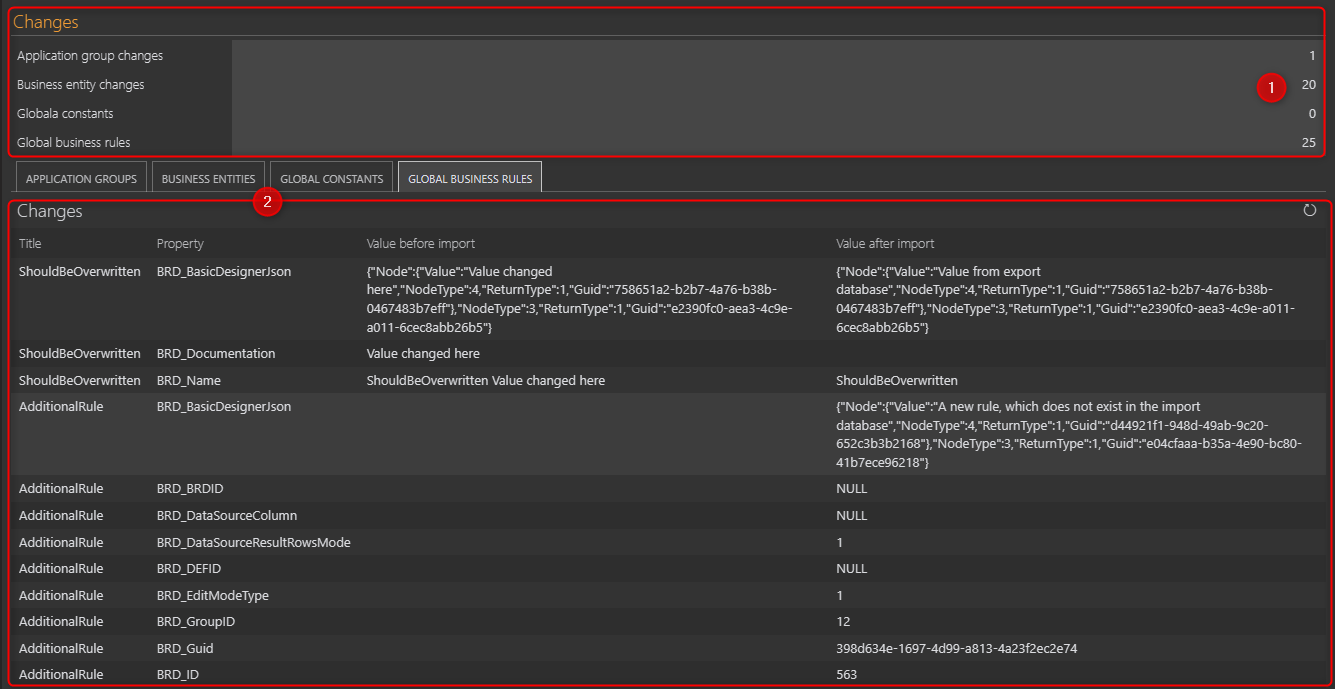
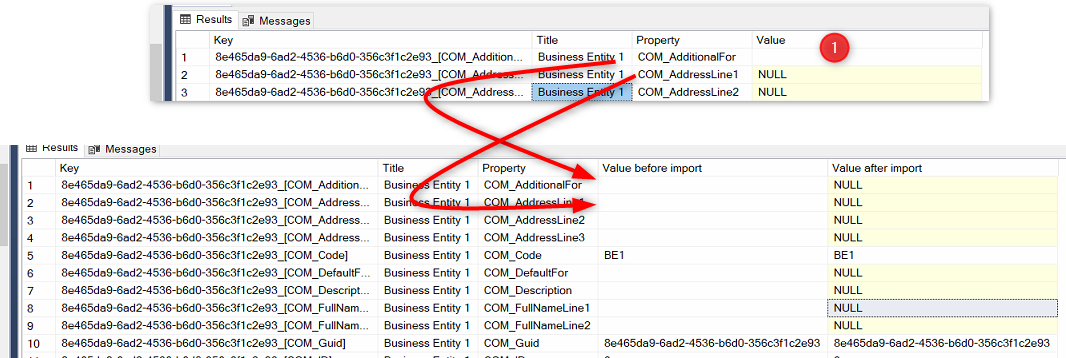
But how does it look like? Let’s use an application which uses global constants rules as an example. If you are transferring an application between different content databases in the same environment or have multiple environments to which an application should be transferred, these values may be different. The below screenshot is an example of changes. Please ignore the fact, that I used business rules here. One business rule (constant) was changed which should be overwritten after the import while the other one should keep its configuration.
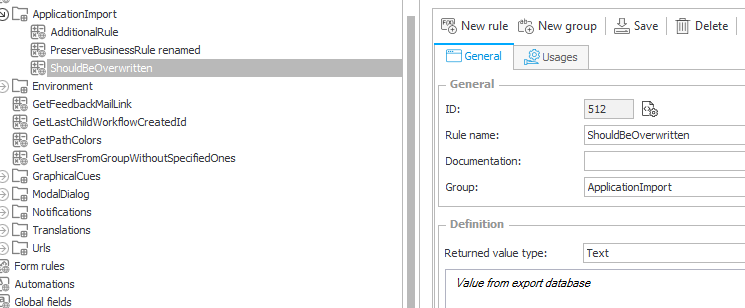
This was the result after the import.
Since the values have been stored before the import and are read again after the import we can:
- Provide an overview where and how many properties have been changed
- What exactly was changed
Saving the data
This is basically the same for each element we want to save. We need to
- Create an item list to store the information
- Populating the item list in the different steps
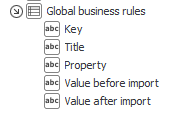
The item list consists of these fields
- Key
The key is needed to update the correct row and identify whether a new element has been added by the import. It consists of the GUID of the element and the column name. The integer ID of an element is not an option, as the element may have been deleted and will be added again. While the integer value will change, the GUID will be the same. - Title
The name of the element, so that you know to which element the property belongs. I don’t assume that you would like to use the key. ;) - Property
The column in the table in which the value is stored. - Value before import
- Value after import
Due to performance reasons, I never display the item list itself, but use a data table to render the information. Both are placed inside a group which is collapsed by default.
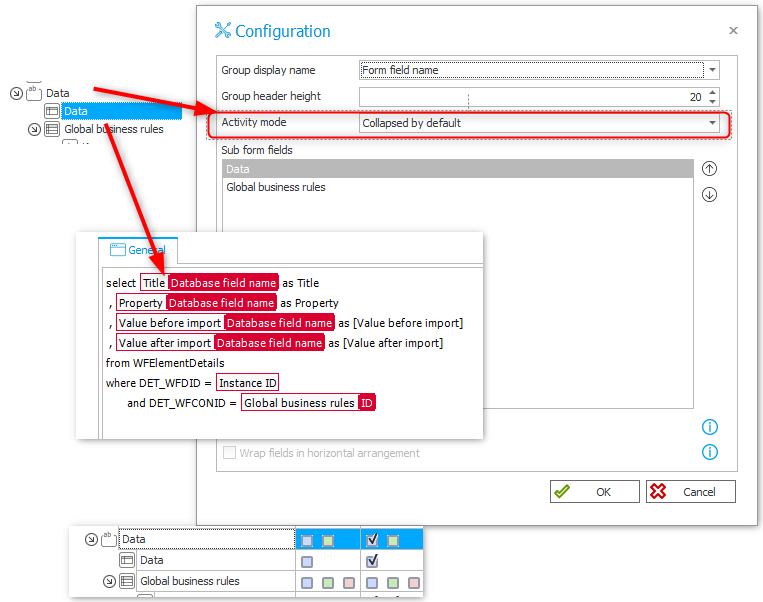
Info: If you don’t need any special formatting and an item list is read only anyway, then using a data table is a good option for a better user experience. Especially if there are hundreds of rows.
Displaying the changes
The changes are again displayed in a data table. There’s just an additional where condition to check, whether anything was changed. Since you can’t compare null values I had to make sure, that:
- The value is different, which works if neither value is null.
- That either column is null but not both.
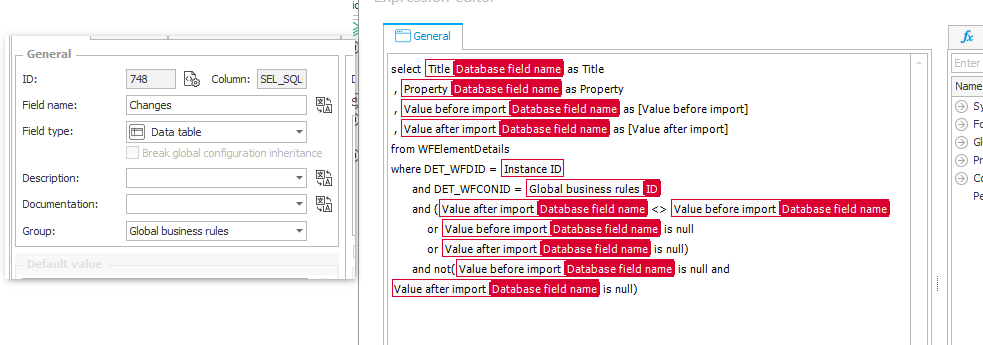
select {DCNCOL:170} as Title
 , {DCNCOL:171} as Property
 , {DCNCOL:172} as [Value before import]
 , {DCNCOL:173} as [Value after import]
from WFElementDetails
where DET_WFDID = {WFD_ID}
       and DET_WFCONID = {WFCON:749}
       and ({DCNCOL:173} <> {DCNCOL:172}
            or {DCNCOL:172} is null
            or {DCNCOL:173} is null)
       and not({DCNCOL:172} is null and {DCNCOL:173} is null)
The overview of the changes is simply a combination of these statements displayed as a data row. Instead of selecting the columns we do a count and use the whole statement as a sub select.

Actions
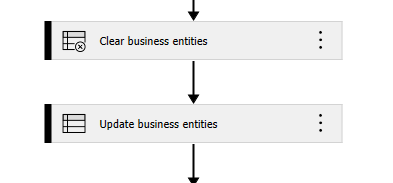
I tend to create process automations for each trigger, so that I don’t need to bring up the step dialog. In this case the OnEntry automations are both the same, at least at this moment.
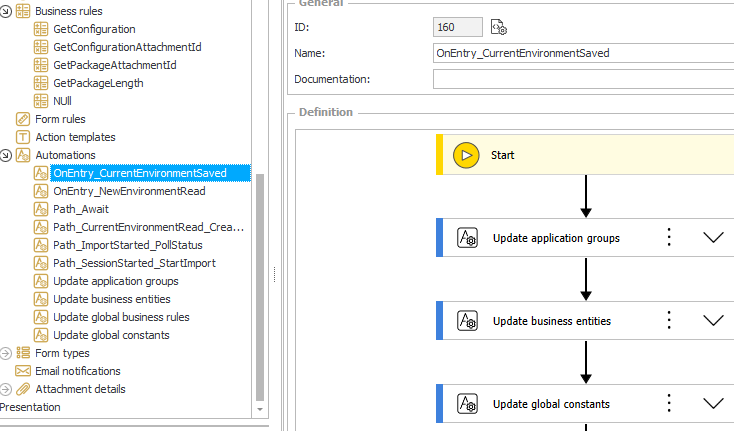
Each OnEntry automation calls all ‘Update xyz’ item list automation. The automations are always build up the same way. There’s a condition to check whether the ‘before import’ or after ‘import value’ should be updated. The numbers in the screenshot will be used later.
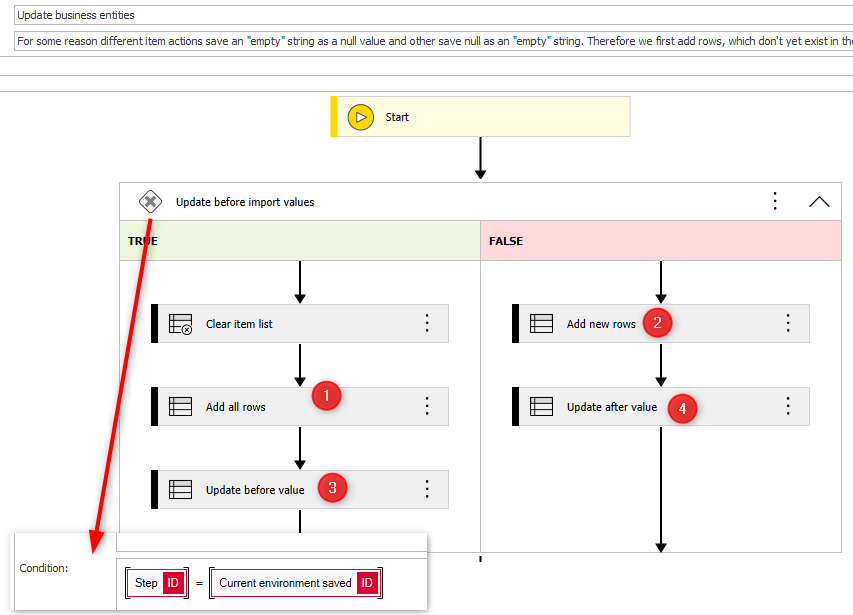
The actions all use the same SQL command and only the settings are different.
- The add rows action is in both cases the same.

- The update actions map the value to a different column.

Info: You are right, this looks strange. Originally, I used a replace action on the left and an update action with update and add rows option on the right. It turned out I wouldn’t be able to compare the values using this approach. You can read up on the nitty gritty details here.
Creating the SQL statement
I’m way too lazy to create all those SQL commands myself and no I didn’t use ChatGPT or similar. I used my favorite tool for ‘generating’ code: Excel. :) The file is stored in the GitHub repository, so I will focus on how to use it.
- Bring up the SQL Management studio, generate a select statement and copy the columns.
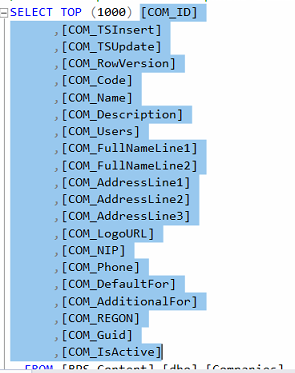
- Paste these into the Excel and remove the leading space and comma with
Find and replaceso that you only have the column names.
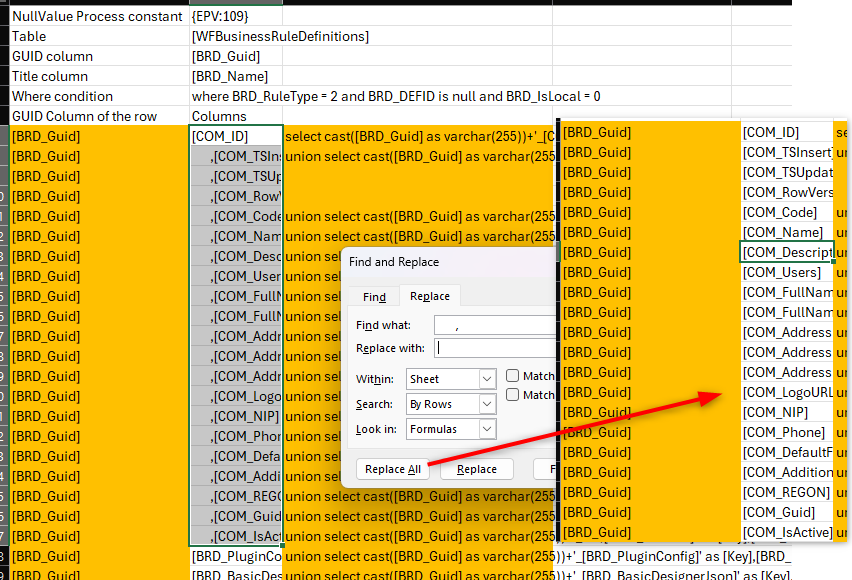
Paste the columns to excel and remove the spaces and ,. - Update the values of:
- Table
- GUID column
- Title
- Where condition, which is optional
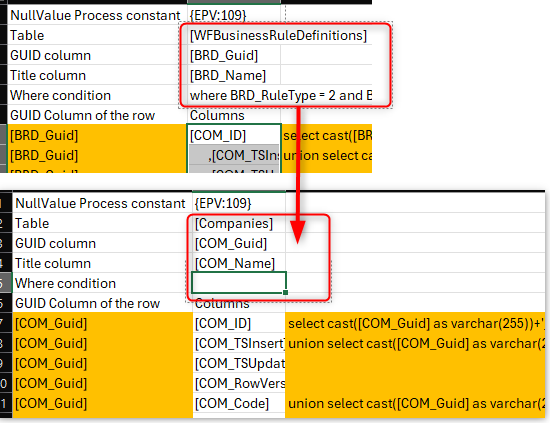
Updated elements for this table - Afterwards you can copy the generated lines back to management studio to test them.
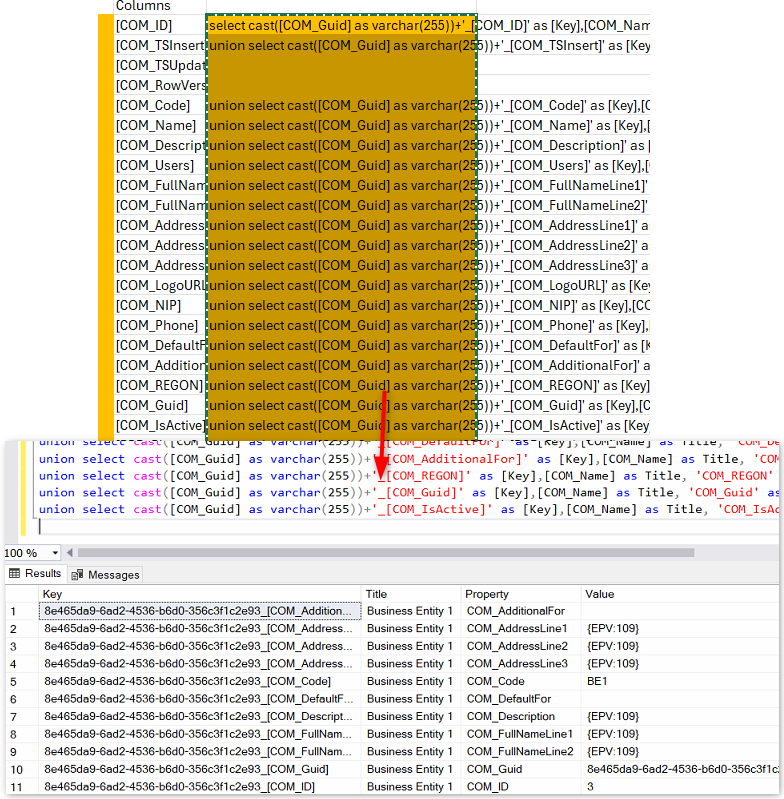
The TSUpdate and RowVersion column is always ignored. Either the values stay the same, if the element wasn’t modified or they will be different, in this case something else was changed. Therefore, these values would only cause unnecessary data.
Importing the import package
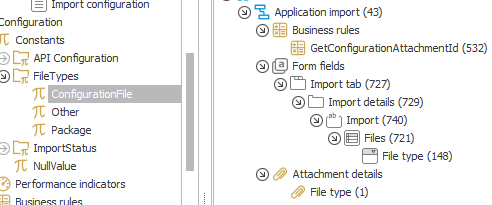
Fields
Using the import API requires the import package and a configuration. I’ve opted for uploading those two files. While I also used categories in the attachments I created an item list with local attachments. This allowed me to make these files mandatory. For the File type I used a drop down with a custom SQL query which uses constants as an id.
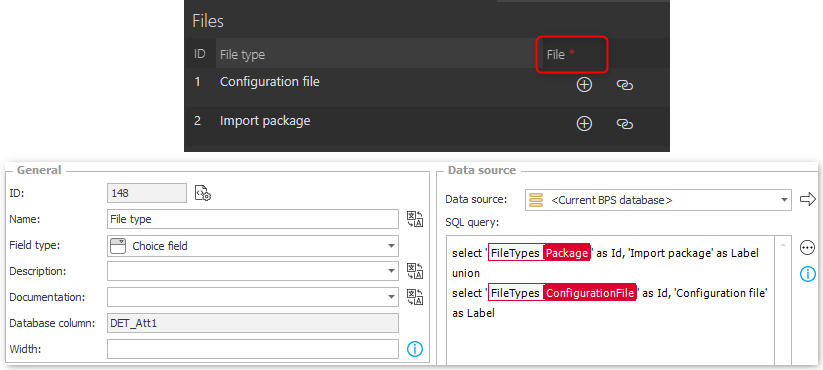
If you could imagine that a drop down / choice field is not only displayed but used with logic, always use constants instead of fixed value lists. This way you can make sure that you will find all places with the Usages tab.
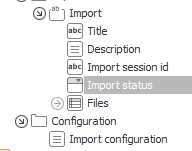
In addition to the files item list there’s:
Import session id, a single text field.Configuration, a multi line text field. We need to saved the extracted configuration in a field because only those can be used inRawmode in a REST action, see uploading the configuration.Import statusanother choice field.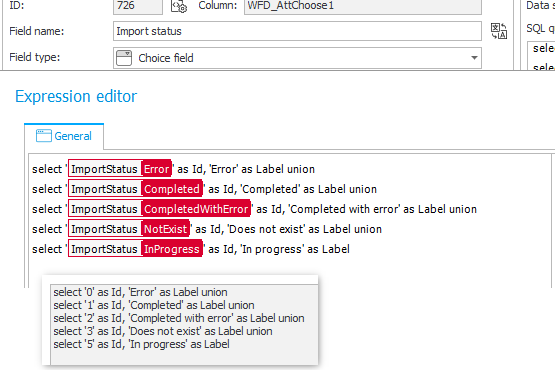
The values of the import status
I also added a title and description field, so that I can describe what was the reason for the import.
Business rules
There are four business rules which will be used in the REST action:
- Read the text from the configuration file
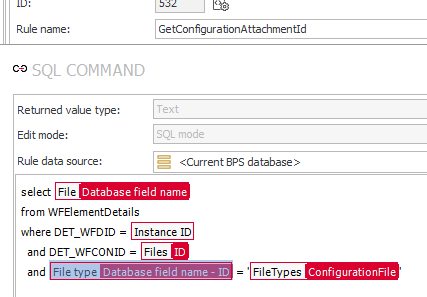
- One for the configuration and package file to get the attachment id
- One to get the size (length) of the package, which is required for starting the import session
I created two business rules for getting the correct attachment id. An alternative would be to create one with a parameter, which passes the correct constant value.
select {DCNCOL:149}
from WFElementDetails
where DET_WFDID = {WFD_ID}
  and DET_WFCONID = {WFCON:721}
  and {DCNCOL_ID:148} = '{EPV:98}'
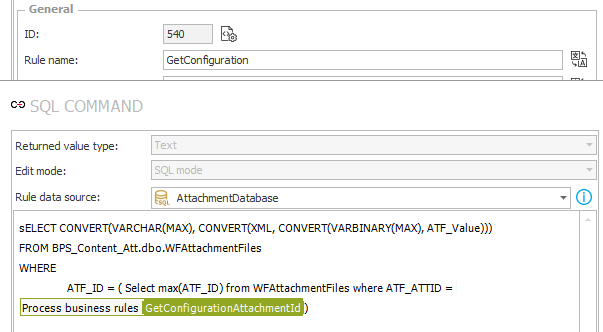
SQL command for converting the binary value of the configuration file to a text.
SELECT CONVERT(VARCHAR(MAX), CONVERT(XML, CONVERT(VARBINARY(MAX), ATF_Value)))
FROM BPS_Content_Att.dbo.WFAttachmentFiles
WHERE
	ATF_ID = ( Select max(ATF_ID) from WFAttachmentFiles where ATF_ATTID = {BRD:532})
Last but not least the SQL command for getting the size (length) of the package file.
select ATT_ContentLength
from WFDataAttachmets
where ATT_ID = {BRD:528}

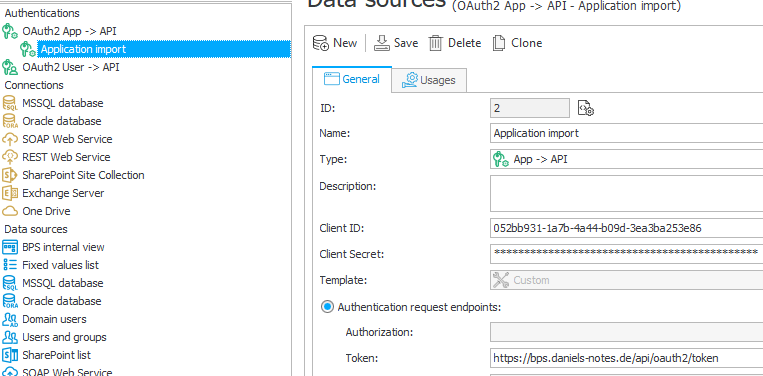
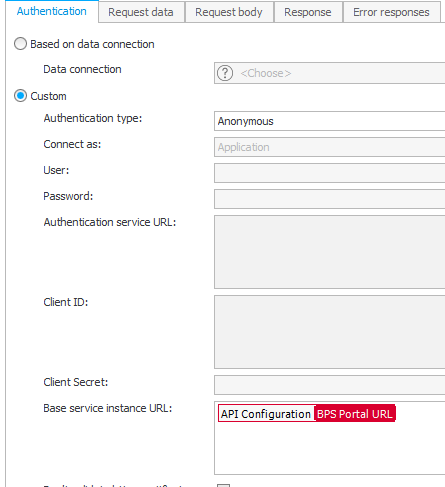
Authentication
I’ve used the same application, I’ve configured here. In WEBCON BPS I’ve setup an OAuth2 App -> API authentication which in turn is used by the REST actions.
Token:
https://bpsportal.example.com/api/oauth2/token
Create import session path
Creating the import session uses the standard REST action with business rules to get the site of the package file and an action to read the configuration file.
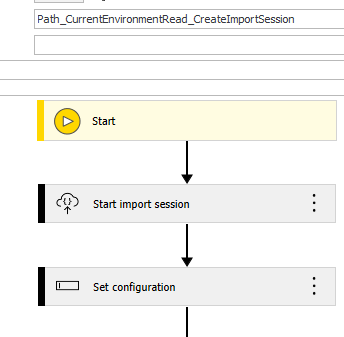
Configuration of the REST action for starting the import session.
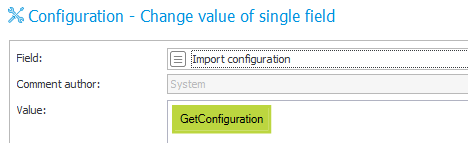
Storing the configuration in the field.
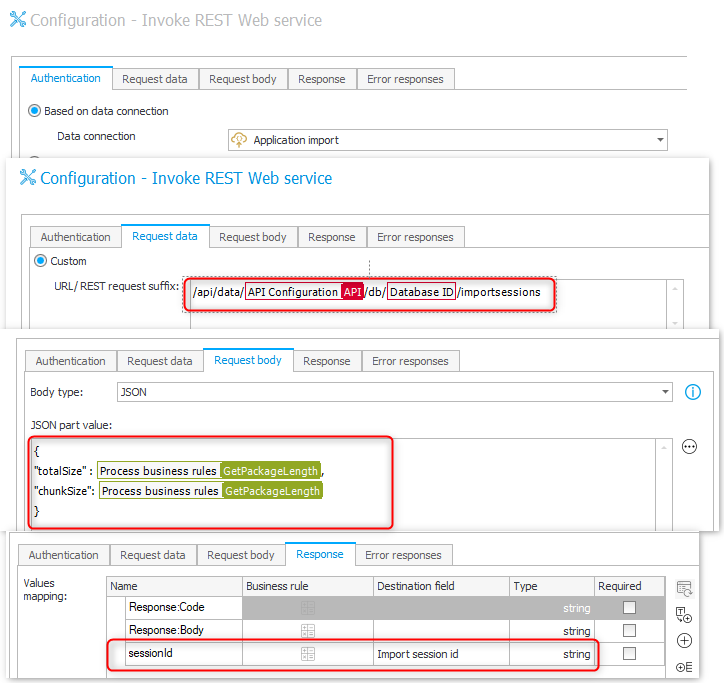
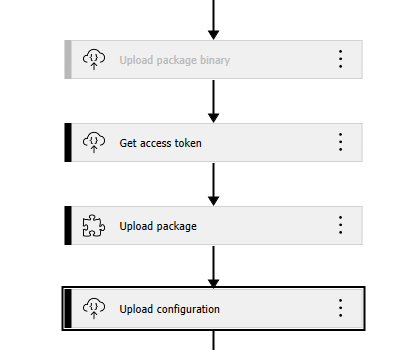
Upload the package and configuration
I was not able to use the standard REST action for uploading the file. If you are interested in my tests you, can read more here.
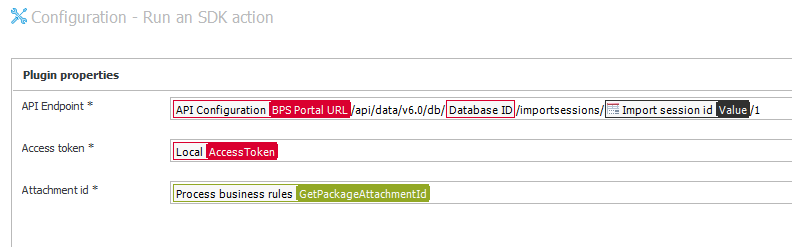
In the end, I gave up and created a custom very minimal custom action with three properties:
- API Endpoint
The absolute address of the endpoint to be used.
https://bpsportal.example.com/api/data/v6.0/db/{DBID}/importsessions/{722}/1 - Access token
This is retrieved by another action, as I did not want to bother with the authentication and hope to get rid of this plugin in the future anyway. - Attachment id
The id of package which should be uploaded.
Since I decided against implementing the authentication, it’s necessary to get the access token with a standard REST action.
- Authentication
- Request data
URL suffix: /api/oauth2/token
Headers
- accept:application/json
- Content-Type:application/x-www-form-urlencoded
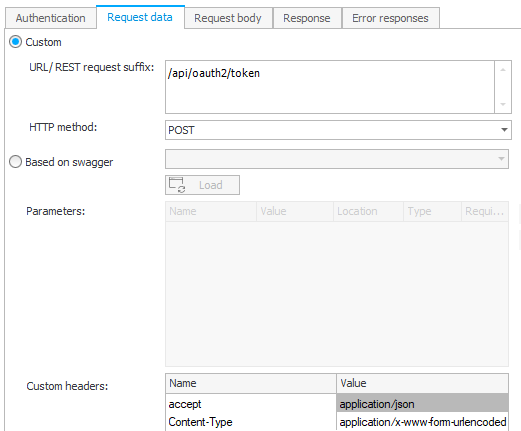
- Request body
I stored the secret as a constant for this example.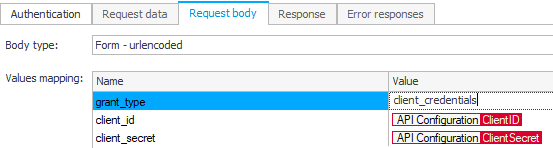
- Response
The returned access token is stored in a parameter which is passed to the upload action.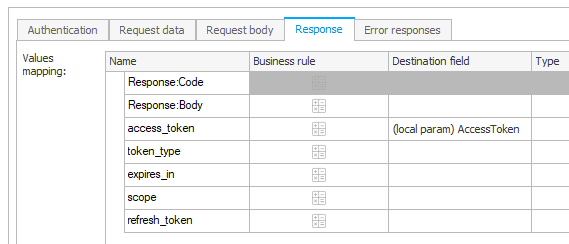
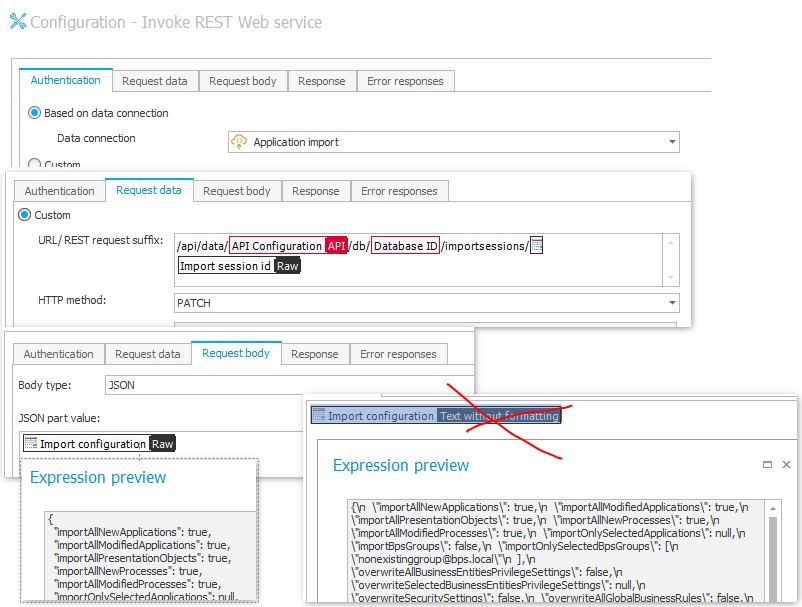
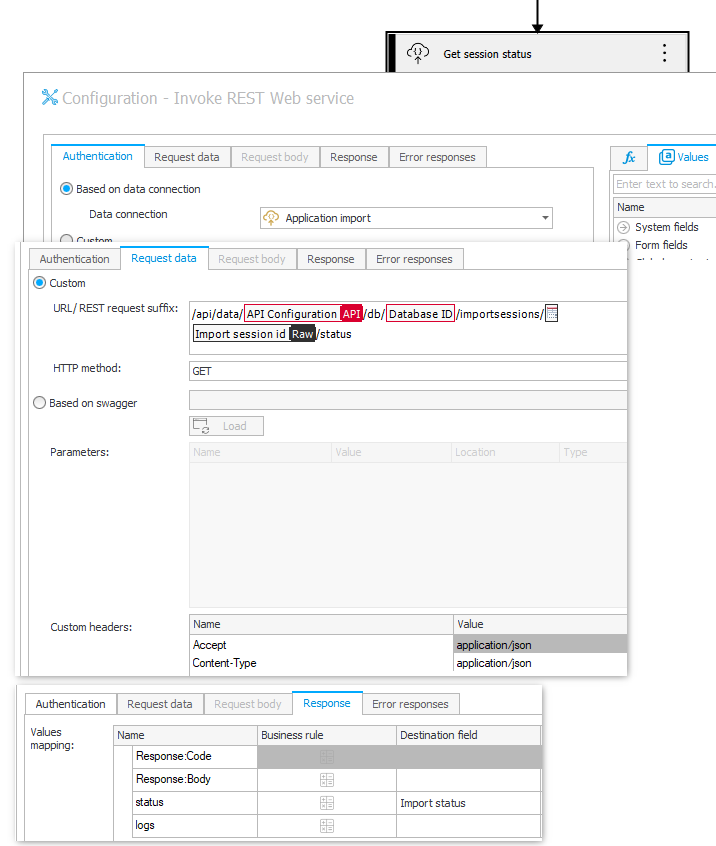
The last action is to upload the configuration which will start the import. The important thing here is to use the value stored in the field and return it in RAW. If you use the Text without formatting the value will not be a valid JSON because the characters are escaped as you can see it in the screenshot. If you would be using the business rule directly, then it would also be encoded as the field with Text without formatting setting.
All combined, the automation for starting the import by uploading the file and configuration looks like this:
Waiting for import completion
It can take a while until the import is completed. This is handled by moving the workflow instance to the flow control. During this path transition the current status of the import is polled. The flow control then decides how to continue. If it’s still in progress it goes back to the previous step.
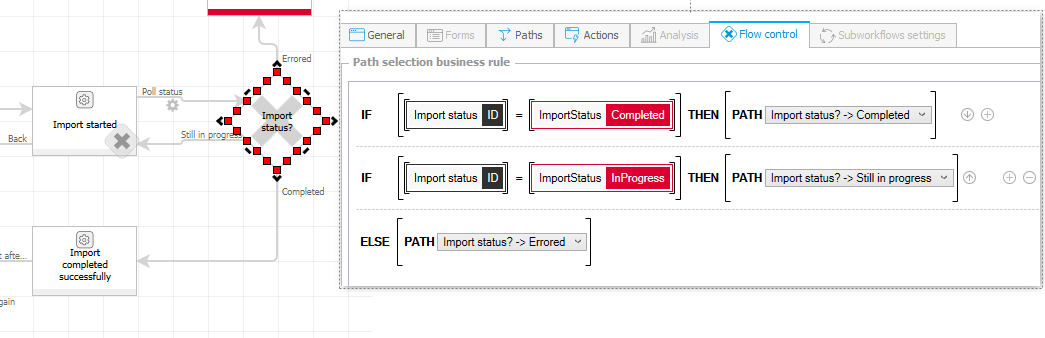
This path has only one REST action which stores the result in the prepared choice field.
Setting up the response body
The easiest way for configuring the Response body correctly is to:
- Navigate to the endpoint
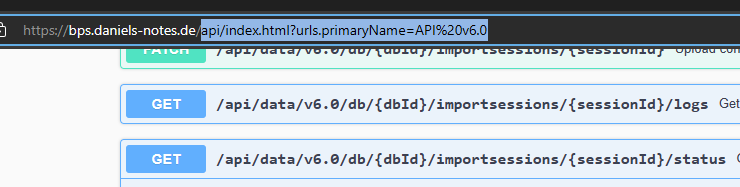
API endpoint - Copy the example of the success code 200
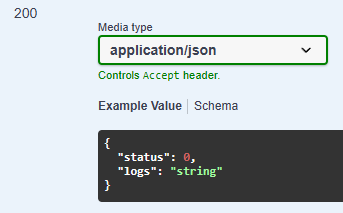
Success code result - Paste it into the JSON editor
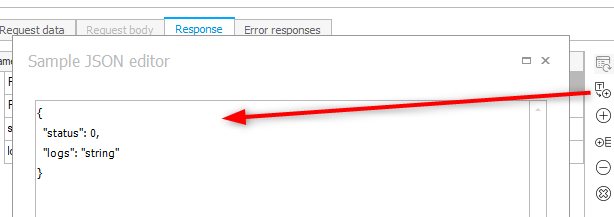
Insert the success body
Remarks
Importing the same application in multiple databases
By default, it is not possible to import the same application into multiple database. This can be changed by deactivating the flag ImportValidateAppProcPresUniqueness in the global parameters of the configuration database.
SELECT *
  FROM [BPS_Config].[dbo].[GlobalParameters]
  where PRM_Name ='ImportValidateAppProcPresUniqueness'
Uploading package with standard REST action
I spend quite of lot of time trying to figure out, whether I can use the standard action to upload the package. In the end I was not able to do it. Nevertheless, I want to document my results.
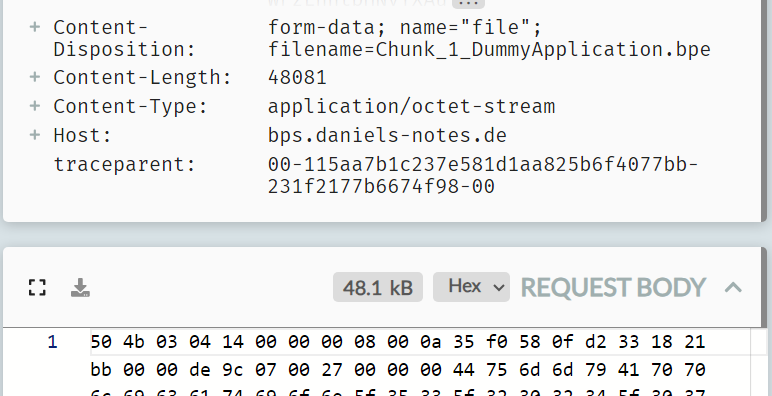
Below you see the request body which is send when I used PowerShell to upload the file.
The body starts with a boundary --GUID followed by the Content-Disposition and Content-Type in line 5 the binary part would follow.
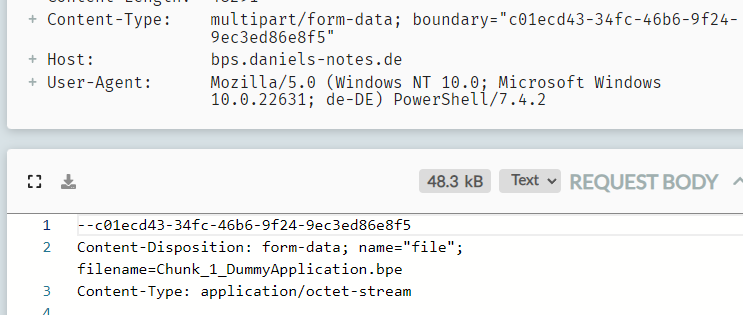
Request body type Multipart
I was not able to reproduce the body using the Body type: multipart. The problem is the JSON part. Regardless of what I did there have always been two ‘starting’ boundaries. One for the JSON part and on for the binary part.

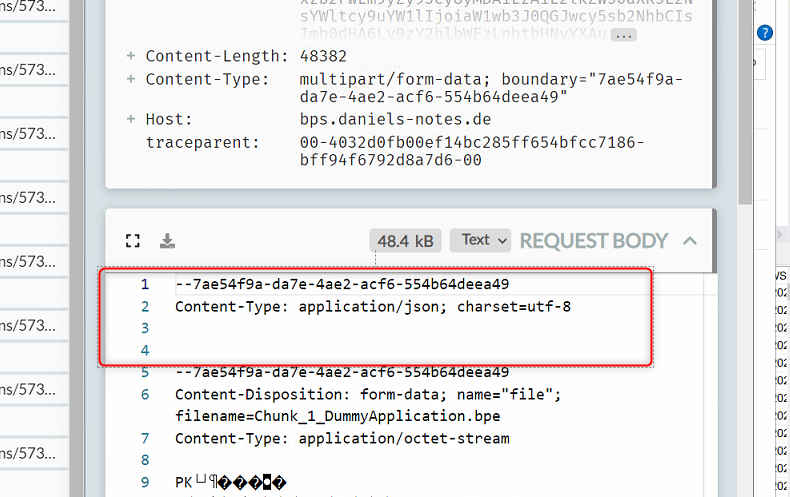
But this is not supported by the API, it causes a bad request.

The underlying error was that the Model is not valid

I was able to ‘persuade’ the API to accept the model, when I was using the binary part headers as the JSON headers.
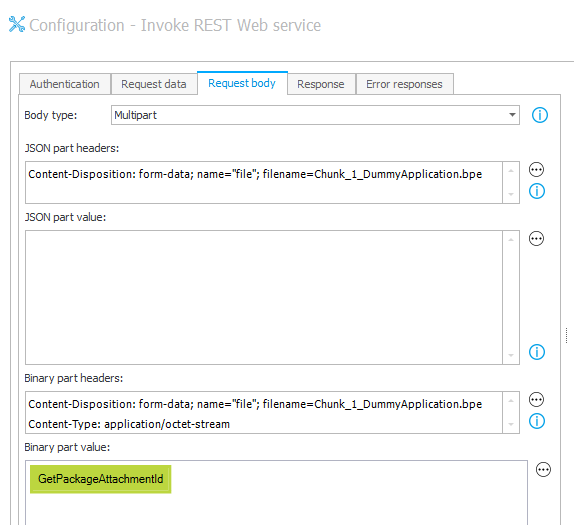
hile it worked for the upload it caused an error during the import. The stored binary is not a valid zip package.
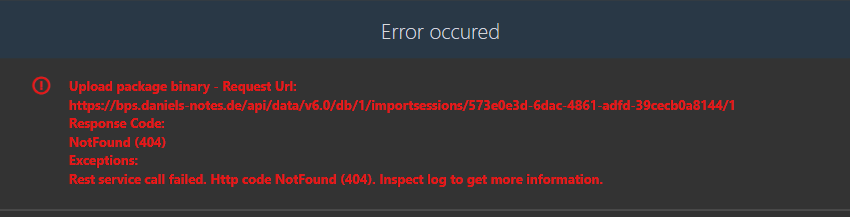
Request body type binary
Even so I didn’t expect that using Body type: Binary would work,
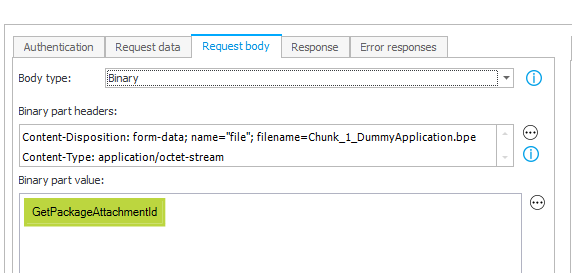
I didn’t expect that I would receive a Not found 404 error. That got me really confused.
Additional error information
Each API call is logged in the table AdminAPILogs in the configuration database. In case of an error the column WSAL_ErrorGUID will have a value.

With this GUID you can use the Search for logs by GUID option from the administration tools.

Empty and NULL handling depends on the item list action
Background and summary
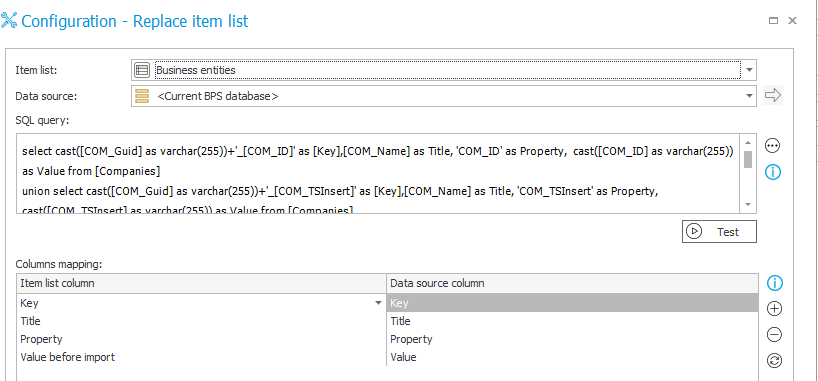
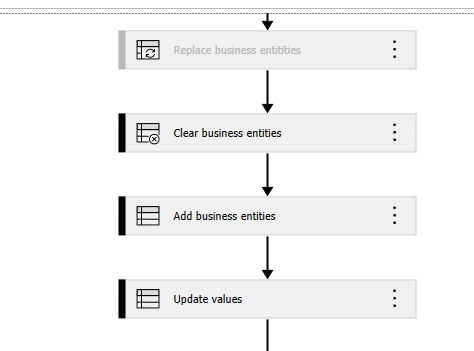
Originally, I used the Replace list item to store the data in the item list and in a later step I wanted to update it. This did work but when I wanted to display the changes I got an unexpected behavior.
Replace list itemandUpdate item list valueswithAdd new rows from the datasourceoption
These actions store an empty string value and a NULL value as an empty string value.Update item list valueswithUpdate existing rowsoption
This setting will save an empty string value and a NULL value as a NULL.
Due to these different behaviors, I decided that I cannot use the replace action and have to add new rows and update all rows later. This way, the value is always stored with the update action in all cases. However, the implementation may be.
In addition, I decided to replace the NULL value with a NULL text value. In the UI I will see the NULL text value and know that the value actually was NULL. Even if an empty string value is stored as NULL in the database, it doesn’t matter in the UI. You can’t distinguish a NULL value and an empty string value in the UI.
There’s also no issue when comparing two columns, if we only want to know, whether they are different. If both are null or have an empty string, that doesn’t make a difference. In all other cases there would be a difference and they would be part of the changes.
Baseline
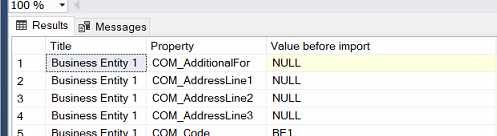
I was using this SQL command and result as a baseline. The value column of the first row contains an empty string, while the second row is NULL.
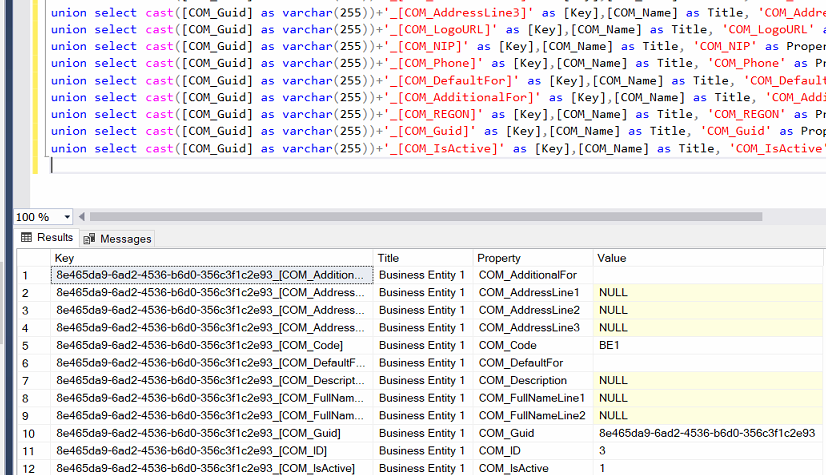
Replace action
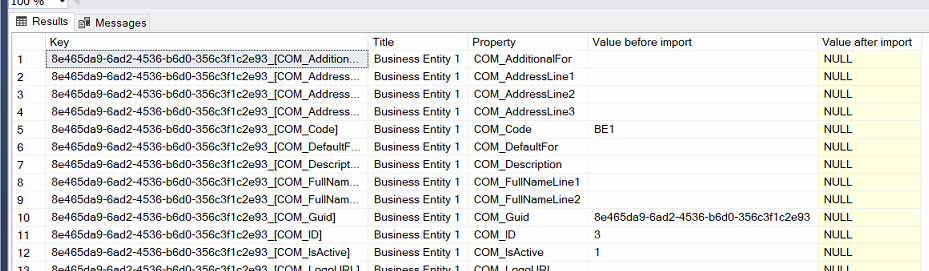
As you can see below, there’s no NULL stored in the Value before import column of the item list. All rows have at least an empty string.
The NULL value is not stored as NULL.
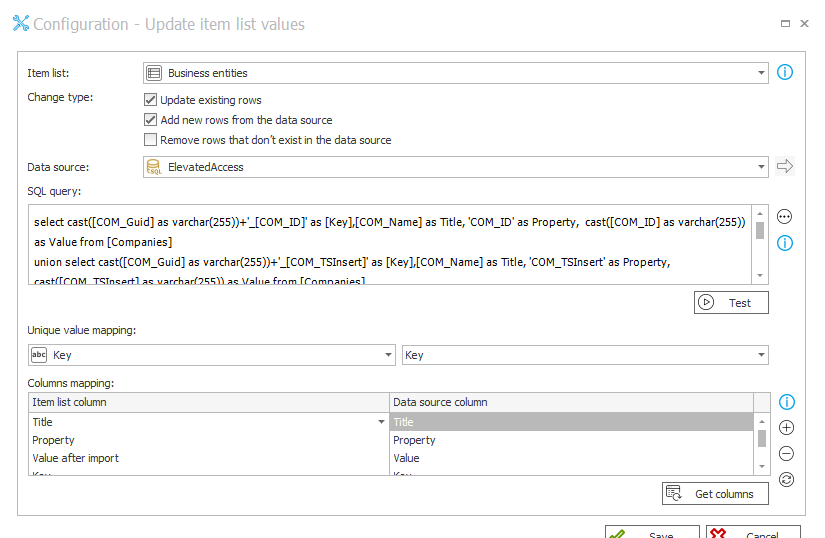
Update and add action
I switched from the Replace action to the Update action with a combination of Add and Update.
The result is that again the NULL values are stored as an empty text.
Clear and add only
This had the same result as the replace action. There’s a little difference because I decided to replace the NULL value with a NULL text. This way I can distinguish whether something else was stored as a NULL.

Using add followed by an update
If the row already exists, the update will store an empty string value as a NULL value.
NULL.
HTTP Requests
If you are wondering, how I got the requests, which had been generated by the REST actions you can read this post Debug a web service data source and also Debug a web service data source alternative
GitHub Repository
In the linked repository you will find:
- The PowerShell solution.
- The Visual Studio solution for the custom action.
- The Excel file.
- An export of the application.
Yes, the exported application contains the credentials and I deleted the existing and setup a new credentials after the export. ;)
Comments