Import application using PowerShell and REST API
Overview
While I would guess that the majority of the WEBCON BPS customers are fine with the option to import applications via Designer Studio, there have been enough to request an automated process. With WEBCON BPS 2024 a public REST API was provided.
There’s already a knowledge base article describing it. In addition to the API a command line utility was created by WEBCON. This is located in the Tools folder which was the Migration tools folder in previous versions. This tool can be used to import a package.
What I’m missing from the article is an example on how to use the REST API directly. While it is documented which calls should be made in which order, I’m missing an example. This is reason for this blog post.
Importing a package
Setting up the API application
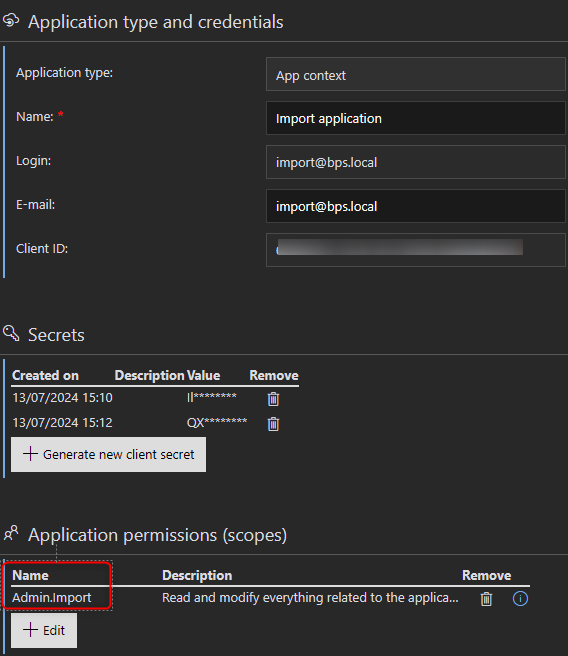
I won’t provided detailed information, on how to do it. You can refer to the knowledge base article for this.
The main difference to other API application is, that this one makes use of the new scope Admin.Import.
Configuration file
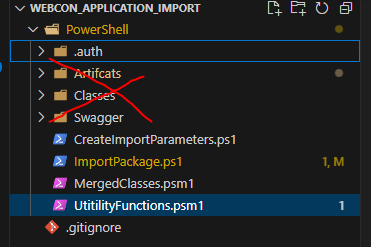
When the script gets executed it will read a webconConfig.json file from the .auth folder. If it does not exist, it will create one, open it so that you can provide the required parameters. Alternatively, you can create the file with the following content.
{
  "ClientId": "xyz",
  "ClientSecret": "xyz",
  "Hostname": "https://xyz",
  "ApiVersion": "v6.0"
}

webconConfig.json
Remark: The .gitignore defines that all files in the .auth folder should be ignored except the .empty file. This way the client credentials won’t be committed.
Configuring the import script
The script ImportPackage.ps1 is used for the actual import. Here you can define:
- The database id, into which the package should be imported
- The path to the package
- A custom configuration, if necessary.
In my case I saved the exported package in the Artifacts folder.

Remark: I have used the script only from VS Code. Here the PowerShell session is started in the source folder. Therefore, the script changes the location to the PowerShell folder, if it is not the current directory. You may need to change this depending on your use case.
PowerShell explanation
Overview
You can ignore the files in the Classes and Swagger file. The base functionality is located in the UtilityFunction.psm1
The file itself is ordered into four function areas:
- Handling the configuration
- Everything related to execution of th REST requests. This includes authentication, executing Get, Post and Patch requests.
- The main function
Import-WEBCONPackage - An internal helper function to start the import session and upload the file.
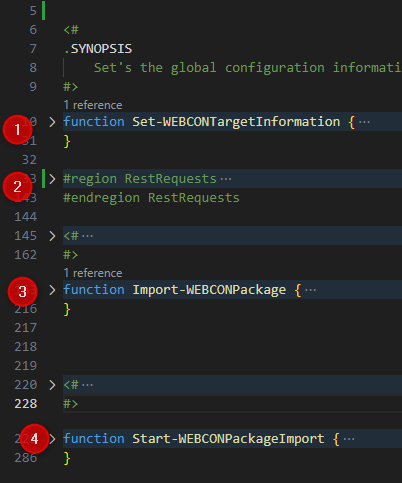
Import-WEBCONPackage
This is intended to be used from the external script. It will start the import and return the results of the logs endpoint when the import is finished. If no configuration file is provided the default configuration is used. The status of the import is polled every second, if this exceeds 60 seconds, the script aborts and no longer polls the status.
- The configuration file can be defined by setting the
importConfigurationFilePathparameter. - The timeout can be set by setting
maxWaitTimeout.
function Import-WEBCONPackage {
    [CmdletBinding()]
    param (
        [Parameter(Mandatory = $true)]
        [int]
        $dbId,
        [Parameter(Mandatory = $true)]
        [ValidateScript({ Test-Path($_) })]
        [string]$importFilePath
        ,
        [Parameter(Mandatory = $false)]
        [string]$importConfigurationFilePath = ".\Artifcats\defaultConfiguration.json"
        ,
        [Parameter(Mandatory = $false)]
        [int]$maxWaitTimeout = 60
    )
Start-WEBCONPackageImport
This is used from the main function and shouldn’t be used from another function. At least not if everything is working. ;)
This function starts the import sessions and uploads the file. If the file size exceeds 300 kb, the upload is split into multiple requests. You can change this value by setting the variable maxChunkSize. I was too lazy to add parameters to each function so that it could be set by the calling function.
Custom configuration file
Creating a custom configuration file
While the knowledge base article provides information on how to define a custom configuration file. I wasn’t sure whether I understood it correctly. So, I tried to create one using PowerShell and the classes created from the swagger.json.
The result of my experiment is the CreateImportParameters.ps1 with a few tests how to configure different properties. The final object is then converted to JSON an saved as ImportParameters.json
I wanted to create a dummy file with all parameters, but that didn’t work out as expected.
I got an System.ArgumentException An item with the same key has already been added.. Maybe because I used [System.Guid]::Empty a lot of times, but it seemed that [System.Guid]::NewGuid() didn’t work either. I’m not sure about it, I didn’t test this thoroughly.
I didn’t use a completely configured file, as you can see with all the commented lines in the script. Based on the swagger.json and the generated classes, the JSON output should work. That’s the benefit of working with classes instead of creating the file in a text editor. ;)
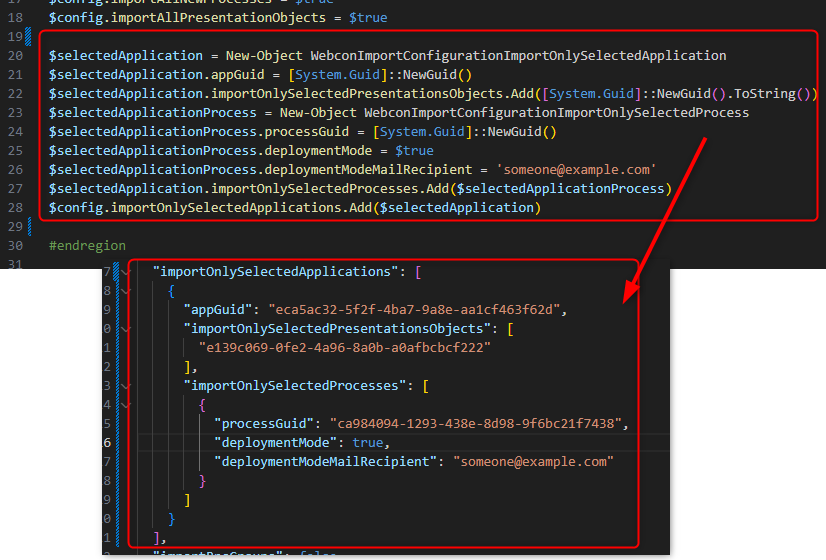
Remark: Before you execute the script, make sure the current location is the PowerShell folder, by executing the lines below from the script. Afterwards you can execute the script whole script including the using module .\MergedClasses.psm1 line. This is necessary so that the classes can be used.
$currentDirectory = Get-Item -Path .
if ($currentDirectory.Name -ne "PowerShell") {
    Set-Location .\"PowerShell"
}
*Selected* takes precedence over *All*
Somewhere in the middle of the knowledge base article there are a few sentences about precedence. This is something you should be aware of.
The value should be set to true/false accordingly. However, it is important to note that the indication of specific elements (“Selected” / “OnlySelected”) takes precedence over all elements to be imported (“All”). For instance, if the “ImportAllPresentationObjects” parameter is set to “true,” it will be ignored if the “ImportOnlySelectedPresentationObjects” parameter is entered in the same configuration file with the corresponding GUID of the presentation object.
In short, if you configure something like
  "overwriteAllGlobalBusinessRules": true,
  "overwriteSelectedGlobalBusinessRules": [
    "0cbe377b-46de-472a-b1a0-9a906b6f52f9"
  ],
 "importBpsGroups": true,
  "importOnlySelectedBpsGroups": [
    "nonexistinggroup@bps.local"
  ],
The system will treat it as
  "overwriteAllGlobalBusinessRules": false,
  "overwriteSelectedGlobalBusinessRules": [
    "0cbe377b-46de-472a-b1a0-9a906b6f52f9"
  ],
 "importBpsGroups": false,
  "importOnlySelectedBpsGroups": [
    "nonexistinggroup@bps.local"
  ],
If you define any Selected the corresponding All property will be ignored. The keyword All is not always used as the example with the BPS Groups shows.
Setting selected values to empty
If you want to define the configuration, that the selected property should be used you have to define it like in the examples above. If you want that the property is ignored, you need to set it to $null. Passing an empty string will cause issues. The same applies to empty arrays.
If you want to make use of the CreateImportParameters.ps1 script be aware of the following:
- Setting a string to $null
# Assigning null will not set the value to null but to an empty string, which then causes issue down the line. #$config.overwriteAllProcessesDeploymentModeMailRecipient = $null # If we need to set a string to null, we need to use this: $config.overwriteAllProcessesDeploymentModeMailRecipient = [NullString]::Value - The arrays are initialized by default therefore they need to be set null explicitly
 $config.overwriteSelectedGlobalBusinessRules.Add("0cbe377b-46de-472a-b1a0-9a906b6f52f9")
 #$config.overwriteSelectedGlobalBusinessRules = $null
Remark: I’m not 100% sure about the empty arrays because the default script generated by export dialog also uses empty arrays sometimes. For the time being I will just set all to null and not only a few.
Remarks
PowerShell 7
I used VS Code with PowerShell 7 to develop the scripts. This version is typically not installed by default.
Status values
The status values are defined as a simple integer in version 2024.1.1.48. I would have expected that it’s an enum but it may have been forgotten in this version. In PowerShell I’m using this enum to map the integer value to a more human friendly value. In case you are not aware of how enums work: Error is mapped to 0, Completed to 1 etc.
enum ImportStatus
{
    Error
    Completed
    CompletedWithError
    NotExist
    Created
    InProgress
}
Location of the import session id
If you have lost your import session id, then you can take a look at the HistoryImports table of the content database into which the package should be imported.

HistoryImports table stores the import session id.
Logs
I’m not sure when we are able to download logs. Maybe only if the status is Completed or CompletedWithError, but not if it’s Error.
If you are able to get the logs you are in for a little surprise. In the version 2024.1.1.48 there’s a little mistake and the response is a string where the XML log of the import is assigned to a JSON property without wrapping the value in double quotes. Basically, this is neither a JSON nor a XML value. It may be easier to remove the JSON part so that the XML can be parsed itself.

Status ‘Error’
If the PowerShell exits with status Error something went wrong, and the import could not even be completed with errors. You may be able to find more information in the AdminServiceLogs of the configuration database.
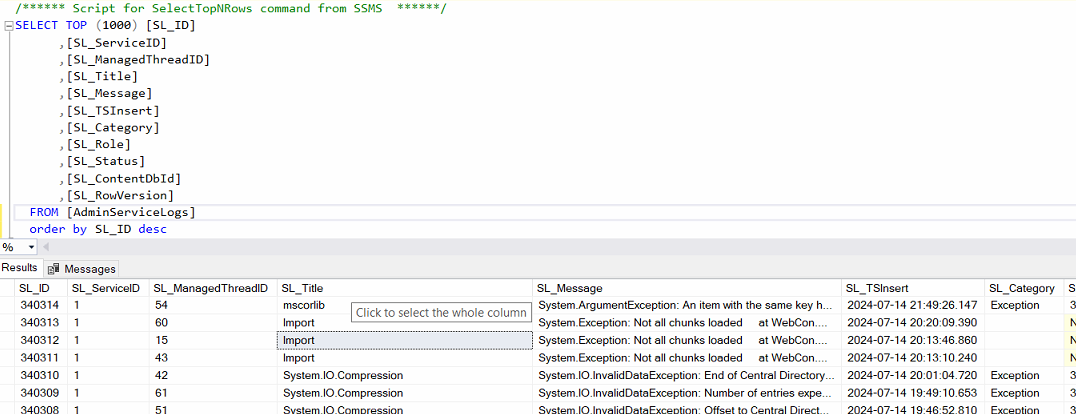
Error.
GitHub Repository
You can find the PowerShell scripts here.
Comments