Searching 317,000 files with PowerShell in 9 seconds
Overview
I don’t know if any other profession has this problem, but as a developer I encounter the following scenario quite often: I need to find a file which contains a certain word. Even so I know the word, I have no idea in where I used it. If I can narrow the folders down, I would search for it with Notepad++ or similar programs. But if I have no idea, it really becomes a problem. Because of the automatically downloaded packages/folders, my workspace folder has grown to 101,509 folders with 797,422 files. Tough luck searching these files. I was finally fed up with being unable to search it and put together a PowerShell script, for this use case.
Remark: The video above searches only one folder of my workspace. There are a few more and the total of all files is the above number.
Usage
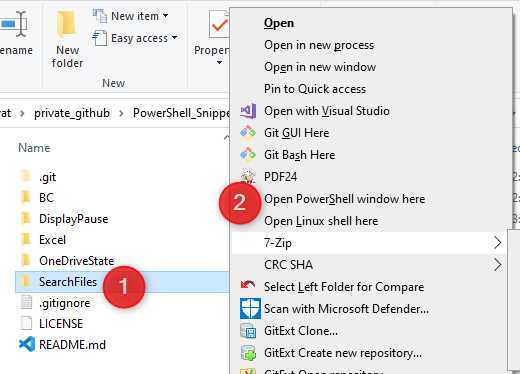
Easiest why I know of in Windows 10 is to open the folder where the script files have been stored using the Explorer and shift+right click the folder to bring up the extended context menu (1) and select ‘Open PowerShell window here’.
Afterwards you could call the script with the default settings using the below line:
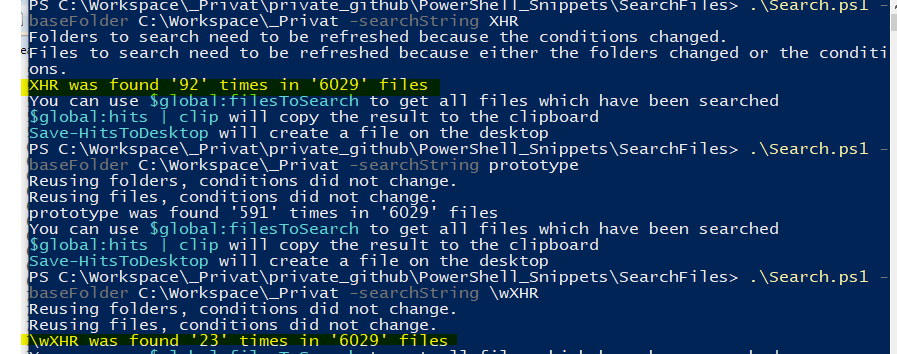
.\Search.ps1 -baseFolder C:\Workspace\_Privat -searchString prototype
The script will:
- Make a list of the directories to search, excluding the defined ones and all their subfolders.
- Prepare a list of files which should be searched.
- Display a file with the results, which is placed on the desktop. See the other chapters for more information.
If you didn’t find what you looked for, and you want to try a different word, you can execute another query. This will skip step 1 and 2.
Explanations
Why two files
I have added the search.ps1 in addition to the search.psm1 file so that one can easily define some default settings for different use cases. For example, there could be a searchbackend.ps1 and searchfrontend.ps1.
Used search mechanism
The actual search is done using Select-string and the searchstring value is the only parameter which is passed to it. So, you can either pass a simple string or a regex. The later one will obviously increase the execution time.
Output Messages
Explanations of the numbers in the below screenshot:
- See chapter
Searched folders - See chapter
Searched files - See chapter
Accessing the result

Searched folders
The script searches all folders which are in subfolders of the parameter basefolder. If a folder name matches the blacklist ExcludedFolders it’s skipped as well as all child folders. The result is stored in $global:foldersToSearch.
If the script is executed multiple times, these folders are reused as long as you don’t change the values for the parameters BaseFolder and ExcludedFolders.
Searched files
Once the foldersToSearch are defined, the $global:filesToSearch are prepared. For this you can defined, file types to exclude, include and a maximum file size. Depending on your profession there will a difference in file sizes which you work with and those which are downloaded/generated, even so they share the same file type.
As with the folders, if the folders don’t need to be updated and the parameters ExcludedFolders, IncludedFileTypes and MaxFileSizeInKb don’t change, the files will be reused on subsequent calls.
Accessing the results
By default the results will be saved to a file on the Desktop. Alternatively, you can change the Target parameter to Clipboard. The later one will obviously copy the result to the clipboard.
If you used the Clipboard option you can still use Save-HitsToDesktop to create a file afterwards, or you access the results using $global:hits
Download
The script files can be found here.
Comments