Graphical cues
Overview
“I’ve made a mistake, because I didn’t notice ..”, replying to these kind of comments with “It’s written here”, doesn’t help anyone. So, instead of arguing you should find a way to make it easier for the user to distinguish error prone issues.
This post will provide a few ideas, of what you could do. Some are more common then others, but those may inspire you and you can come up with your own ideas. Covered topics:
- Colorized business entities.
- Colorized database names.
- Custom icon for commonly used steps inside the form.
While doing implementing the ideas I also found a solution for a ‘global’ HTML field, or at least a workaround for it. ;)
Info: You will see different options on how I used the ‘global’ HTML field. I’ve yet to get a feeling when to use which implementation.
Remark: As all ideas use the same approach I will provide less and less information on how to implement them.
Colorized business entities
View
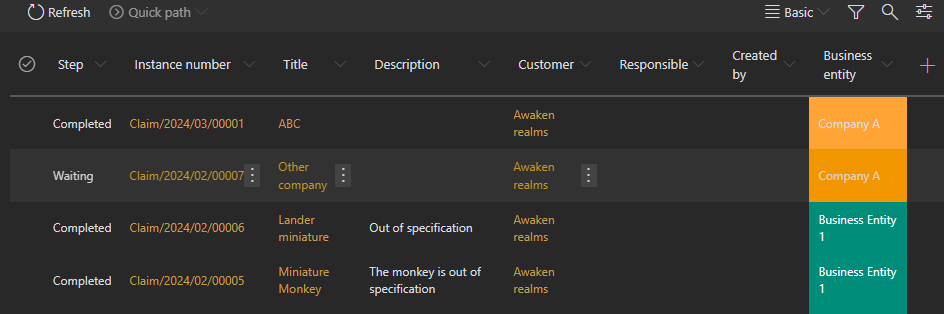
This one uses the default row color options on the view. There’s a little pen in the view. When you click on it you can define some conditions and colors for the cell.
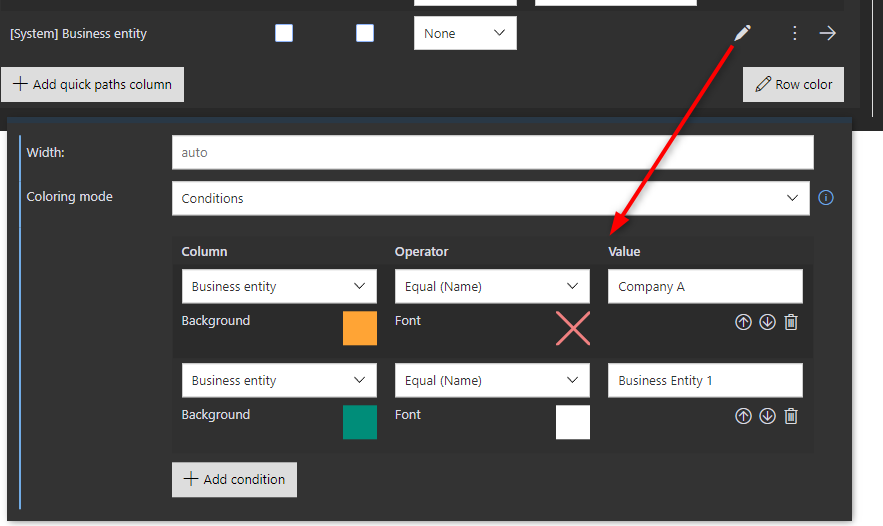
The big drawback is, that you need to apply it to each view manually.
But if you do it, you can simply move the column to the other side of the view. Once the users learn the colors of the business entities, the users will still be able to identify the row. This frees up space on the left for more important information.
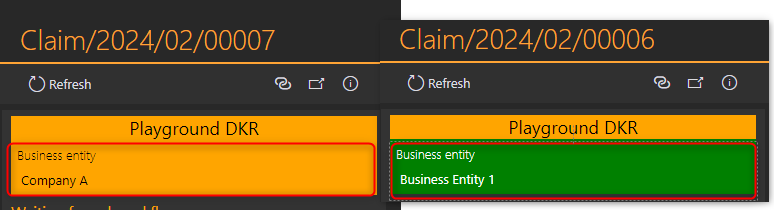
Form level
This one works by adding a CSS class to the business entity HTML element. The CC class is added by executing JavaScript which is part of an HTML element. In addition, the CSS class is defined in the global appearance.
Global elements
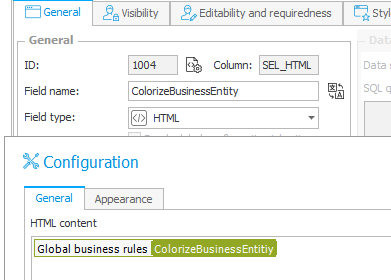
This is the hinted workaround for creating ‘global HTML’ fields.
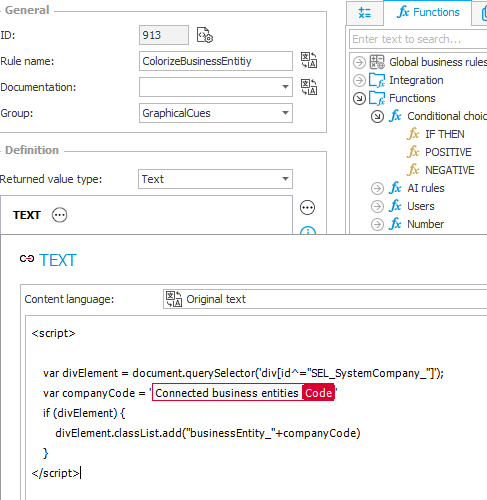
One interesting function which we can use in the context of a business rule is the Text function.
It’s intended to be used with translatable text. Depending on the language of the user, the defined text or the fallback (Original Text), is returned.
We can utilize this to define the content of an HTML field. Since we don’t need a translation we simply ignore the intended functionality.
The JavaScript simply adds a CSS class to the business entity HTML element. The CSS class uses the business entity company code as a suffix. In case you have three business entities with the codes HQ, CompanyA and CompanyB one of these classes would be added:
- businessEntity_HQ
- businessEntity_CompanyA
- businessEntity_CompanyB
The JavaScript added to the business rule:
<script>

    var divElement = document.querySelector('div[id^="SEL_SystemCompany_"]');
    var companyCode = '{COM_CODE}'
    if (divElement) {
        divElement.classList.add("businessEntity_"+companyCode)
    }
</script>
The next step would be to add the CSS classes to the global CSS. This example uses nested CSS classes to define different stylings for a dark and light theme (1). Inside the theme node, each business entity class is defined using the syntax from the JavaScript.

   .theme-860305cd-602f-42c4-9999-e1825639c59c {
        & .businessEntity_CompanyA .ms-formlabel, .businessEntity_CompanyA .ms-formbody  {
            background: orange !important;
        }

        & .businessEntity_CompanyB .ms-formlabel, .businessEntity_CompanyB .ms-formbody {
            background: yellow !important;
        }
        & .businessEntity_BE1 .ms-formlabel, .businessEntity_BE1 .ms-formbody  {
            background: green !important;
            color:white;
        }
    }
   .theme-a24dcfc2-2b14-4de8-8af3-7952a0a2cf61 {
        & .businessEntity_CompanyA .ms-formlabel, .businessEntity_CompanyA .ms-formbody  {
            background: orange !important;
            color:black;
        }

        & .businessEntity_CompanyB .ms-formlabel, .businessEntity_CompanyB .ms-formbody {
            background: yellow !important;
            color:black;
        }
        & .businessEntity_BE1 .ms-formlabel, .businessEntity_BE1 .ms-formbody  {
            background: green !important;
            color:white;
        }
    }
Ok, we could also place the CSS classes inside the business rule. Would we do it, the CSS would be transferred to the client each time any form is displayed and not once, when the page is loaded for the fist time.
Info: The .theme-GUID may be different on your environment. You can verify it by taking a look at the class of the body element.

Info: I’m not a CSS expert, if anyone comes up with a more modern looking way, feel free to share it and I will update the post.
Process level
Having done the ground work, we can now do a mundane task:
- Add an HTML field
The HTML field uses the business rule. The ‘Show form field’ is ticked off.
-
Place the HTML field after the business entity
This is necessary. If the order is reversed, it won’t work, as the JavaScript won’t find the HTML element
- Field matrix
The last one is obvious, even so I forget it more often than I would like to admit. ;) You have to make the new field visible in each step, in which the business entity is displayed.
Info: The order of the fields is only important for this idea. For the other ideas it doesn’t matter, where you want to display the HTML field.
Colorized database names
Ok, this may not be a typical problem, but I’ve access to multiple environments in which there are multiple database which use the same process.
The only hint you have is the URL. Even if you take a look at it, you have to remember which id represents which database.
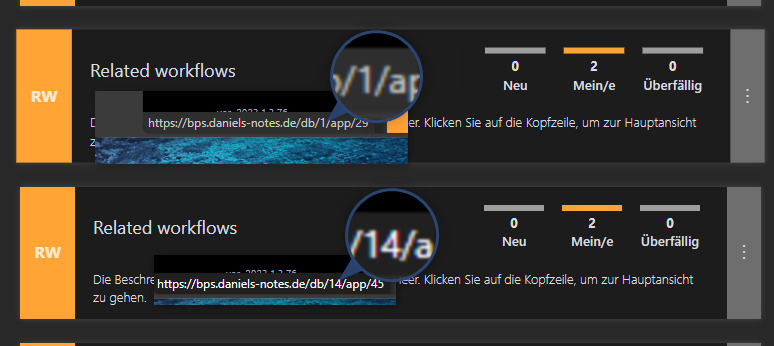
Especially in the global task list it can get confusing, as one won’t necessarily take a look at the URL. So, it may be easier to add the database name to the form and use some colors. The colors, or the absence of them will provide sufficient information to prevent accidentally working in the wrong database.
The implementation uses the same approach as the colorized business entity.
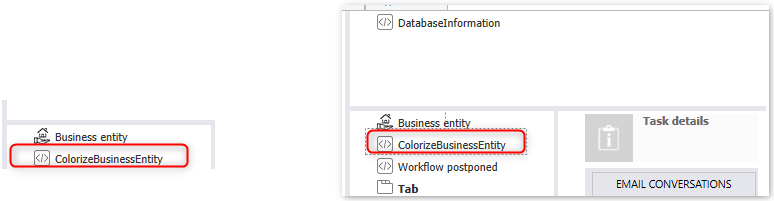
- Global business rule
This time we are using a SQL command, to return the HTML based on the current database. It’s basically a div, with- a database_x class. The x could stand for your database name.
- a fixed database_label class
- the label itself
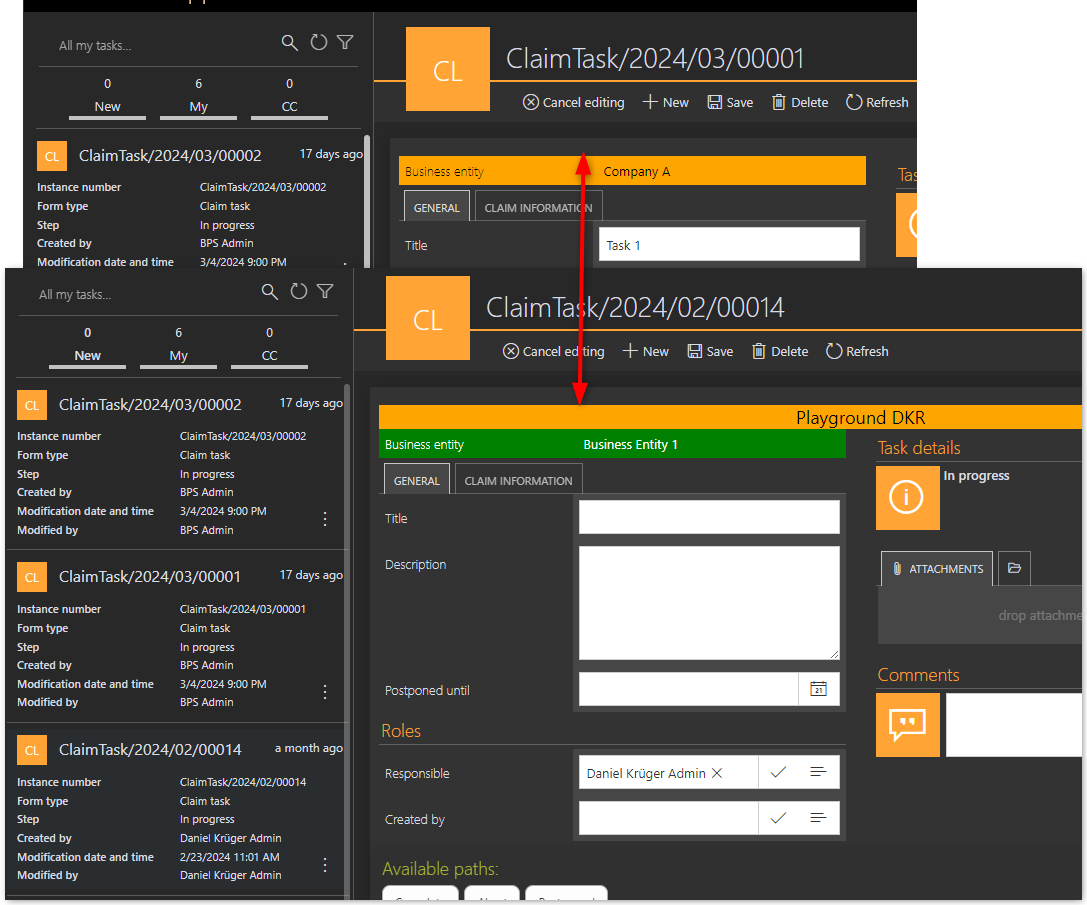
select
case DB_NAME()
when 'DEV01_BPS_Content_DKR' then '<div class="database_DEV01_BPS_Content_DKR database_label">Playground DKR</div>'
when 'BPS_Content_2' then '<div class="database_BPS_Content_2 database_label">Playground DKR</div>'
else ''
end;
Ok, I could use a
Textfunction and define a different HTML for the business rule in each database. But I prefer to have a robust single source of truth. Especially if it may accidentally get overwritten during a transport.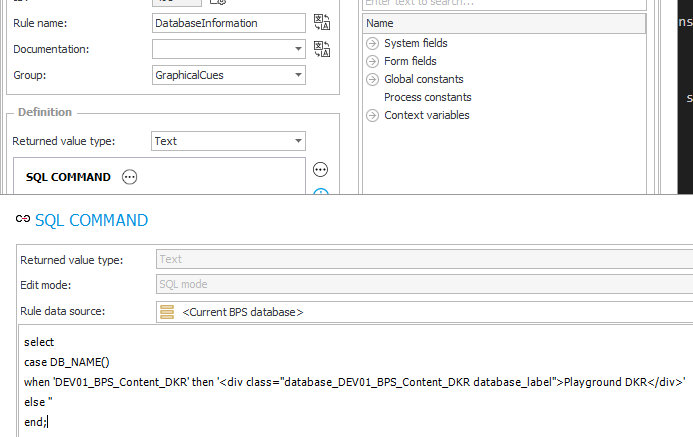
- Global CSS
The provided CSS makes use of the nested CSS rules again to potentially provide different stylings. The most important aspect here is, that there’s a CSS class matching the specific database class..theme-860305cd-602f-42c4-9999-e1825639c59c { & .database_DEV01_BPS_Content_DKR { background: orange; } & .database_BPS_Content_2 { background: yellow; } & .database_label { text-align: center; font-size: large; } } .theme-a24dcfc2-2b14-4de8-8af3-7952a0a2cf61 { & .database_DEV01_BPS_Content_DKR { background: orange; } & .database_BPS_Content_2 { background: yellow; } & .database_label { text-align: center; font-size: large; color: black; } }
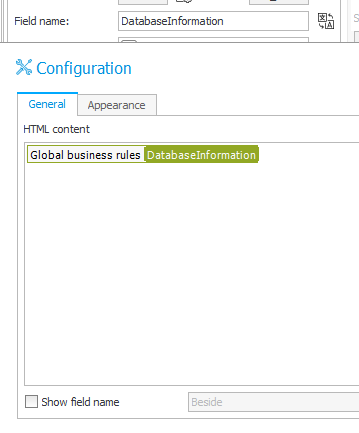
- HTML field
This one is even easier than the first one. Reference the business rule, place it anywhere on the form and make it visible.
Why is there no assigned person?
Sometimes users look at a workflow instance and have no idea what’s going on. Why is no one assigned although it’s not finished? Of course, they could take a look at the step name, the step description or the diagram, but most of the time they will just ask. If you want to free yourself form such support questions it could be good to provide a more visible cue.
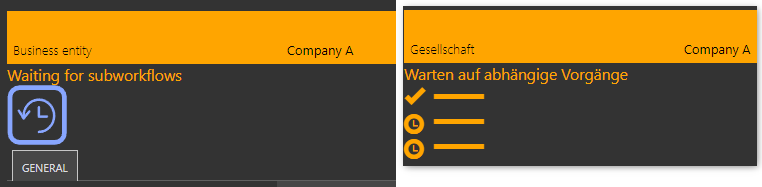
Waiting for subworkflows
In case a parent workflow is waiting for subworkflows you could add an icon and a text, which will inform the user about the current situation.
The Waiting for subworkflow step already has a default icon which can also be displayed on the report. I wanted to use this one, but it was to small when I played around with it. Afterwards I tested the designer desk icon, which is a little bit better, but I didn’t like it. Therefore, I’m providing two options you can choose from. They use a similar approach anyway.
Default step icon
You already know the basic of what will be done:
- Global Business Rule
- Global CSS
- HTML field
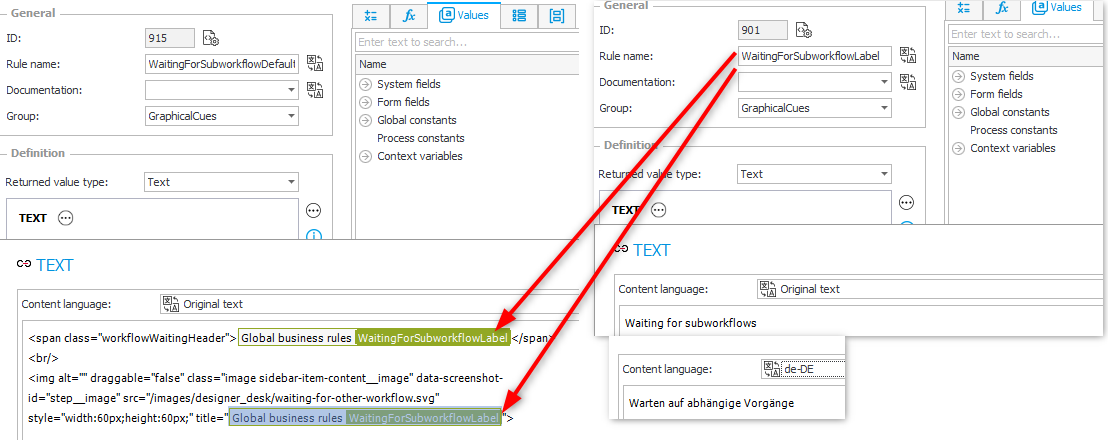
Ok, this time it’s slightly different, because I’ve chosen to use two business rules. One, which defines the HTML, and the other one is used for the multilingual label.
The label is returned by a business rule, which simply uses the Text function, as it is intended.
This is the content of the HTML business rule, which references the label business rule.
<span class="workflowWaitingHeader">{BRD:901}</span>
<br/>
<img alt="" draggable="false" class="image sidebar-item-content__image" data-screenshot-id="step__image" src="/images/designer_desk/waiting-for-other-workflow.svg" style="width:60px;height:60px;" title="{BRD:901}">
Instead of using two rules you could also add the label directly to the HTML and duplicate the HTML for each language. I don’t like to have duplicates if there’s a way around them, but it’s only a personal preference.
This is the class I used for the label. Of course, you could use add nest it to the theme class, so that you could define a different styling for your themes.
.workflowWaitingHeader {
    font-size: larger;
    color: orange
}
All that’s left is to create the HTML field and reference the HTML business rule.
Info: In theory you could also use the icon from the report using this url: /api/images/db/14/stepIconLarge/215. Unfortunately, all integers will be different for each database. While we have the database id as a variable I didn’t bother to look at the database where the 215 comes from.
Custom icon
I for my part, don’t like how the blue designer desk icon looks in the dark theme with orange links. Therefore, I’ve chosen to combine a few icons to come up with an own icon.
The only difference is the content of the HTML business rule and a few more CSS classes.
Content of the HTML business rule, which references the label business rule.
<span class="workflowWaitingHeader">{BRD:901}</span>
<div class="workflowWaiting">
    <i class="workflowWaitingIcon icon ms-Icon ms-Icon--TaskList ms-Icon--standard" aria-hidden="true"  title="{BRD:901}"></i>
    <i class="workflowWaitingClockIcon icon ms-Icon ms-Icon--Clock ms-Icon--standard" aria-hidden="true" title=""></i>
    <i class="workflowWaitingClockIcon icon ms-Icon ms-Icon--Clock ms-Icon--standard" aria-hidden="true"  title=""></i>
</div>
Global CSS classes
.workflowWaitingHeader {
            font-size: larger;
            color: orange
        }

.workflowWaiting {
    position: relative;
    color: orange;

    & .icon.ms-Icon--standard.workflowWaitingIcon {
        font-size: 80px;
        vertical-align: middle;
    }

    & .icon.ms-Icon--standard.workflowWaitingClockIcon {
        font-size: 20px;
        position: absolute;
        left: 0px;
        top: 30px;

        &:nth-child(2) {
            top: 55px;
        }
    }
}
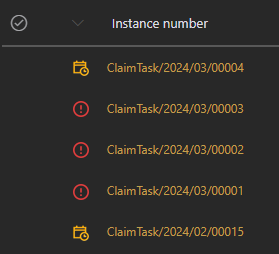
Scheduled / postponed workflow instance
I don’t know about you, but in a lot of workflows we have a step, which is used for scheduling/postponing a workflow instance. There are different reasons why you currently can’t work on an active workflow instance. For example, you are waiting for someone or you wanted to plan tasks today, but have to wait four weeks before you can execute them.
In these cases, we are using a date field like Postponed until and a path which leads to a System step. The step will send the workflow back to the previous step once the date is reached. This way you can clean up your task list a bit as the system step doesn’t require an assignee.
If you postpone the execution, it may be nice to provide an obvious information to anyone who’s looking at the workflow.

Implementation
The only difference this time is, that we are using a parameter in the business rule.
- Global business rule with a parameter.
Because of some limitations, I was not able to use two business rules. Instead, I had to provide the HTML for each language so that I could translate the labels.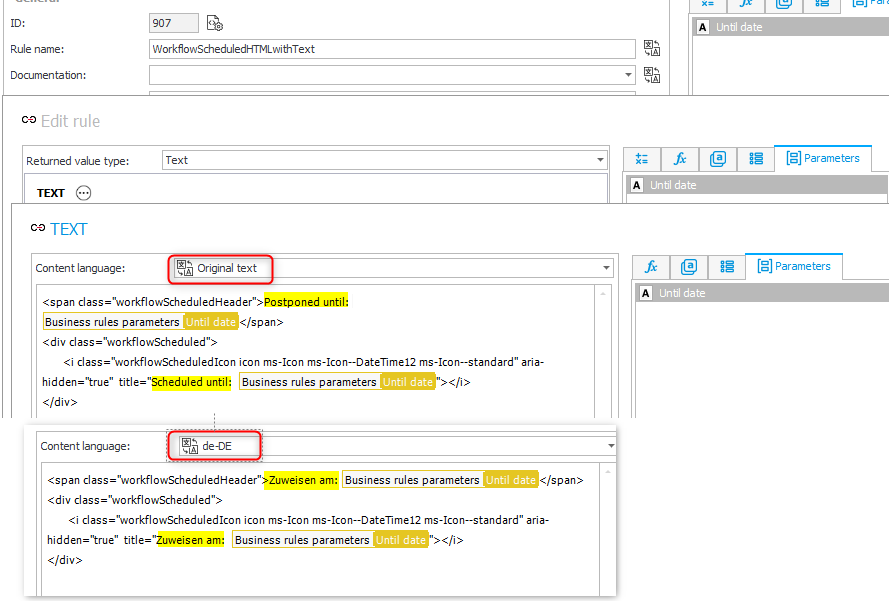
- Global CSS
.workflowScheduledHeader { font-size: larger; color: orange } .workflowScheduled { position: relative; color: orange; & .icon.ms-Icon--standard.workflowScheduledIcon { font-size: 80px; vertical-align: middle; } } - HTML field
You can simply reference the business rule and pass a value. I used thedate according browser settingsto pass a localized date value. If you get an ISO formatted date you can simply add a space after the field value. Read this for more information.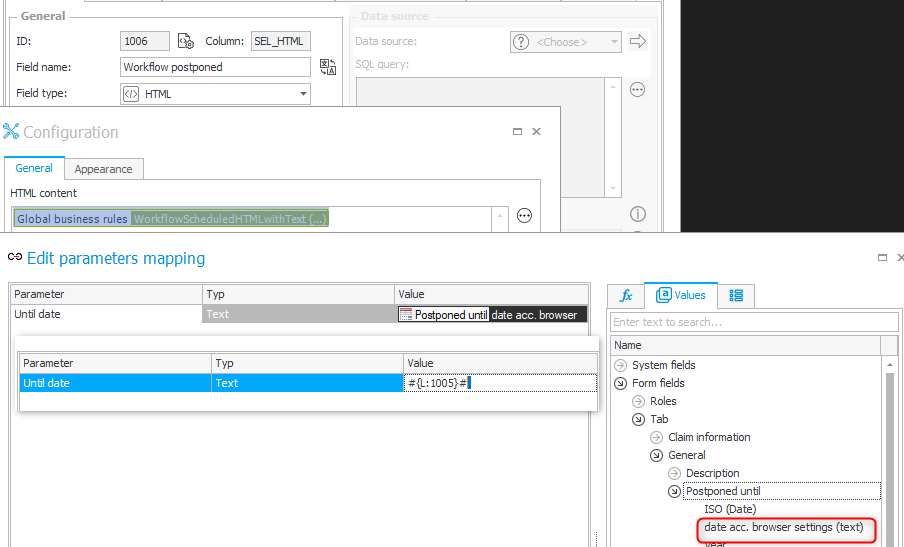
Using a custom icon for a step
In case you are using a custom icon for a specific type of step across all processes, you may want to use the icon for the step, so that it is displayed on the report, too.
There may be more sophisticated toolsm but I use the following way:
- Make a screenshot from the icon in the browser
- Paste it to Paint
- Apply the
Remove the backgroundoption and erase the remaining background manually. I’m zooming in for this. You don’t need to be to detailed as it will be displayed as a small icon anyway.
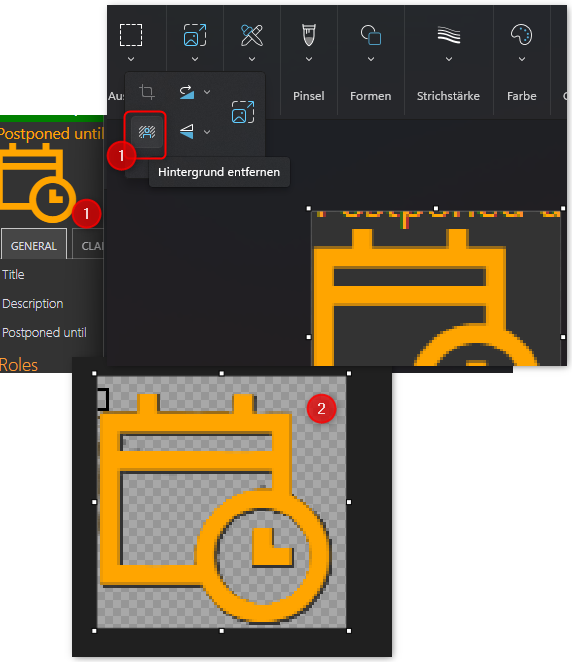
- Save it as .png.
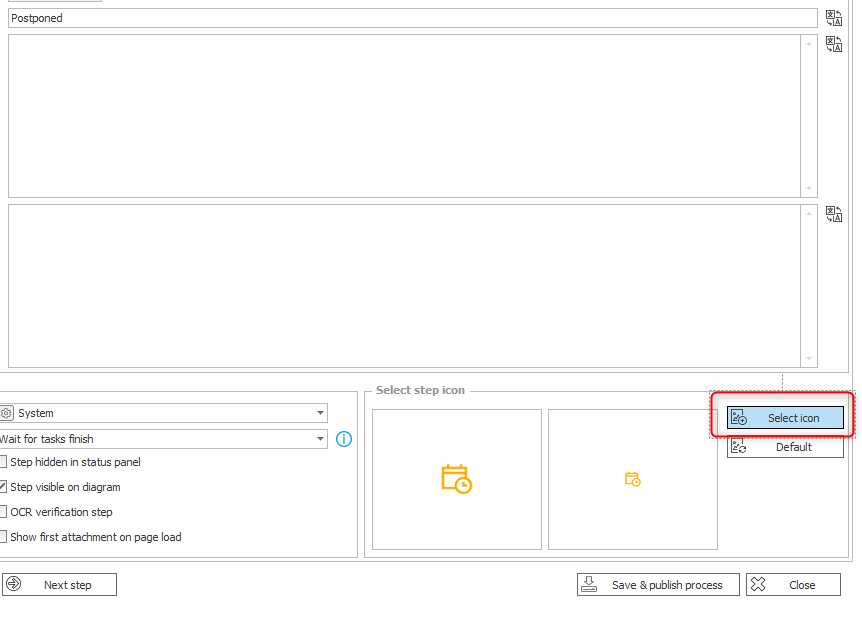
- Add it to the step using the
Select iconbutton.
You can download the icon I used from here.
Info: I have no idea why Paint is in German. Windows, Office, pretty much everything else uses the English UI.
Issues with business rules in 2023.1.3.76
While I implemented this I encountered two issues in 2023.1.3.76, which should be solved in a future BPS version.
Originally, I wanted to use two business rules again. One for the HTML and one for the label. As the label should contain an information from the workflow instance, I wanted to use a parameter.
- The HTML field would call the HTML business rule with a parameter
- The HTML business rule would pass the parameter to the label rule.
The issues I encountered area:
- It was not possible to pass the parameter to the nested business rule.
- It was not possible to pass the date in a format depending on the language, even so I was using a parameter of type Text. WEBCON BPS cast the text to a date and returned the date in the ISO format.
The positive side is, that I learned something new in the context of the support ticket.
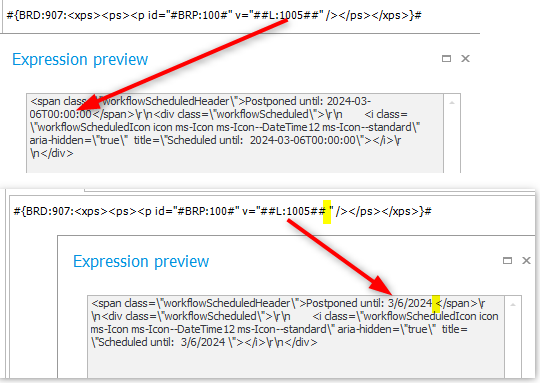
If you enclose the value of the parameter with single quotes, then there won’t be a conversion and the value will be passed as it is. At least if the value itself is not parameter. In this case, it doesn’t work with 2023.1.3.76. But if you add a space after the parameter and before the closing single quote it works:
- ‘03/03/2024’ will be returned as 03/03/2024
- ‘{BRP:202}’, will be returned as ‘2024-03-03T00:00:00
- ‘{BRP:202} ‘, will be returned as 03/03/2024
All of these will be solved in future versions.
Comments